When many beginners first start to learn to play guitar, the first thing they want to do is learn their favorite song. The good news for beginners is that you can learn a wide range of pop, rock, and country songs using only a few basic guitar chords.
Whether you can already play some chords or are completely new to guitar, the chords in this article are what you need to learn to begin and advance in your playing. If you just picked up a guitar for the first time, the first thing you want to do is learn a few easy guitar chords. Below we’ve provided a list of the basic guitar chords and shapes along with helpful tips, charts, and videos to help you master them.
Table of Contents
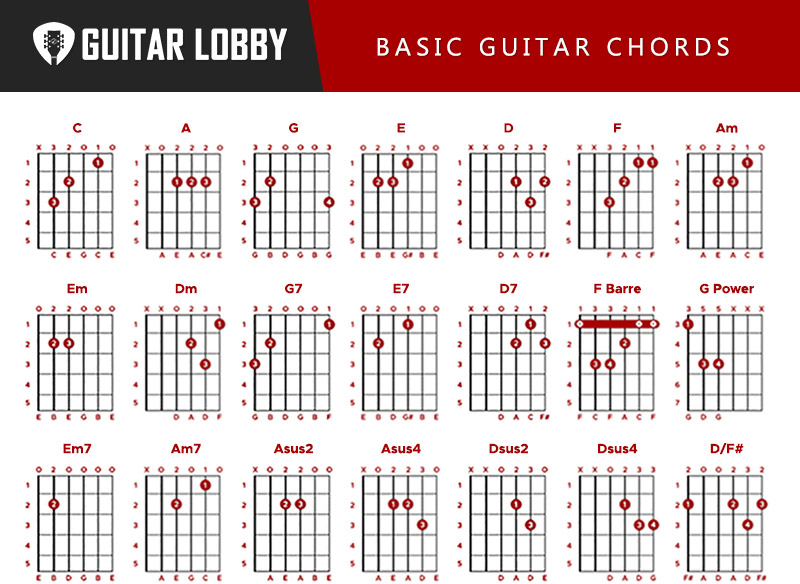
Open Guitar Chords
We’re going to start this article by discussing open chords, which are sometimes referred to as “cowboy chords”. Open chords are called “open” chords because they use open strings. An open string is a string you play without fingering any of the frets on that string. The fingering of open chords and their versatility makes them the ideal set of chords to learn first. In this section of this article, we will be looking at both Major and Minor open chords.
What’s the Difference Between a Major and Minor Chord?
Major chords are made up of the 1st, 3rd, and 5th notes of a particular key signature, whereas the minor chord is made of the 1st, flattened 3rd, and 5th of the key signature. There are always 7 notes (or intervals) in a particular key signature.
An “A Major” chord, for example, the 1st is an A note, the 3rd is a C# note, and the 5th is an E note. So the notes that make up an “A Major” chord are A, C#, and E. The notes that make an “A Minor” chord, on the other hand, are A, C, and E. We can start with “A Major” and then flatten the 3rd, which is C#, by moving it down 1 fret which makes it a C, making an “A Minor” chord.
1. E Minor
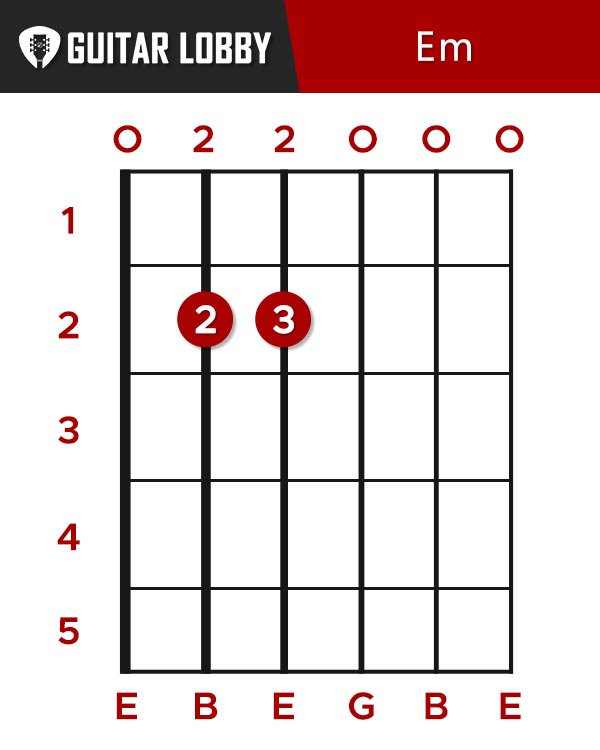
The first chord we will look at is the E minor Chord, which uses the following fingering:
- Place your second finger (middle) on the 2nd fret of the A string
- Place your third finger (ring) on the 2nd fret of the D string
- Leave the other strings open and strum all 6 strings
2. E Major
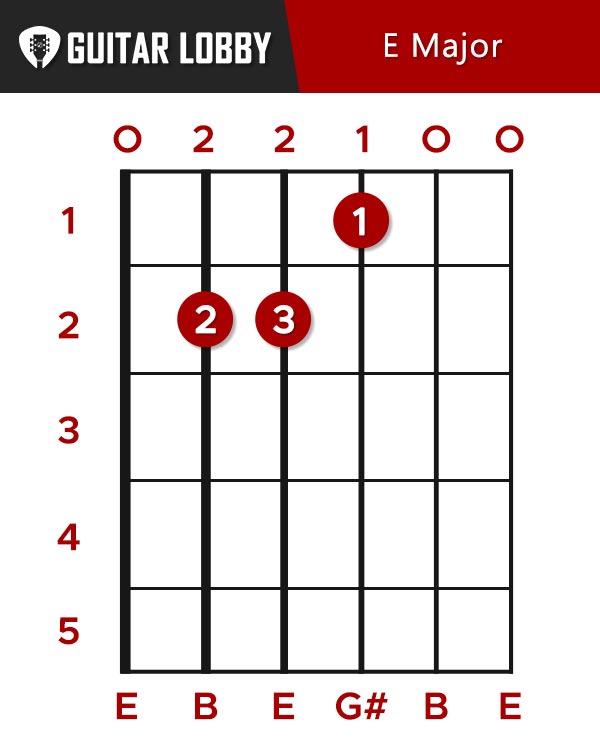
The Em chord is probably the easiest chord to finger for beginners and so is the E Major chord, which uses the this fingering:
- Place your second finger (Middle) on the 2nd fret of the A string
- Place your thrid finger (Ring) on the 2nd fret of the D string
- Place your first finger (Index) on the 1st fret of the G string
- Strum all 6 strings
3. A Minor
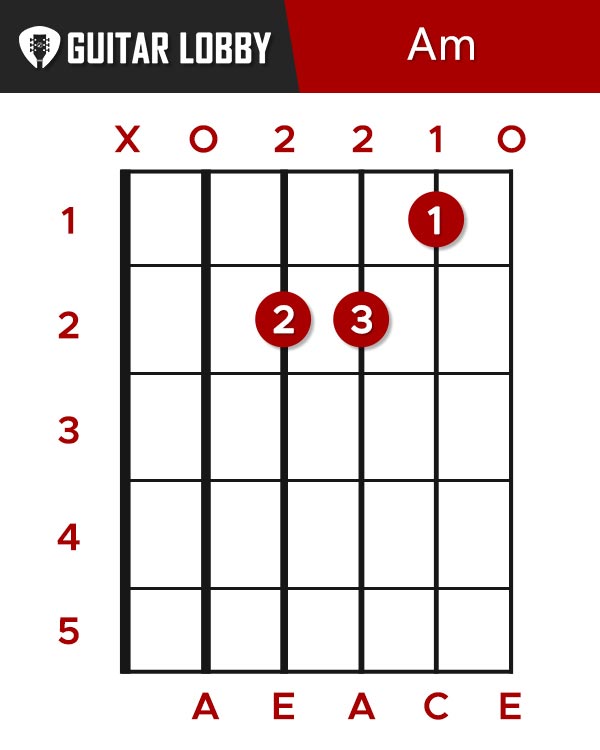
To play and A minor chord:
- Place your second finger (Middle) on the 2nd fret of the D string.
- Place your third finger (Ring) on the 2nd fret of the G string.
- Place your first finger (Index) on the 1st fret of the B string.
- The low E string stays muted and strum the strings from the A string and below.
4. A Major
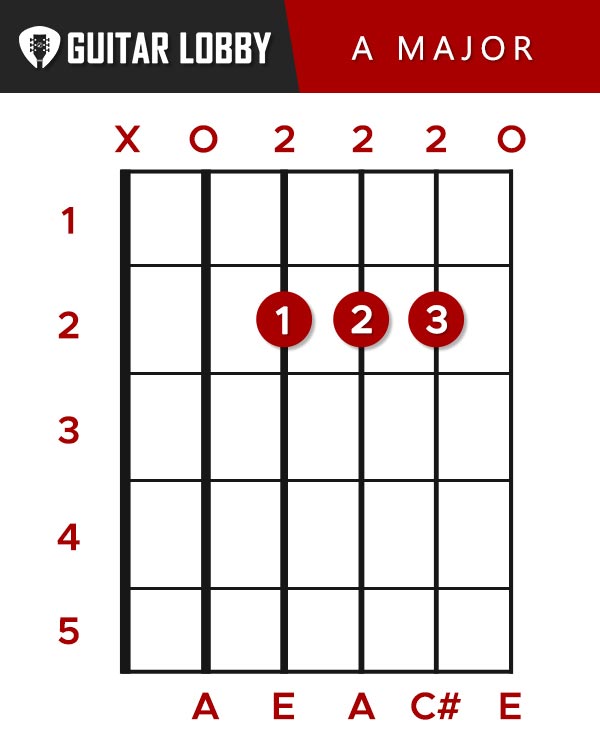
The A major chord uses the following fingering:
- Place your first finger (Index) on the 2nd fret of the D string.
- Place your second finger (Middle) on the 2nd fret of the G string.
- Place your first finger (Ring) on the 2nd fret of the B string.
- Strum from the A string below. The low E string stays muted.
5. C Major
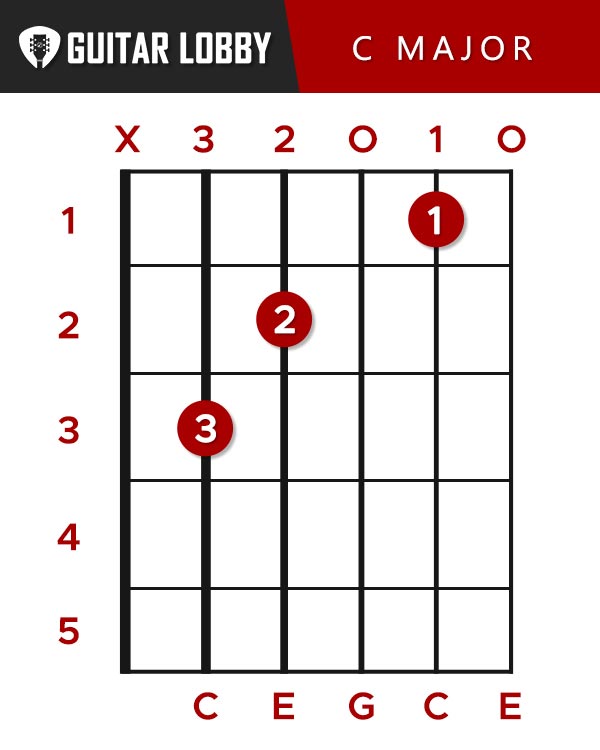
The C major is another easy open chord but with a bigger stretch involved:
- Place your third finger (Ring) on the 3rd fret of the A string.
- Place your second finger (Middle) on the 2nd fret of the D string.
- Place your first finger (Index) on the 1st fret of the B string.
- Strum all strings from the A string and below.
6. G Major
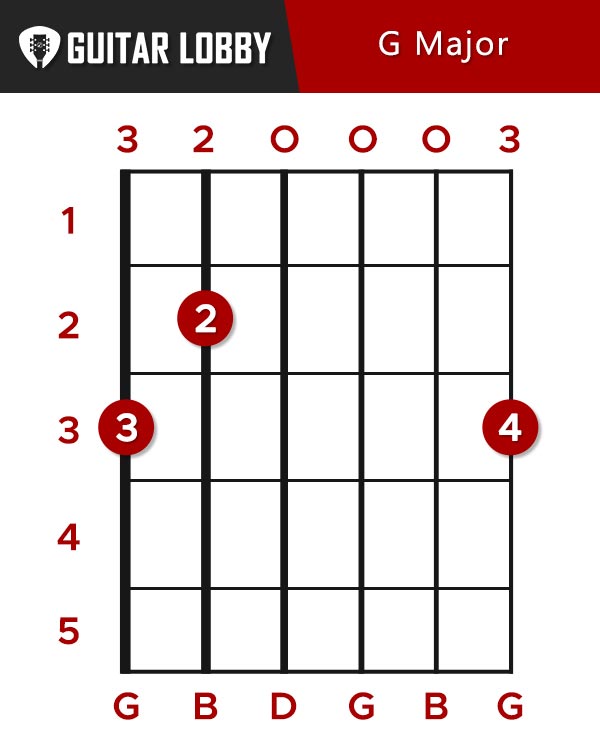
The G Major is another common open chord:
- Place your second finger (Middle) on the 3rd fret of the low E string.
- Place your first finger (Index) on the 2nd fret of the A string.
- Place your third finger (Ring) on the 3rd fret of the B string.
- Use your fourth finger (Pinky) to play the 3rd fret of the high E string.
There are different ways to finger the G major. For example, you can leave the B string open in one variation and also use your middle finger instead of your ring finger to fret the low E.
7. D Major
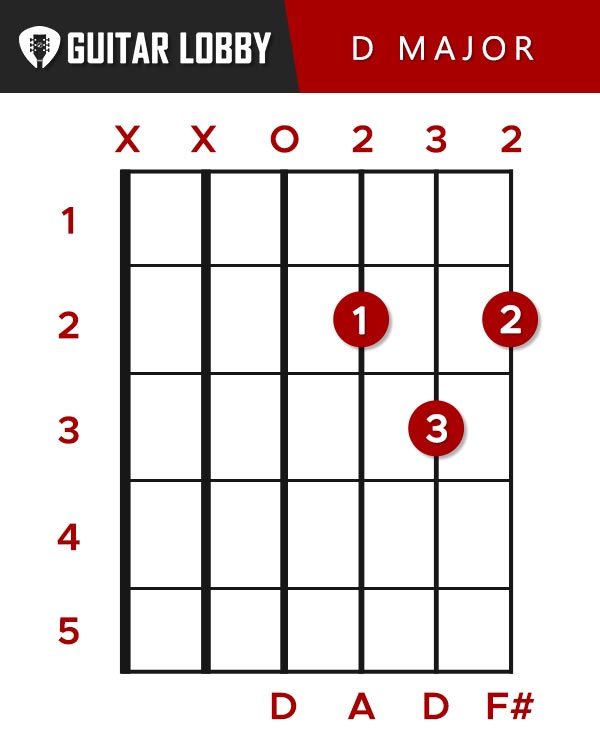
The D Major is a necessary addition to your open chord arsenal:
- Use your third finger (Ring) on the 3rd fret of the B string.
- Place your second finger (Middle) on the 2nd fret of the high E string.
- Place your first finger (Index) on the 2nd fret of the G string.
- Strum from D string below, keeping the low E and A strings muted.
8. D Minor
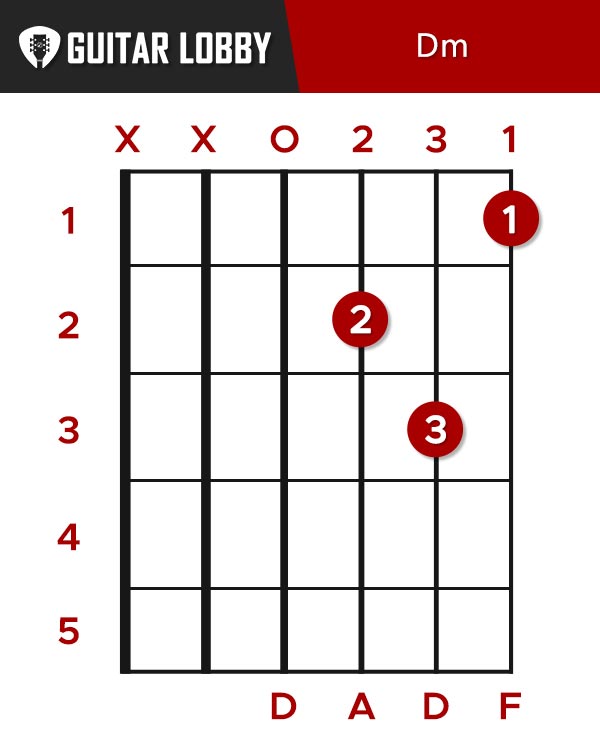
The D minor uses the following fingering:
- Use your third finger (Ring) to fret the 3rd fret of the B string.
- Use your sending finger (Middle) to fret the 2nd fret of the G string.
- Use your first finger (Index) to fret the 1st fret of the high E string.
- Strum from D string below. Don’t play the low E or A strings.
As we discussed above the only difference from the D Major to D Minor is moving the “3rd” note of the key which is the F# on the 2nd to the first fret of the high E string in a D Major. To play a D Minor we move that 2nd fret F# down to the F note on the 1st fret of the high E string.
9. F Major

An F major involves a partial barre on the High E and B strings.
The fingering is the following:
- Us your first finger (Index) to barre the 1st fret of the high E and B strings.
- Use your second finger (Middle) to play the 2nd fret of the G string.
- Use your third finger (Ring) to fret the 3rd fret of the D string.
This is a version of a partial barre chord that is very useful and produces a different sound from the full barre chord. You can play this chord until you have mastered the full barre chords, but keep in mind that both versions work great in different contexts and different songs.
Tips on playing open chords
Some general tips that will help out in learning open chords and switching through them with ease are the following
Try holding your guitar in the classical guitar position. This position consists of holding the guitar in your left lap (right for lefties), sitting on the edge of the chair while keeping the back straight, and lifting the leg where you rest the guitar up using a shoe or a similar sized object.
The classical position is the first lesson new guitar players learn in classical guitar school. It not only puts the body in a natural healthy position but also places the fretting hand in a very advantageous situation, allowing it to make wider stretches and place the fingers right above the frets.
Fret your fingers as close to the frets as you can, without touching them. This is a must for guitar playing in general. Most buzzes come from not placing the fingers close enough to the frets
Don’t apply too much pressure with your fingers. Fretting down too hard can cause the guitar to buzz and the strings to change pitch. Experiment with different strengths to find the proper balance for you.
Barre Chords
The next step in your playing is to learn to barre chords. As tricky as you might think they are, barre chords are actually easy to memorize and by applying the proper techniques you can get them right in no time with a bit of practice.
What Is A Barre Chord?
A barre chord is a type of chord that utilizes your index finger across all of the strings on a particular fret to act as the nut of the guitar. This allows you to move up and down the fretboard to play all the Major and Minor chords using the same few chord finger shapes.
The first barre chords we will learn are the F Major and F Minor barre chords. F chords are very commonly used in a lot of guitar-based music that you will eventually encounter. It’s also a great starting point for barre chords as it starts on the first fret, but also these 2 major variations and 2 minor variations serve as perfect examples of the different fingering shapes and positions you’ll want to know. Once you master these chord shapes, you can move them up and down the fretboard, keeping in mind that whichever not the tip of your index/barre finger is positioned on is the root note for the chord. For example, if you were to move the F Major Barre chord from the 1st fret to the 3rd fret, the 3rd fret of the E string is a G note. Therefore, if you play the chord in the same shape you will have made a G Major Barre chord.
10. F Major Barre
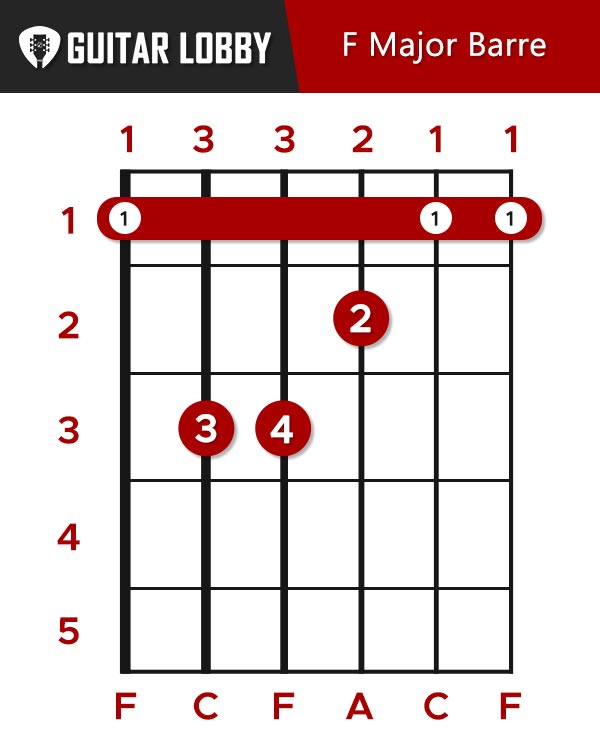
The fingering for the F major barre chord is the following:
- Use your first finger (Index) as a barre across all the strings on the 1st fret.
- Put your third finger (Ring) on the 3rd fret of the A string.
- Put your fourth finger (Pinky) on the 3rd fret of the D string.
- Put your second finger (Middle) on the 2nd fret of the G string.
As tricky as it might seem at first to hold the barre and not have any buzzes, you will eventually build enough strength and muscle memory to avoid those.
11. F Major Barre 2

The second F major barre chord variation we’ll look at is formed around the root on the A string. To play it, you should find the F note on the A string, which is located on the 8th fret, and apply the following fingering:
- Use your first finger (Index) on the 8th fret of the A string and barre down to the 8th fret of the high E string.
- Use your second finger (Middle) on the 10th fret of the D string.
- Use your third finger (Ring) to play the 10th fret of the G string.
- And use your fourth finger (Pinky) to fret the 10th fret of the B string.
If this method is difficult for your hands, you could also try to barre the notes on the 10th fret of the D, G, and B string with your ring finger or pinky.
12. F Minor Barre
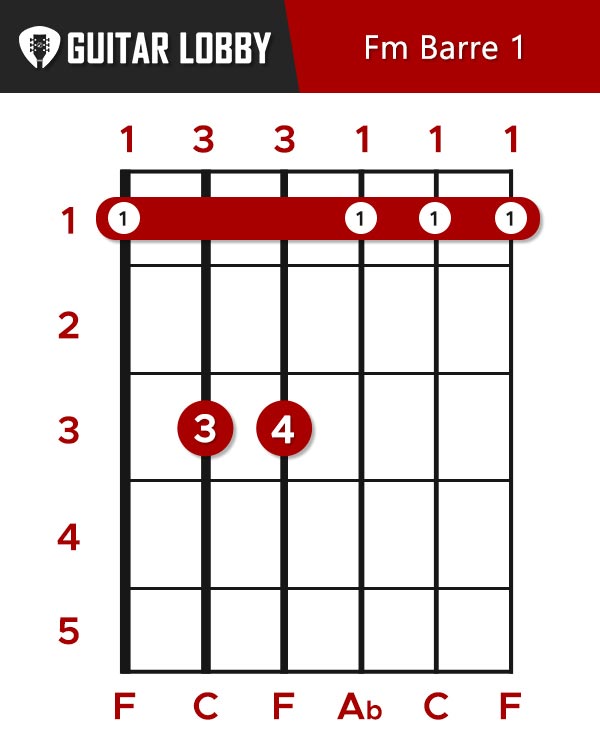
Minor barre chords are very similar to major barre chords. Just like we discussed above when learning open chords, we can get the F minor barre chords by flattening the “3rd” note in an F Major scale which is the A note in this case. For the F minor scale, the 3rd will be an “A flat” note. The fingering is the following:
- Use your first finger (Index) as a barre on the 1st fret of all 6 strings.
- Use your third finger (Ring) to fret the 3rd fret of the A string
- Use your fourth finger (Pinky) to fret the 3rd fret of the D string and strum
13. F Minor Barre Variation 2

Another second variation of the F minor barre chord based around the root on the A string, just as we did for the F major barre chord:
- Use your first finger (Index) as a barre on the 8th fret with will play the A string and the high E string.
- Use your second finger (Middle) finger on the 9th fret of the B string.
- Use your third finger (Ring) to play the 10th fret of the G.
- Use your fourth finger (Pinky) on the 10th fret of the D string.
- Strum all 5 strings from A string down, keeping the low E muted.
Tips on playing barre chords
Playing barre chord can be tricky for most beginners and harsh on the hands at first. But if you use the right techniques and practice carefully you will be able to play smooth power chords in no time with some practice.
When playing a barre chord that is rooted on the A string, mute the low E string with the tip of your index finger. It’s often difficult at first to keep that low E string muted when playing barre chords that are rooted on the A string. You can work on making sure you only string from the A string down, but another method is to all the very tip of your index finger to just barely touch and rest against the side of the low E string. This is just enough so that if you do hit the low E with your strum, it is not fretted and will not vibrate and ring out because it is held muted by the gentle touch of your finger. This may take some practice to get the hang of but give it a try!
Place your thumb on the center of the back of the neck. The thumb is often overlooked, but a right thumb placement in the neck can make the whole difference. By placing your thumb in the center of the neck your fingers will stand right on top of the strings and the barre will have more power.
Focus on the barre with your index finger. First thing is to place the barre firmly and then the other fingers. Successfully playing each note with your barre finger is fundamentally important to playing these barre chords.
Play an arpeggio before strumming. Play all the strings of the chord individually first to check if it sounds clean and then strums the whole chord. This will help you diagnose where any errors might be in your chord and what steps you need to make to fix them.
The shape is movable. Once you learned the F barre chord, you can move the shapes to different root notes and down the neck. This is when I chose to give you 4 F chords above.
7th Chords
7th chords are a fundamental tool of all blues music and of a lot of pop and rock music as well. When playing these basic 7th chords you will notice a lot of similarities to the open chord shapes you already know but with a few small changes to the fingering. 7th chords will be made up of the 1st, 3rd, 5th, and 7th notes of a particular key signature. Note that there are 3 main types of “7th chords” we will touch on. Major 7th, Minor 7th, and Dominant 7th chords.
What’s the difference between Major 7th, Minor 7th, and Dominant 7th?
The difference between Major 7th, Minor 7th, and Dominant 7th is the type of 3rd and 7th intervals used in the chord. A Major 7th Chord contains a Major 7th whereas a Dominant 7th Chord contains a Minor 7th note. A Minor 7th Chord contains both a Minor 3rd and Minor 7th notes.
| Major 7th Chord | Minor 7th Chord | Dominant 7th Chord |
| Root note | Root note | Root note |
| Major 3rd note | Major 3rd note | Minor 3rd note |
| Perfect 5th note | Perfect 5th note | Perfect 5th note |
| Major 7th note | Minor 7th note | Minor 7th note |
14. E Minor 7
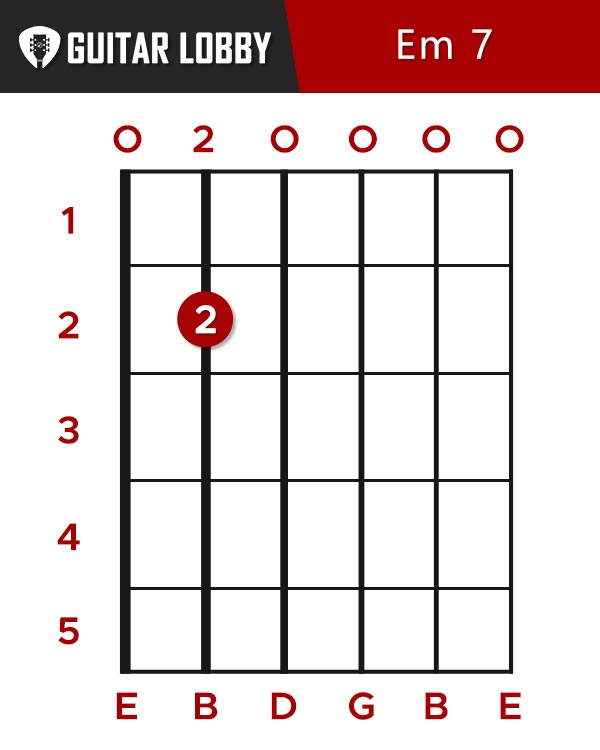
There are several ways to play and E Minor 7, or Em7 as it is also known. This variation is an open chord:
- Use your second finger (Middle) on the 2nd fret of the A string.
- Strum all the strings
15. E Major 7
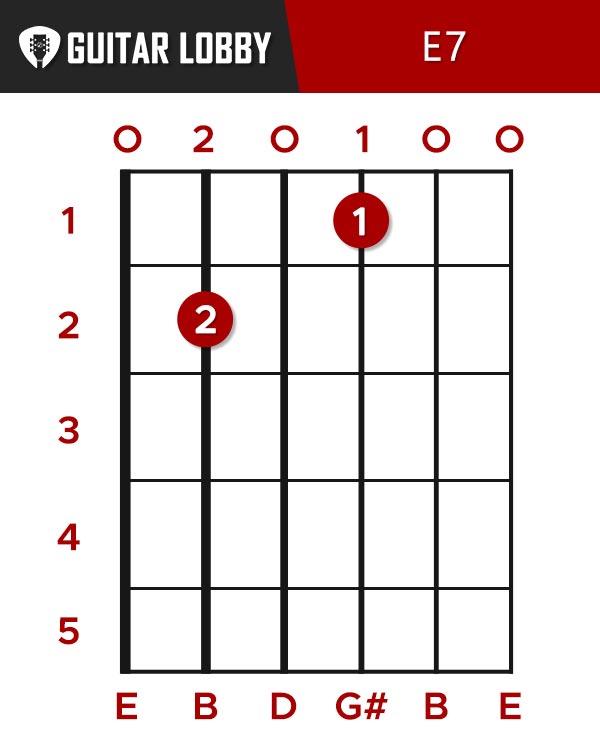
The E Major 7 open chord uses the same open D string but adds the Index finger on the 1st fret of the G string to sharpen that 3rd note in the key to a G#:
- Use your second finger (Middle) to play the 2nd fret of the A string.
- Use your first finger (Index) to play
- Strum all the strings
16. D7, aka D dominant 7
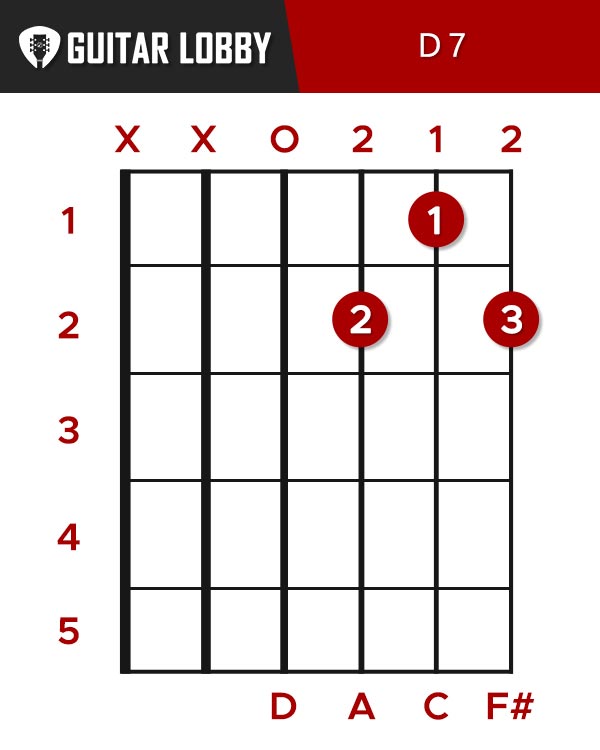
The D7 chord is also very easy to play and involves almost the same open shape as the D major chord. The fingering is the following:
- Place your second finger (Middle) on the 2nd fret of the G string.
- Place your first finger (Index) on the 1st fret of the B string.
- Place your third finger (Ring) on the 2nd fret of the high E string.
- Strum from the D string below. The low E and A strings stay muted.
17. G7, aka G dominant 7
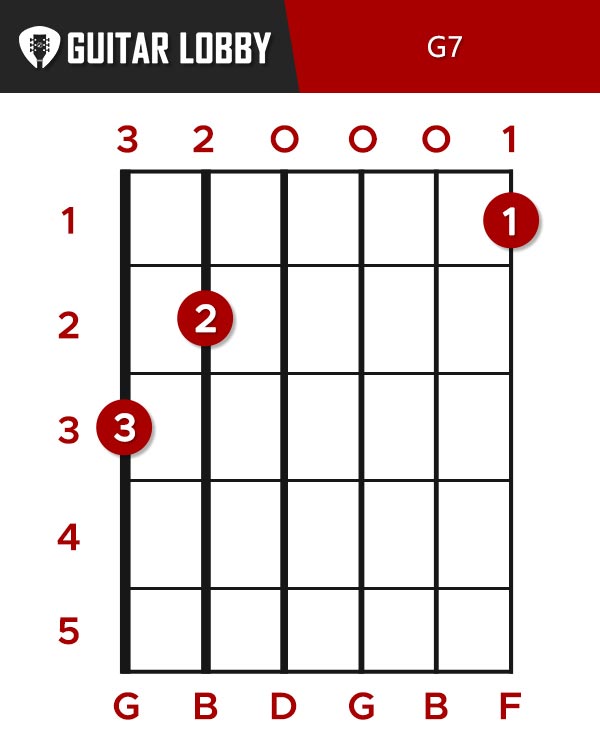
The G7 Chord Is also derived from just a small movement from the classical G major open chord:
- Use your third finger (Ring) on the 3rd fret of the low E string.
- Use your second finger (Middle) on the 2nd fret of the A string.
- Use your first finger (Index) on the 1st fret of the high E string.
- Strum all six strings.
18. A Minor 7
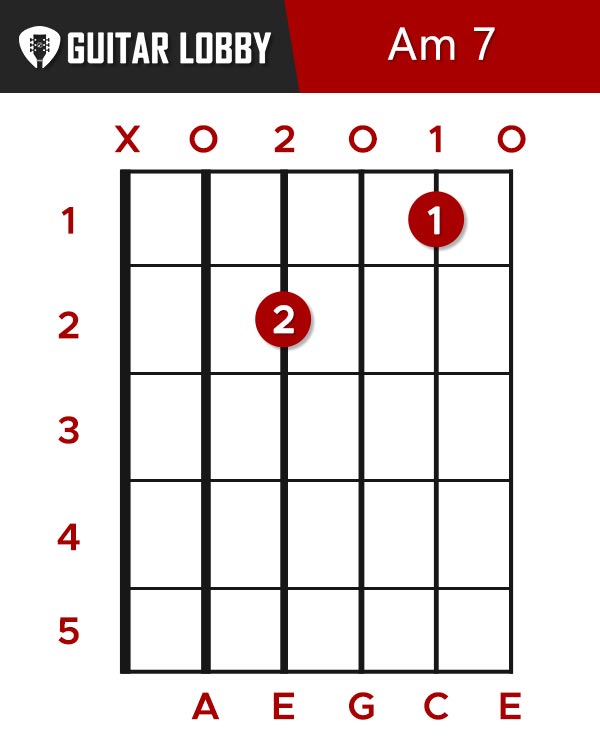
The A minor 7 chord involves just lifting the ring finger from the open A minor chord shape:
- Use your second finger (Middle) on the 2nd fret of the D string.
- Use your first finger (Index) on the 1st fret of the B string
- Strum all strings from the A string and below.
Tips on playing open 7th chords
When playing open 7th chords, always start out by visualising the standard open chord it corresponds to, then think about what to change based on that. For example, if you want to play the A minor 7 chord, you can think about it as an A minor chord with the lifted ring finger, as we explained in the previous section.
Sus Chords
Sus chords are chords that stay in between major and minor. The tone of a sus chord is very “tense” and unique.
What is a Sus Chord?
A suspended chord, also known as a “sus” chord takes away the 3rd note in a particular key signature and replaces it, typically with a perfect 4th note but there are exceptions and variations. Sometimes the 3rd is replaced with a major 2nd.
Like with 7th chords, Sus chords are also based on shapes we covered in the previous sections. You achieve a sus chord by moving the 3rd of the chord (I will touch more on this later in the article) down or up on the fretboard.
19. Dsus2
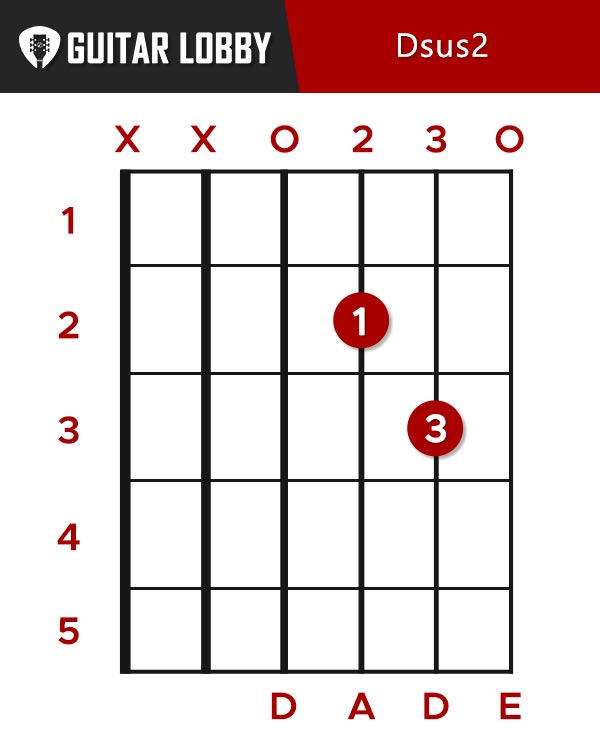
Dsus2 chord has the following fingerings:
- Place your first finger (Index) on the 2nd fret of the G string.
- Place your third finger (ring) on the 3rd fret of the B string.
- Strum from the D string below leaving the high E Open.
20. Dsus4
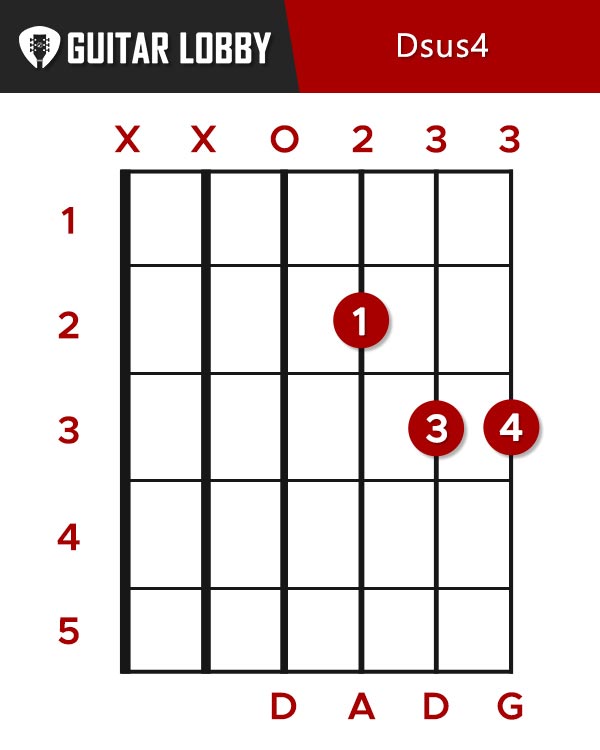
The Dsus4 chord uses almost the same fingering, but instead of the open high E you fret the 3rd fret of the string like in the image above:
- Use your first finger (Index) to play the 2nd fret of the G string.
- Use your third finger (Ring) to play the 3rd fret of the B string.
- Use your fourth finger (Pinky) to play the 3rd fret of the high E string
21. Esus4
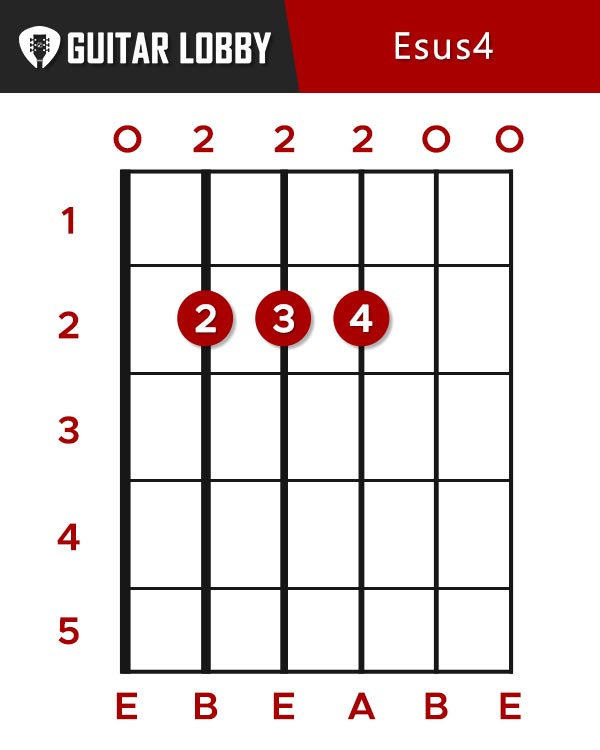
The Esus4 chord is one of the easiest chords to play.
- Put your second finger (Middle) on the 2nd fret of the A string.
- Put your third finger (Ring) on the 2nd fret of the D string.
- Put your fourth finger (Pinky) on the 2nd fret of the G string.
- Strum all 6 strings
22. Asus2
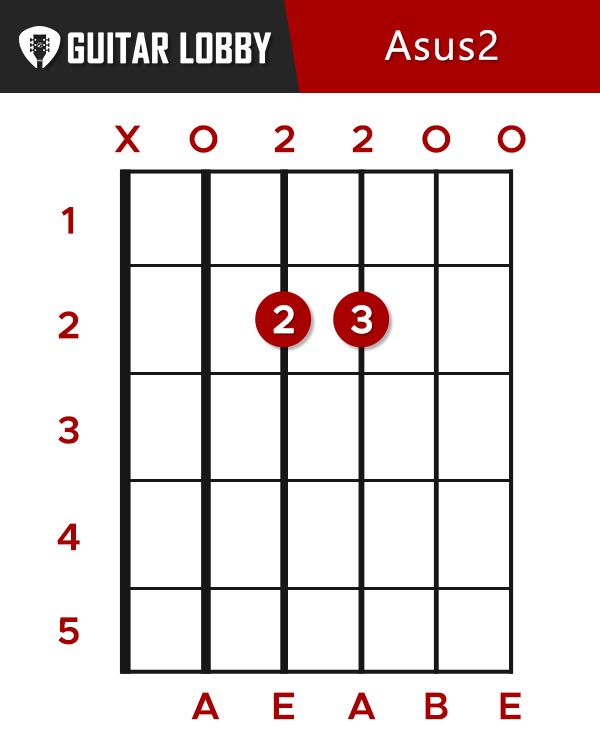
The Asus2 chord is played very similarly to the Esus4 except we drop the low B note to a low A note by playing the A string open, and also muting the low E string.
- Place your second finger (Middle) on the 2nd fret of the D string.
- Place your third finger (Ring) on the 2nd fret of the A string.
- Strum all the strings from the A below, muting the low E string from playing.
23. Asus4
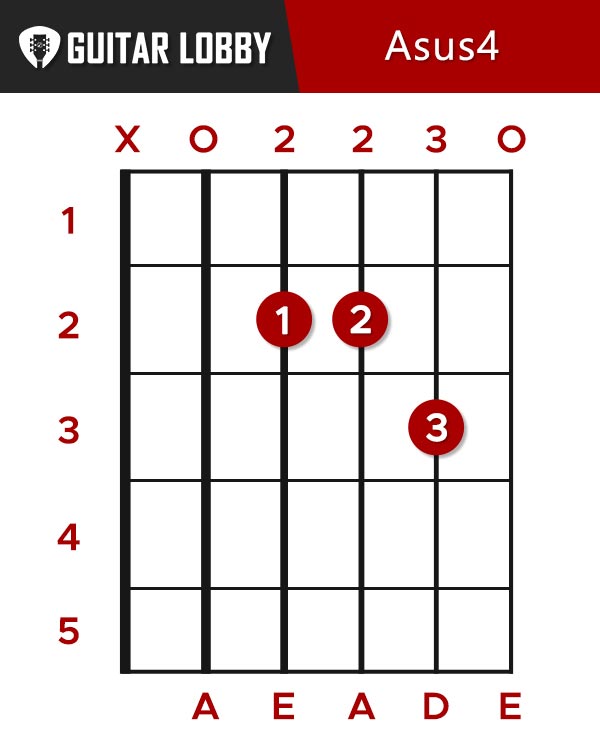
The A sus4 is very similar with just an added pinky in the mix:
- Use your second finger (Middle) to fret the 2nd fret of the D string.
- Use your third finger (Ring) to fret the 2nd fret of the A string.
- Use your fourth finger (Pinky) to fret the 3rd fret of the B string.
Tips On Playing Sus Chords
As with the 7th chords, think of sus chords as variations of normal open chords. For sus chords one simple trick is to move the finger on the bottom string you are fretting one fret above to achieve a sus 4 and 2 frets below to achieve a sus 2 chord.
For example, with the A sus 4 you move the pinky 1 fret above starting from the A major chord, from the 2nd fret of the B string, the 3rd fret.
To achieve the A sus2 you take off the pinky as to achieve the note 2 frets below the 2nd fret of the B, which is the open B string.
Power Chords
Power chords are the sound of rock n’ roll! If you want to learn how to play rock songs on guitar, power chords are a must. If you are just picking up the electric guitar and want to play some rock riffs, you should first learn power chords. With just a simple shape movable up and down the neck, you can play a wide range of modern and classic songs.
What Is A Power Chord?
Power chords are formed by only 2 notes, the 1st note (the root note) and the 5th note of a particular key signature. The typical chord shape will include a second root note for a 1-5-1 formation and can be moved up and down the fretboard to play different power chords with the same finger shape.
24. G Power Chord
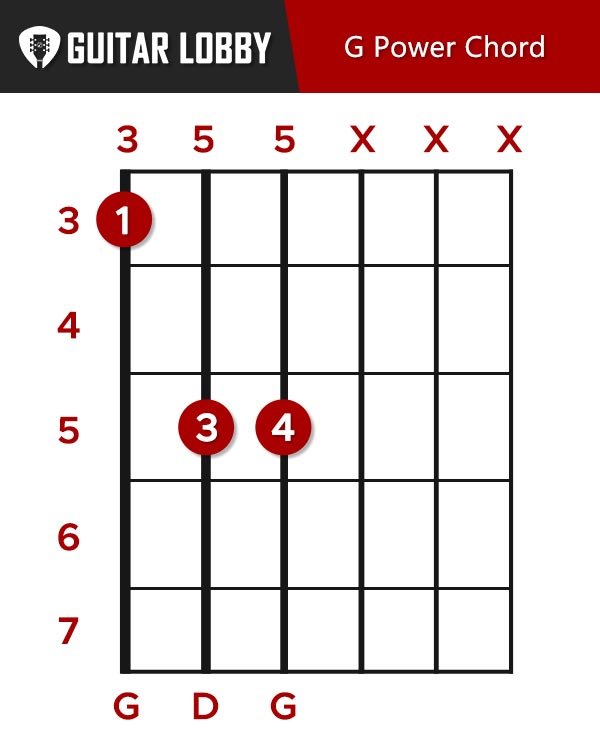
The G power chord uses the following fingering:
- Your first finger (Index) gets placed on the 3rd fret of the low E string.
- Your second finger (Ring) gets placed on the 5th fret of the A string.
- Your fourth finger (Pinky) gets placed on the 5th fret of the D string.
- Play the top 3 strings only.
This position is based on the root on the low E string. The G note on the 3rd fret.
25. G Power Chord Variation 2
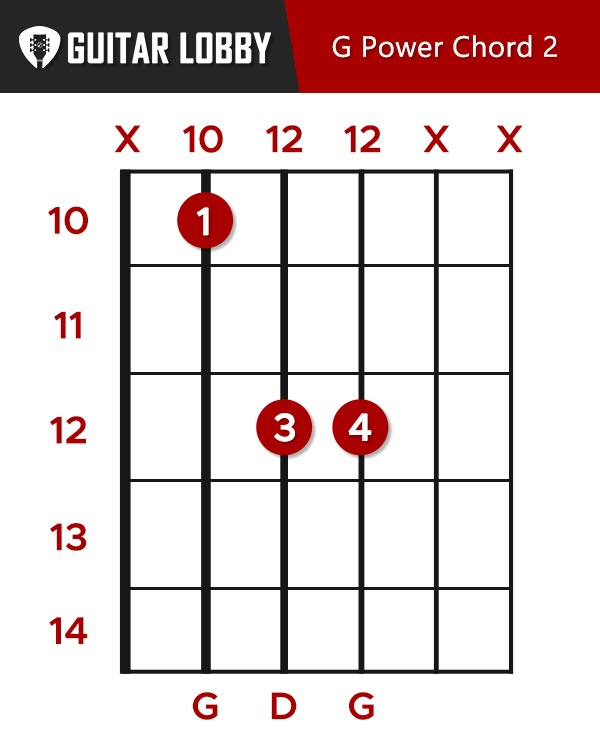
The other position of the G power chord is formed around the G note root on the 10 fret of the A string.
- Use your first finger (Index) to fret the 10th fret of the A String.
- Use your third finger (Ring) to fret the 12th fret of the D string.
- Use your fourth finger (Pinky) to fret the 12th fret of the G string
- Play only the A, D, and G strings.
As you can see, it’s the same shape but moved such that the root note is located on the A string.
Tips on playing Power Chords
Similar to playing Barre chords, when playing a power chord with the root note on the A string, work on using the tip of your index finger to mute the low E string. With the tip of your index finger that is fretted and playing a note on the A string, work on being able to gently rest the very tip of your finger against the low E string. This will hold the low E from vibrating such that it stays muted while you are strumming.
Apart from the fingering, power chords, especially on electric guitar, sound great when playing only palm-muted downstrokes. Palm-muting is a technique that involves resting your right hand near the bridge of the guitar and slightly touching the strings while playing to produce a more percussive sound. The harder you press down and the farther from the bridge you are, the more muted the sound will become. Palm mute especially when playing power chords with an electric guitar on a distorted tone. This way you achieve a great sound and also control the “noise” an electric guitar makes.
Slash Chords
Another category of chords are slash chords, which are a type of chord inversion. Chord inversions are formed where you take the same notes from a chord but change up their place in the fretboard.
What Are Slash Chords?
Slash chords are a type of modified chord that adds an extra note to the lowest voice of the chord. For Example, the D/F# chord is a D Major chord with an extra F# note on the low E string. In this example, it’s the 3rd note in the key of D that is being added to the bass.
26. D/F#
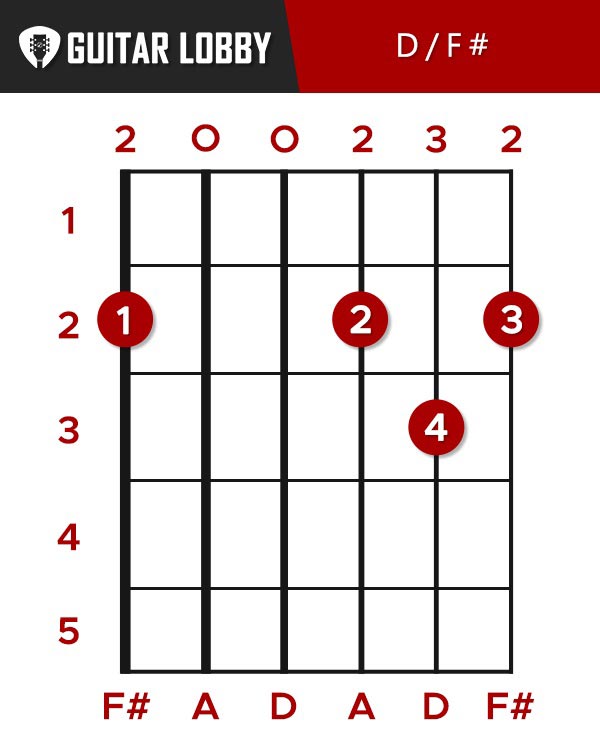
The D/F# chord is one of the most common slash chords. What you’ll notice is it’s a D major chord with the F# added on the bass. The fingering is the following:
- Place your second finger (Middle) on the 2nd fret of the G string.
- Place your third finger (Ring) on the 2nd fret of the high E string.
- Place your fourth finger (Pinky) on the 3rd fret of the B string.
- Stretch your first finger (Index) up to play the 2nd fret of the Low E.
27. F/A
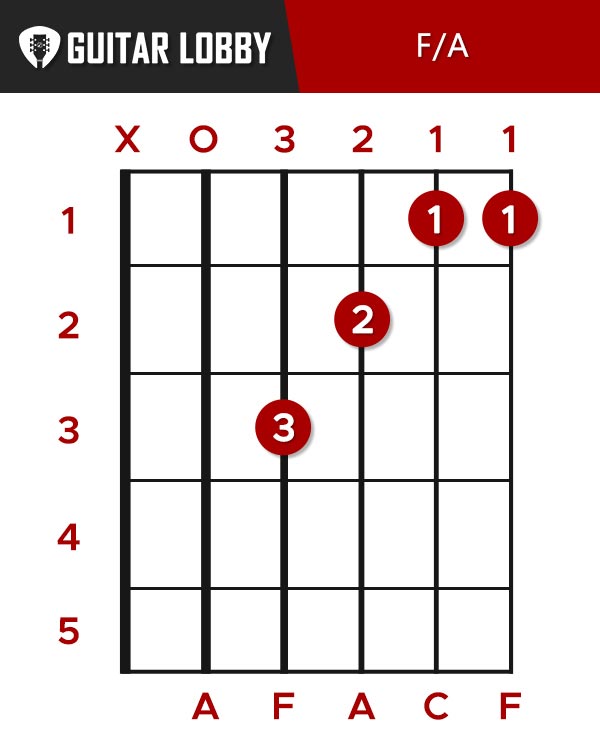
Another common slash chord is the F/A chord. Continuing with the same logic this is F major chord with an added low A note. The fingering is the following:
- Use your first finger (Index) to barre the 1st fret of the B and high E strings.
- Use your second finger (Middle) on the 2nd fret of the G string.
- Use your third finger (ring) to play the 3rd fret of the D string.
- Play the open A string.
The A note is part of the F chord, more precisely is the 3rd interval of the chord. Slash chords work because the notes that are added onto the bass of the chord are always notes that are part of the chord. So this chord is basically an F Major chord that already has an A note in it (which is the 2nd fret of the G string) and adds an extra A to be the lowest note played which really accentuates that 3rd interval in the chord giving it a different fullness effect then playing a normal F Major chord.
How Are Guitar Chords Built?
If you want to know more about how a chord is built and build them yourself, this section will teach you the basic music theory you need to do that. We talked alot about key signatures and intervals so far in this article. There are 7 intervals in every key signature. All chords are formed from notes within that key signature.
For example, the notes of the A major scale are the following:
| A | B | C# | D | E | F# | G# |
| 1 | 2 | 3 | 4 | 5 | 6 | 7 |
The number below each note is the interval to which that note corresponds. An interval refers to a distance between 2 notes. For example, the distance from the A note to the C# notes is a 3rd since A is 1 and C# is 3.
To build a Major chord, it is the 1st, 3rd, and 5th intervals of a particular key signature (scale).
For example, the A Major chord is formed from the notes of the A major scale 1, 3, 5 intervals which is A, C#, and E. Minor chords are built by “flattening” the 3rd interval of the scale. So for an A Minor chord makeup, we have A, C, and E, as we flattened the C# to a C.
How to practice chord changes
Memorizing chord shapes is important, but the final goal is to be able to play smooth chord progressions.
Try a 1 minute chord change exercise. Pick 3 or 4 basic guitar chords you want to practice and set a timer for 1 minute. During this minute, work on strumming and switching between chords smoothly until you can strum out each chord without having to take a major pause in between. It’s important to strum a clean chord before changing to another. The aim of the exercise is to play quality clean chords, not fast clumsy ones.
Practice with a metronome. Start a metronome at a slow speed, around 60-70 bpm for example and try this exercise. The metronome will be your best friend during your whole guitar journey. Start strumming chords along with the beat and build up the tempo of your strumming pattern as you start to feel more and more comfortable. Then try changing up the chord progression. Again, the primary objective of the challenge here is still to get a clean sounding chord and clean sounding transitions, not just speed.
Practice only 1 group of chords at a time. For example, start with only basic “open chords”. Once you can play clean open chord progression then work on learning another set of chords or move on to the next chord group.
I would suggest leaving barre chords for last as they are typically the most difficult for beginners to have the strength, dexterity, and hand positioning at first.

My name is Chris and I’ve had a passion for music and guitars for as long as I can remember. I started this website with some of my friends who are musicians, music teachers, gear heads, and music enthusiasts so we could provide high-quality guitar and music-related content.
I’ve been playing guitar since I was 13 years old and am an avid collector. Amps, pedals, guitars, bass, drums, microphones, studio, and recording gear, I love it all.
I was born and raised in Western Pennsylvania. My background is in Electrical Engineering, earning a Bachelor’s degree from Youngstown State University. With my engineering experience, I’ve developed as a designer of guitar amplifiers and effects. A true passion of mine, I’ve designed, built, and repaired a wide range of guitar amps and electronics. Here at the Guitar Lobby, our aim is to share our passion for Music and gear with the rest of the music community.