Whether you’re a beginner or a seasoned music professional, the importance of a good DAW cannot be overstated. DAWs (Digital Audio Workstations) have made creating music more accessible, easier, and creative than ever before. You can now record, arrange Audio or MIDI data, and access an entire world of sounds, plug-ins and effects, all right from your home or studio.

With the mind-boggling range of features offered by many DAWs in the market, choosing the right one can potentially be a confusing process. If you’re looking to find the right DAW that matches your production goals and preferences, then our in-depth guide to with help you find the best DAW for you. I’ll start this review by reviewing my favorite DAWs, but if you want to learn more about DAWs before reading reviews, check out our DAW information guide at the bottom of the page here.
Table of Contents
- Here Are the Best DAWs
- 1. Studio One 4 (The Best DAW for Songwriters)
- 2. Cubase 11 (Best Overall DAW For Producers)
- 3. Logic Pro X 10.5 (Best MacOS DAW With Free Lifetime Updates)
- 4. Ableton Live 11 (Best DAW for EDM Producers)
- 5. Pro Tools (The Industry Standard For Mixing, Mastering, and Recording)
- 6. Cockos REAPER 6 (Budget DAW With Powerful Customization)
- 7. FL Studio 20
- 8. Reason Studios Reason 12 (Formerly Propellerhead): The King of Synthesis
- 9. Bitwig Studio 4
- The Best Free DAWs
- How to Choose the Right DAW (Buying Guide)
Here Are the Best DAWs
1. Studio One 4 (The Best DAW for Songwriters)
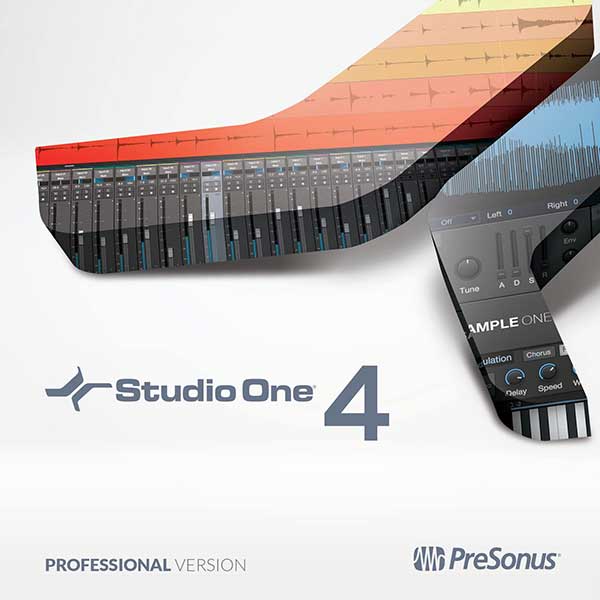
Overview: While Studio One has always been an impressive DAW thanks to its intuitive workflow and best in class features and plug-ins, their latest version of Studio One 4, hits it out of the park with tailor-made functionalities, especially for songwriters and beginners. Some of these are transient detection for easy visualization, advanced midi note effects and control, a chord track that lets you make coordinated, in-depth changes in MIDI or audio, and harmonic editing.
Presonus also has a web-store for you to purchase additional content like samples, plugins, and other products such as the widely-used Melodyne pitch correction and vocal editing suite. These features let songwriters conveniently put down their ideas and alter them to their heart’s content. This is why I consider this DAW to arguably be one of the most up-to-date and versatile DAWs on the market. Let’s take a closer look at Studio One and see what it has to offer.
Pricing and Upgrade Path: Studio One 4 is available in 3 versions: Prime, Artist, and Professional. The Prime version is free to use and offers basic recording and editing features. It is intended for folks who are beginners and just exploring the basics of recording and production and those who just want to try out Studio One’s workflow. It comes with a limited but healthy selection of plugins, effects, and sounds.
The Artist version is tailored towards working musicians and artists and adds the ability to support 3rd party plugin formats like VST and AU, and a whole bunch of sample libraries and sounds, while also adding some advanced features like the ability to export MIDI to notation (ideal for composers).
The Professional version gives you access to the full suite of features like harmonic editing, an integrated mastering suite, native support for 3rd party sample library formats like Kontakt, and a host of useful plugins and sounds.
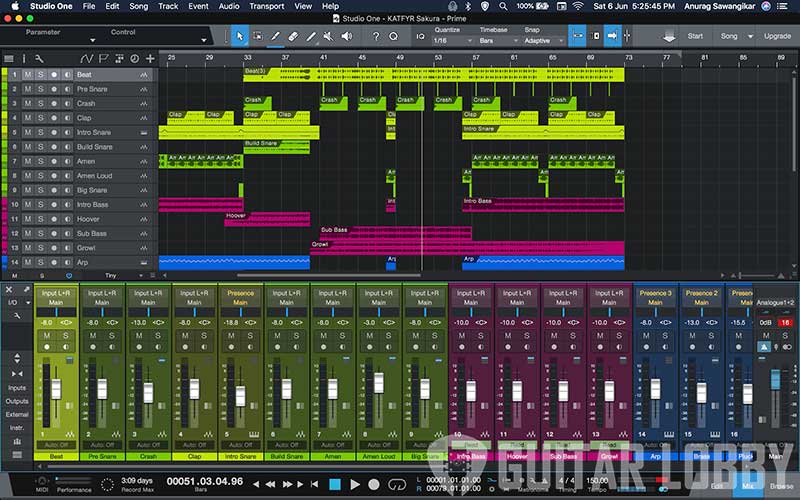
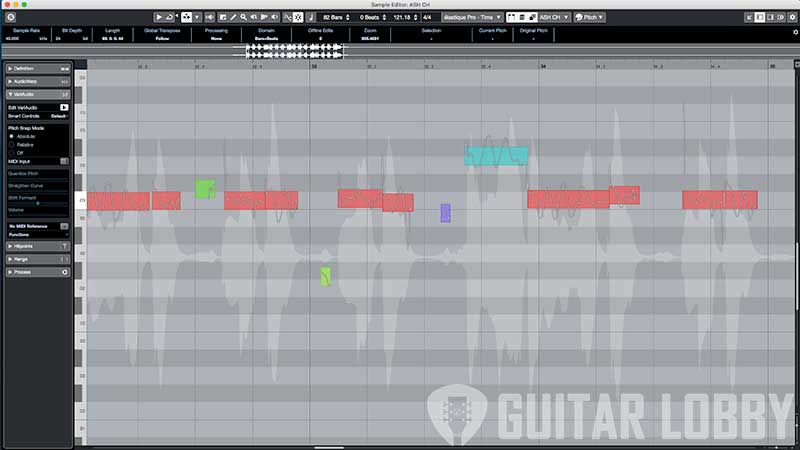
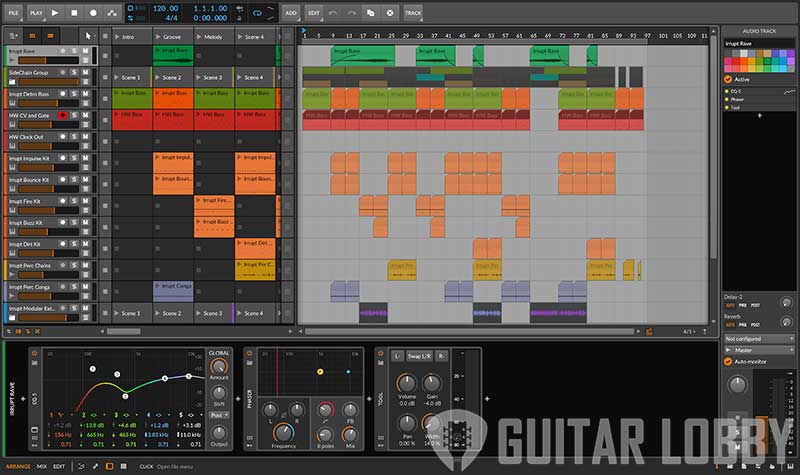
Here is a picture of a demo project using Studio One:
My Review: Studio One 4 is arguably one of the few DAWs tailored towards songwriters, and composers.
Setting up and installation of studio one is a breeze and involves directly downloading the setup files from the Presonus website after you’ve created an account. Studio One greets you with the start page with the most common settings for the projects or “songs” as they are called. The main arrange window features recording and playback controls at the bottom. The mixer, edit, and browse pages are all located in the bottom right corner and open into the arrange window which Presonus calls a single-window workflow. Folks with large single monitors will enjoy the details in the interface however, on smaller devices it feels a bit cluttered.
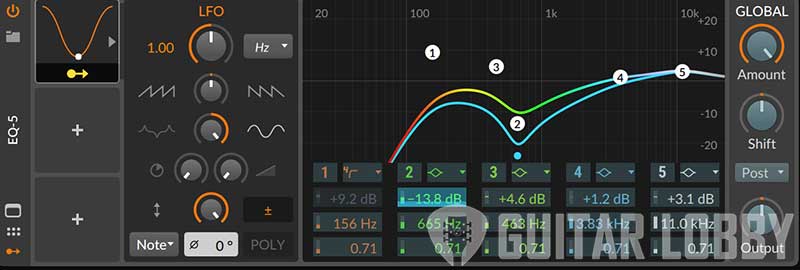
One of the highlights of Studio One 4 is the new drum editor and pattern editor. The drum editor, similar to Cubase, eliminates the excess functionality of the piano roll and lets you focus on creating realistic drum parts. The piano roll is also handy, with quantization controls front and center but splitting the midi across different channels or tracks takes a few workarounds. Studio One 4 also features a step-sequencing mode, called pattern editor for drum-machine style production. Another handy feature I noticed is that all the effects added to one track show up as tabs on the same window helping to declutter the interface.
Studio One 4 Professional comes with a full suite of effects like compressors, multi-FX, delays, and reverbs. I really liked the channel strip plugin, and their small digital reverb called Mixverb. The plugins are effective and require less CPU power so you should be able to use them liberally without worrying about maxing out your CPU.
Key Features:
Chord Track And Harmonic Editing: Introduced in version 4, the chord track essentially helps to organize the track around its chordal structure. That way making any changes to a chord on the chord track also modifies all the MIDI information in that section. Convenient for songwriters who often have to make drastic changes to the song structure on short notice. Also super convenient is the chord wheel, which provides different options for the chords in your track to build new sections or reharmonize existing ones.
Harmonic Editing: This tool involves non-destructively manipulating harmonic information inside audio regions to match the chord changes. For example, changing a Gmaj chord played in the verse to a Cmin chord is just a few clicks away. It is super handy for making quick changes in tracks but it is not perfect and results in some clicks and pops. It works a lot better with Vocal information. Harmonic Editing is also an extremely powerful tool at your disposal however it can be a hit or miss depending on the situation.
Mastering Suite: Studio One 4 happens to be one of the only DAWs with a full mastering solution built right in. Once the production of a song is done, exporting all the tracks and automation to a dedicated mastering session is just a matter of a few clicks. The same mastering session can have multiple tracks coming in from different mix sessions. And any changes made to those mix sessions are automatically reflected in the mixdown .wav file in the mastering session. Sweet! For producers who mix and master professionally as well as their own content, this is a great alternative to buying a dedicated mastering suite.
Bottom Line: Is It For You? PreSonus’ Studio One is versatile enough for most users, but it’s definitely geared more towards songwriters and bedroom musicians. Harmonic Editing and the built-in mastering suite are massive features to cater to the DIY audio production atmosphere. Studio One’s workflow is highly musical and intuitive and the feature set is strong. If you’re starting fresh with DAWs and not encumbered by using legacy software or plugins then Studio One is definitely a strong recommendation.
2. Cubase 11 (Best Overall DAW For Producers)
Overview: For those of you that are new to DAWs, the evolution of the Digital Audio Workstation is closely connected to the evolution of Cubase. Steinberg, the creators of Cubase, are also the inventors of the Virtual Studio Technology standard or VST, which is more or less the universal format with which most plugins are designed today. Cubase also happens to have some of the most advanced non-destructive audio editing features available in the market.
Most industry professionals swear by this DAW and its evolved workflow features and an extensive library of sounds, synths, and FX plugins. With the launch of the latest version, 10.5 in 2019, the grand old pro audio brand Steinberg has updated it with some much-needed features like exporting video out to audio. With this, Cubase 10.5 yet again plants itself firmly as one of the oldest and strongest contenders in the DAW space.
Pricing and Upgrade Path: Cubase comes in a variety of different flavors to suit different needs. The flagship version is Cubase Pro 10.5 with 11 professional-grade sample libraries and synths such as the new Padshop 2 synth, and over 75 effects. This version is meant for industry professionals who are specialized in various stages of audio production with a full feature suite. Cubase Artist 10.5 gives you all of the sounds and generators of Pro but limits the number of audio tracks to 64 and cuts back on some advanced features like the VariAudio 3 audio correction tool.
The Artist version is subsidized to cater to producers who need a bit of everything but can work without highly advanced audio tools. Cubase Elements 10.5 is the base retail version with only basic instrument packs for the Halion Sonic SE 3 sample engine and the Groove Agent SE 5 drum sampler and a standard set of effects. Designed for home setups, Cubase Elements is a great choice for anyone willing to explore the Cubase ecosystem at a fraction of the cost of the Pro version with future upgradeability in mind.
The other two Cubase versions are almost barebones – Cubase AI is shipped free with Yamaha products (Yamaha being the parent company of Steinberg) and Cubase LE is the free-to-download version.
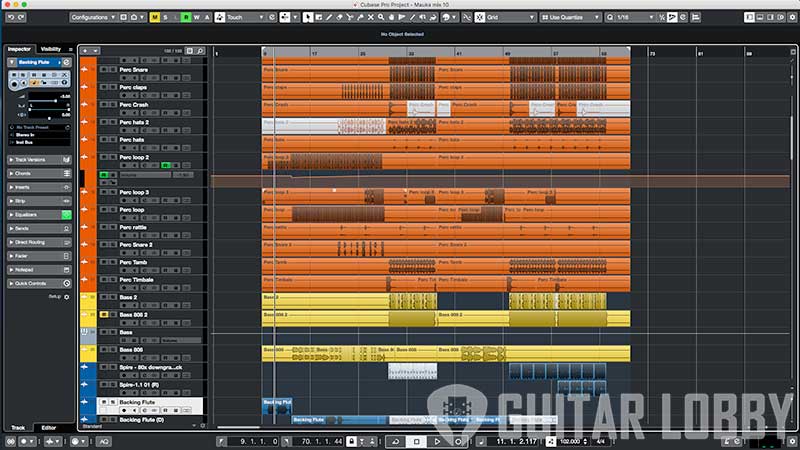
An example of a project within Cubase 10.5:
My Review: Okay, so the first and probably only major gripe that I have with this DAW is its licensing method. Most other audio brands have switched to software solutions for license management but Cubase still requires an eLicenser USB stick to work. In the days of USB-C, this probably means carrying around a dongle just for that. However, if you’re a professional it’s probably not an issue since a lot of other plugins also require eLicensers or iLOKs, and carrying them around to different studios becomes easier.
Once the installation is complete, the rest of the experience is smooth as ever. The Steinberg Hub houses recent projects and all of your templates, and an information center with updates from the Steinberg community. The GUI color scheme has been darkened from before for ease of use. Cubase boasts of a best-in-class MIDI environment with features that other DAWs often try to mimic but with limited success.
The dedicated Drum Editor makes drum programming highly efficient and the Key Editor (Piano Roll) is also very feature-rich. Pro Tip: The Logical Editor in Cubase can be used to design and perform precise modifications in MIDI using basic logic programming skills. Highly effective for custom quantizations or humanizing. The built-in notation tool is highly powerful and is designed to work with Steinberg’s own notation software, Dorico.
Cubase also features the chord track function that allows you to shape the song around its chordal structure and make adjustments wherever necessary. The audio time-stretching algorithms within Cubase are also exceptional with formants and pitch being accurately preserved even when audio is transposed or warped in extreme cases.
In short, Cubase can handle anything you throw at it, and more. It boasts of one of the easiest workflows and is a powerful DAW with almost unmatched functionality. One can only expect the best from the good people at Steinberg.
Key Features:
Video Export and Project Import Settings: Cubase 10.5 added the much-needed video import functionality to Cubase, ideal for background scoring, and with wide support for various formats and codecs. However, the ability to import multiple video files and edit them within the project is the icing on the cake. This feature is way more fleshed out in Cubase than in most other DAWs.
Project Data and Settings Import: Similar to Pro Tools, this dialog box allows you to import and copy different track settings and files across sessions. It really makes borrowing files or samples convenient without having to open up multiple projects.
Mix Snapshots: A new feature in version 10.5, this feature allows you to take multiple snapshots of the MixConsole. All the fader levels, routing and bussing, plugin inserts, and their parameters, are preserved in the snapshot allowing you to audition different mixes from within Cubase. It definitely helps to keep track and recall mix changes and improves project management.
VariAudio 3 and Audio Alignment: VariAudio 3 is Steinberg’s professional vocal editing and correction suite within Cubase. It is highly flexible and offers minute control of the audio all the way down to timing, pitch, and formant. It is also highly intuitive offering greater visual feedback and helping make musical changes and corrections in the vocal performance. Another extension of this feature is the vocal alignment tool when the audio is warped to match the timing of another more desirable take. Definitely a more organic sounding solution than vocal doublers because of the 2 actual takes.
Cubase 10.5 – VariAudio 3 in Action:
Bottom Line: Is It For You? Cubase is designed to do almost everything, so it can work for a wide variety of users. If the traditional workflow works for you, the premium pricing is not a problem and you have no issues with dongles, then I think you can’t go wrong with Cubase. You will only be limited by your creativity with this one. No wonder it has set a high standard in the audio industry for the last 3 decades.
3. Logic Pro X 10.5 (Best MacOS DAW With Free Lifetime Updates)
Overview: If you’re like me, deep within Apple’s walled garden by owning more than one of their products, giving their pro software a chance seems like the most obvious choice. And fortunately for macOS users, Apple’s professional audio and video editing suite including Logic Pro and Final Cut Pro are highly sophisticated pieces of software, even if they may lag behind sometimes when it comes to new features.
The new update to Logic Pro, version 10.5, is nothing less than game-changing bringing it more or less at par with other DAWs in terms of functionality. However, is the advantage of running native software on macOS and the subsidized pricing worth it? Let’s find out!
Pricing and Upgrade Path: This is the simplest part of Logic really – just one version. Around $200 on the App Store, and free upgrades till the next major point update. That might not mean much to newer users but for those who’ve been using Logic Pro X, since its update from version 9 in 2013, have been getting all subsequent updates for free for close to seven years now. Around the same time, Logic Pro was also highly subsidized from around $1000 to the current $200. And everything is included with a large library of Apple Loops, plugins, and samples. That’s quite a deal if you ask me.
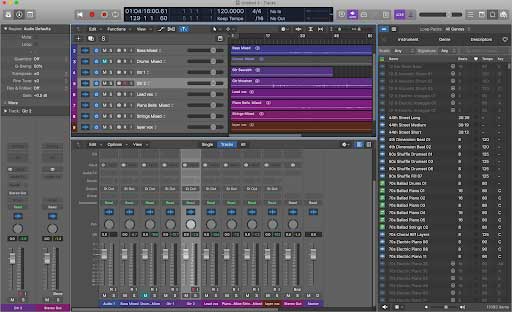
Logic Pro 10.4 screenshot shows the Timeline, Mixer, Track inspector, and Apple Loops browser:
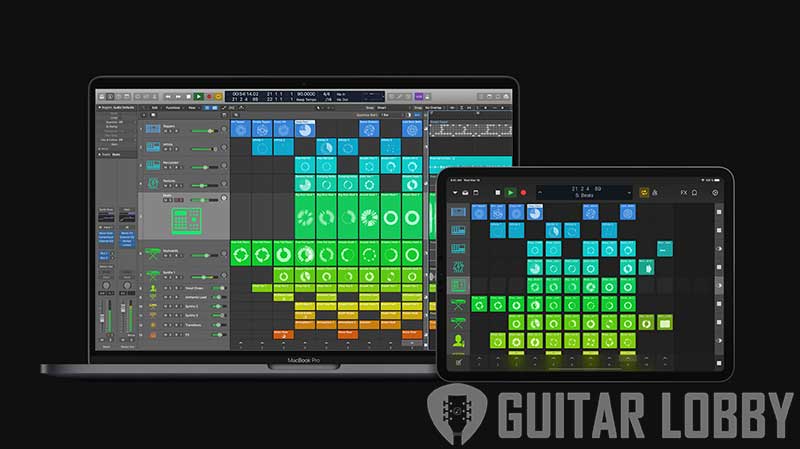
Live Loops in the new 10.5 update look great:
My Review: Logic Pro X is easily one of the most versatile and competent DAWs out there, even as it’s not at the cutting edge of technology. It is almost a default choice for most Mac users since it is so well integrated with the OS like all Apple software. Logic has traditionally had a timeline-based workflow but in its latest 10.5 updates Apple decided to go all-in on the Ableton style, grid-like, loops, and samples approach. This is aimed squarely at producers of dance music and Ableton users will find many similarities in the redesign.
Now you can create scenes, loop them and arrange the song on-the-fly and Logic will record your performance which can be fine-tuned and arranged later. They’ve added a new robust step sequencer, a feature long requested in Logic. The new update has also brought overhauls to its severely outdated samplers, EXS24 and Ultrabeat.
The new Sampler and Quick Sampler are delightful to use with their new fine-tuned controls. It’s now easy to import large sample sets into Sampler and arrange them dynamically with round-robins, something that was quite clumsy to do in EXS24. With Sampler also being backward compatible with EXS24 instruments, it’s easy to see why this new update will not alienate long-time users of Logic.
Apart from the new update, Logic also boasts of a huge variety of stock sounds and plugins. The Vintage EQ collection from version 10.4 features great sounding emulations of popular console channel strips. The built-in reverbs like Chromaverb and Space Designer are highly capable plugins while Alchemy has many powerful features built into one advanced synth.
Another huge advantage with Logic is Logic Remote and Mainstage. These 2 apps extend the functionality of Logic by giving dedicated tools for the 2 situations producers often find themselves in – remote operation and live performance. Other DAWs do have similar features but the OS-level integration and touch functionality with Logic make these features really stand out.
Key Features:
Live Loops: The Live Loops feature adds a whole new dynamic to Logic’s workflow. Whether you’re already a seasoned Logic Pro user or new to the system this update will dramatically change the way you use Logic. But that doesn’t mean that any functionality in the traditional workflow is sacrificed.
Sampler and Quick Sampler: Much needed updates to the sampling instruments in Logic make for a more streamlined and sampling-oriented style of working.

Drummer: These are specialized midi tracks oriented towards making realistic drum or percussion parts. Apple has done this in a unique way by clubbing varied styles of drumming into different personas and featuring deep customization of drum elements, patterns, dynamics, swing, and other parameters to get authentic-sounding drum parts.
Robust Video Editing: Logic can also import movies in Quicktime format for background scoring and editing.
Tight Integration with Logic Remote and Mainstage: While Logic Remote helps with remote control over almost any function within Logic, Mainstage is a stripped-down version of Logic with all its soundbanks tailored for live performance.
Bottom Line: Is It For You? Are you a macOS user? If yes, then I believe going in with Logic Pro X should not be a difficult choice. It offers all the same functionality as most traditional DAWs save for some highly advanced tasks which may anyway be outside the purview of most musicians and producers. And with version 10.5 Apple is bound to pull in some crowd from the Ableton circuit.
That being said, Logic Pro can’t do everything well and it is mostly tailored towards composers, musicians, songwriters, and audio producers. If you fall within any of these categories then you definitely will fall in love with this deceptively intuitive DAW. If you’re looking for the best DAW for Mac this is going to be a top contender.
4. Ableton Live 11 (Best DAW for EDM Producers)
Overview: If you’ve been exploring the audio recording scene on the internet, you might have come across the term ‘legacy’ for code or features. This refers to the traditional timeline-based arrangement and design that most DAWs worked with. Well, Ableton Live was one of the first DAWs to eschew this legacy timeline-based workflow, which wasn’t suitable for producing electronic music. Not to say that you can’t produce electronic music on other DAWs, but Ableton Live was purpose-built from the ground up for 2 things, EDM production, and playing said material live (hence the name ‘live’).
Version 1 of Live came out in 2001, but back then it did not have the fluid and powerful MIDI environment and was more focused on looping and sampling, and ideally meant for live performances or DJing. But later on, it became clear that Ableton’s unusual approach towards music-making was a hit and they kept updating Live’s workflow by incorporating extensive MIDI and audio manipulation features. Let’s take a look at the most popular DAW in the electronic music space.
Pricing and Upgrade Path: Like most other DAWs on this list, Ableton comes in 3 flavors. Intro limits the number of tracks to 16 and sends to 2. It provides 4 instruments though, namely the simpler which is a powerful but basic sampler, Drum Rack and Instrument Rack plugins, and the Impulse drum programming machine and a standard set of MIDI and Audio effects with around 5GB of sounds.
The Standard version comes in at $449, features unlimited tracks and sends, and adds complex time warp and audio and midi editing features, and while it adds almost all functionality it comes with about 10GB of sounds.
The Suite version is the fully loaded Live environment with support for Max devices (more on that later) and a huge library of sounds with over 70 gigs of different drums, orchestral instruments, retro synths, and tons of sound packs. This version costs $749.
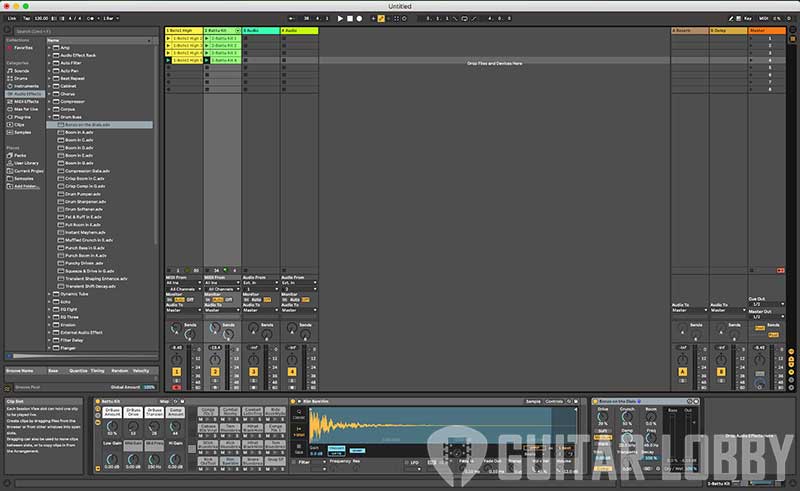
Ableton Live shows the session view and the Device panel at the bottom:
My Review: One of the first things you’ll notice when opening Ableton Live, is the simplicity of the interface. While all the buttons and sections may seem daunting at first, Live is designed to put almost all audio and MIDI manipulation tools front and center so that no time is wasted navigating menus. Live works with 2 views essentially – 1) Session View, where a grid of clips, sounds, and MIDI can be triggered alone, in groups called scenes. 2) The second view is a traditional timeline-based interface called Arrangement View, where songs can be arranged manually. Choosing which method to create tracks is completely up to the user.
When performing with Live, the samples are triggered on the next beat or bar. There are also some features for DJs such as the ability to assign tracks or scenes to A or B sides on crossfades. You can quickly audition sounds through the Browser on the left and also categorize them by folder or color. One of the key features introduced in Live 10, is the ability to capture the last MIDI played before hitting the record button even when the transport is not running, for recalling those spontaneous ideas or happy accidents.
Ableton has thrown in a wide variety of content with Live, whether it’s loops, sounds, or drum kits. The packs are evocatively named skitter and step, chop and swing, punch and tilt and encompass many genres of electronic music. The sounds are not completely finished but are more like starting points that work well within most tracks. The suite version also adds a huge collection of sample packs like Orchestral sounds, and Latin Percussion loops and samples.
The built-in devices and presets are great for getting a quick start into your production process. As for instruments, the 11 instruments designed by Ableton tap into different types of modeling and synthesis. The new Wavetable synth, for instance, is a comprehensive wavetable synthesis with 2 oscillators and remappable modulation sources. There are advanced physical modeling synths like Tension, for strings, and Collision for percussion.
Ableton Live has been one of the first DAWs to embrace physical controllers. Brands like Akai, Novation, and Arturia make dedicated hardware to work within Live’s unique workflow. Ableton’s own controller, called the Push, brings all of Live’s workflow into the physical domain. The Novation Launchpad also was a huge success and spawned many video-game style controllers and samplers that add a lot of fun and style to the art of music-making in Ableton Live.
Key Features:
Simpler: The basic sampler in Live, this plugin is essential to working with samples in Ableton. You can manipulate a sample in 3 fundamental ways – Classic mode follows the pitch of the note played, it works well synth or pad sounds or for loops, the 1-Shot mode is ideal for drums or other accent-type samples as the sounds can overlap instead of re-triggering from the start point, and slicing mode allows you to chop up the sample with different notes playing different slices. It gives you full command over the samples’ ADSR and has advanced triggering and slicing controls. It’s elder brother Sampler, allows working with multi-zones and samples and helps create more detailed sound sets.
Max For Live: One of the greatest additions to Live’s workflow is Max for Live. In version 10, Max is fully integrated into Live, instead of being a separate app and is essentially a logical programming environment built right into the DAW. It is possible to make your own devices using Ableton’s selection of instruments, effects, and tools.
Max also lets you take control of almost any parameter inside the DAW. So controlling lights, or using inputs like the weather to control or alter sounds is made possible. Some of the advanced devices made by Ableton like Poli are made using Max for Live.
Plugins and Effects: Almost all the effects in Live, are quite musical to use, once you get the hang of the interface. The updated channel EQ, in particular, allows you to boost the highs and lows without making the sounds too shrill or too rumble.
The Drum Buss is an exceptional little effect allowing extensive control over shaping the sound of your drums and getting the most out of them. Another plugin not featured enough on other DAWs is the Looper device, which performs identically to a physical looper pedal, meaning you can build upon the same 4-bar phrase to construct sections or the whole track.
Bottom Line: Is It For You? Ableton Live has one of the most unique workflows among this list, and if it works for you, then the functionality and speed of this DAW are second to none. Particularly if you make electronic music and are interested in taking your music live. However, if having a timeline-based interface is fundamental to your workflow, as can happen with film composers or foley artists, then Live is probably not the most suitable. Ableton has built a huge community of dedicated people who help test and develop new features constantly. Thanks to Max for Live, the users of Live, contribute in a big way to its evolution and this, I think, is the reason why it continues to flourish among electronic artists and producers today.
5. Pro Tools (The Industry Standard For Mixing, Mastering, and Recording)
Overview: Pro Tools is a Digital Audio Workstation developed by the good folks at Avid (earlier known as Digidesign) since 1989. A quick search about the history of Pro Tools reveals that Digidesign practically established most of the working methods found in DAWs today. While the earliest version of Pro Tools only offered 4-track recording and sold for a whopping $600, that innovation paved the way for a whole world of digital recording and audio manipulation software.
Pro Tools was one of the first players in the game that managed to gain widespread acceptance, mainly due to the fact that they accommodated the gigantic hardware setups in major studios by designing software with the required internal routing and audio management features. Avid’s video editing suite, Media Composer, was a big hit in the film and television world, and together these 2 pieces of software became the industry standard over the last 3 decades. With that kind of legacy behind it, Pro Tools stands out as one of the most widely used DAWs today, especially in almost all major commercial studios.
Pricing and Upgrade Path: Avid is one of the first brands in the audio world, to offer subscription-based software pricing. The most basic version of Pro Tools, called First, is free to use. It comes with some limitations though – you get up to 16 simultaneous audio tracks at up to 96khz, 16 midi and instrument tracks, 16 aux tracks, and only 4 hardware inputs. It can be slightly limiting for drummers who record at home. First is great for most general scenarios though. On the features front, First leaves out beat detective (more on that later) and advanced audio and video editing but everything else is included.
PT First comes with a fair bit of sample content as well. The upgrade is a $30 per month version simply called Pro Tools (or Native, as it was called earlier) which significantly bumps up the track counts to professional levels, offers a huge quantity of plugins and content and even includes the Avid Complete plugin bundle with their famous AIR plugins.
The full-fledged version is called Ultimate, and comes with full hardware support (HDX) and includes Dolby Atmos and surround mixing features that are required in post-production work. This distinction is important because the use cases for all these 3 versions are distinct, I’ll explain more below.
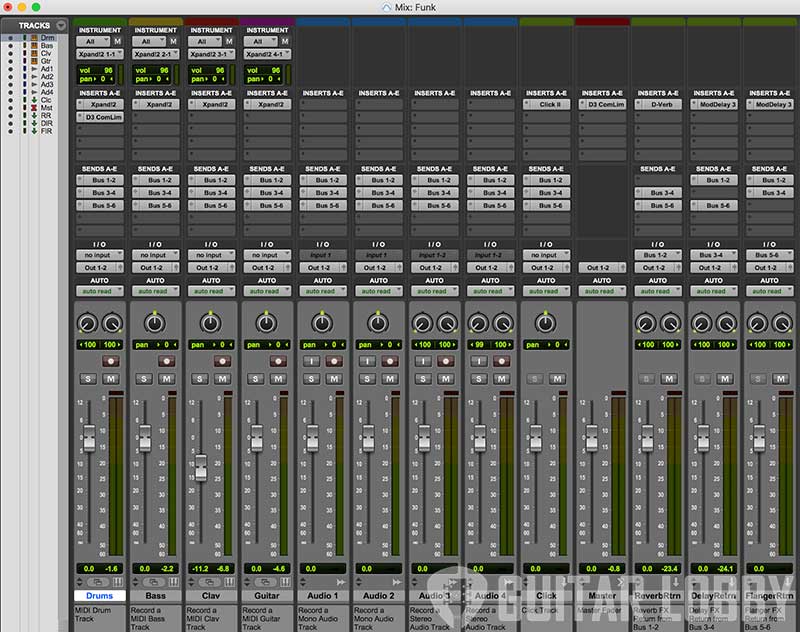
The Pro Tools Mixer Window:
My Review: Pro Tools, as a DAW, is fundamentally designed to work in giant collaborative environments. The interface is pleasant to look at and is comfortable to look at for long periods of time. As artists have limited studio time within their production budgets, most of it is spent in recording vocals, drums, acoustic guitars, or anything that requires good room acoustics, and things like electric guitars and programming are done outside the studio or at home. And Pro Tools in some ways reflects this situation, with an extensive audio-editing suite and while the MIDI environment plays second fiddle.
The audio manipulation features in Pro Tools are second to none, particularly their implementation of shuffle mode and ripple editing. As a former recording assistant, my work involved organizing tons of tracks, fixing them, editing vocals, cleaning up guitar tracks, setting up crossfades, and preparing sessions for the mixing engineer. In all these tasks, Pro Tools shines. I particularly liked the tab to transient feature, something which is extensively used while making complicated edits. The way it implements shortcuts is also handy and efficient when recording in commercial setups where time is of the essence.
Home Producers and bedroom musicians may find Pro Tools a bit limiting, not to say that it won’t do anything you ask. But it’s not really an ideation tool and needs you to know exactly what you’re doing to get work done. For mixing and mastering engineers, however, it’s a different story. The mix window in Pro Tools is designed to mimic and integrate with analog recording consoles. That means all the inserts, channel strip parameters, and sends are upfront and center ready for more traditional mixing engineers who prefer a tactile approach to mixing.
Bussing is also implemented in a comprehensive way. In order for PT to work better with such hardware, tracks are separated into types – Audio Track, MIDI track, Aux Input, Master Fader tracks are created separately and have different tweaks and bussing options. It also features a highly accurate metering system in-line with industry and broadcast standards, making it the first choice for Mastering engineers.
Screenshot of the GUI from Pro Tools First:
Key Features:
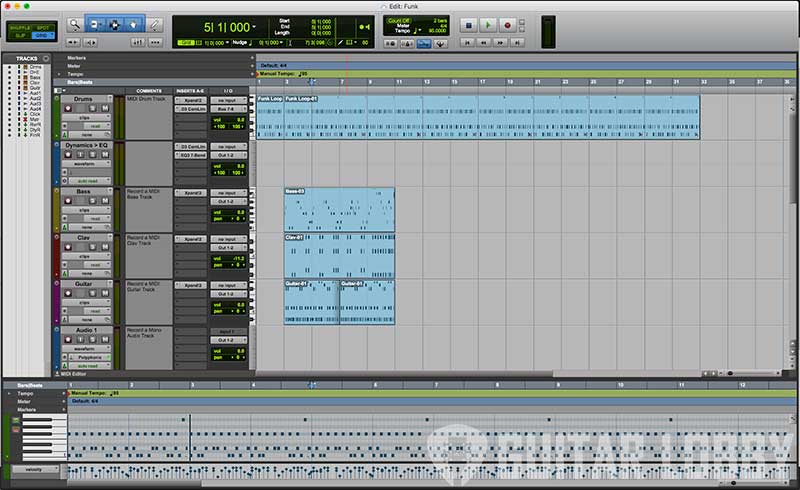
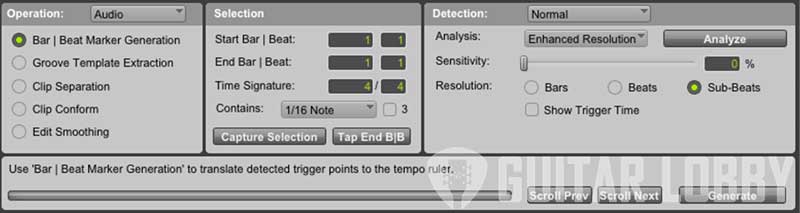
Beat Detective: Pro Tools was one of the first DAWs to implement audio quantization features. Beat Detective allows you to time correct and aligns audio data to the grid, or in accordance with a specific groove template. BD automatically creates beat markers in the audio which can be chopped and then realigned or conformed to the nearest selected note value. Edit smoothing then covers up any gaps in the audio with silence or crossfades which avoids any clicks or pops. A really useful tool especially for rhythmic information like drums.
Strong video editing features and Netflix Support: The advanced video edit and sync features, available in Pro Tools and PT ultimate, are powered by the Avid video engine and can import multiple video tracks, create video playlists and give a surprisingly diverse set of video editing tools. This feature is mostly used in background scoring and foley or FX work. Pro Tools Ultimate also has support for Netflix’s upload standards and even supports mixing for VR.
Importing and Exporting Files: Importing session data in Pro Tools is very convenient to work with. You can import clips, track settings, automation settings, tempo maps, and much more from one session to another or from OMF or AAF files. There’s a handy button to match files to existing tracks in the session by name.
Pro Tools also has a feature called Single File Multi Stem Bounce that allows you to bounce entire stems in a single playable audio file. This file can later be reopened in another session to gain access to all individual stems. Really handy for quickly referring and accessing audio stems instead of having to re-open cumbersome sessions.
Bottom Line: Is It For You? If you’re an audio engineering student or professional who wants to work in commercial audio recording studios, or in film, then it’s almost non-negotiable to at least have working knowledge of Pro Tools. It has almost all the features you’ll ever need in a professional capacity and it’s file sharing and exporting features make it ideal for large workloads. It’s also a great DAW to work with at home, provided you have the computing horsepower to run large sessions on its AAX plugin platform. And while it’s not the most conducive for electronic music production, it’ll probably be the DAW which a mix engineer will use to make your latest masterpiece sound good.
6. Cockos REAPER 6 (Budget DAW With Powerful Customization)
Overview: If there’s ever a good example of a consumer-oriented enterprise in software, it’s Reaper. The goal of its makers, Cockos Inc. is to keep a steely-eyed focus on engineering and software development, keeping marketing costs low and discouraging any such factors from affecting the quality of the software they love to develop and use. And it shows in the way Reaper is built.
It is a highly efficient piece of code, with the installer well below 25MB with no copy protection. And although this means the GUI lacks pretty things to gawk at, Reaper is a functional beast. Its functionality expands well outside the realms of most DAWs with only Ableton’s Live being a likely rival in this regard. Reaper has come a long way from its humble origins and consistent feature updates and prompt debugging have given it high levels of credibility in the audio production circuit. Let’s take a look at what makes Cockos Reaper tick.
Pricing and Upgrade Path: This, I think, is one of the coolest things about Reaper, the full version of the software is free-to-try for up to 60 days. You’ll see a window at startup politely reminding you of that. However, after 60 days the software only keeps showing you that reminder instead of hobbling the software in any way.
Reaper also prices its software responsibly, with a discounted license fee of $60 for students and small businesses, and $225 for commercial use. This makes Reaper one of the cheapest fully functioning DAWs available. While you don’t get any sounds or samples bundled-in, the functionality is all there and it keeps the installer small and the whole package portable and light allowing you to run it directly from a USB stick.
Reapers GUI with some color tweaks to make it bright:

My Review: The key to understanding Reaper and why it looks and works the way it does is knowing why and how it was made in the first place. Often, people who work in sound design, particularly for games, movies, and other forms of media, need their software to work in certain ways that it may not have been designed for. With most DAWs having installers well above a few GB, they are not an ideal situation for engineers on-the-go.
Moreover, professional sound designers and mixing engineers may have to work in places preferred by the client and the studio in question may or may not have the requisite software and licenses for the workflow. Reaper solves both these problems. The customization within Reaper is almost unparalleled, allowing us to set up complex maneuvers or macros with the ReaScript engine. All the plugins have well-coded algorithms and may look quite bland, but they are highly efficient and designed.
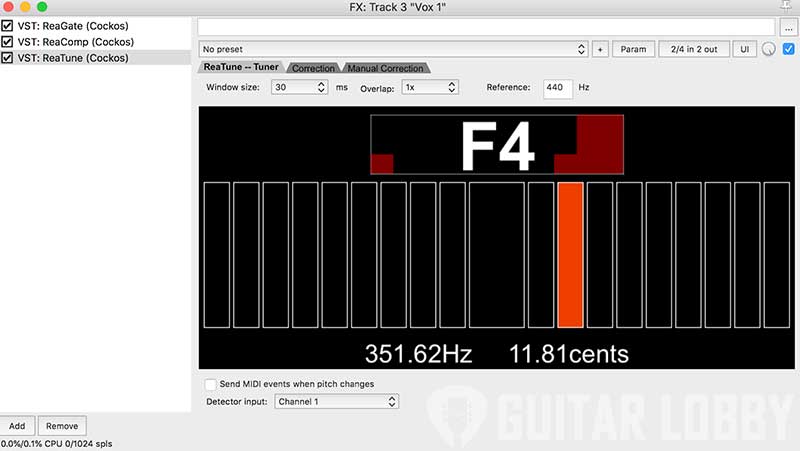
I was pleasantly surprised by how well ReaTune works on vocals. The clip inspector is simple to use but has a ton of functionality. The audio processing algorithms are really well written, pitch and tempo shifts on audio felt super smooth with no jitters or artifacts.
Due to its aggressive focus on delivering features first, Reaper side-steps the process of making them pretty and marketable, saving tons of money and innovating sustainably, and that’s wonderful. The GUI is similar to a standard timeline-based interface, and its performance is really great thanks to its low CPU overhead. When working with Reaper, it’s important to take it slow, go through the tons of material available on their website and forums, and get the basics right otherwise it may seem daunting.
However, since almost every possible action can be customized and sequenced into macros, power users of Reaper have customized the software to great lengths to optimize their workflow. For example, you can change the GUI completely to look like your other favorite DAW, or customize how the mouse pointer behaves when hovering over certain buttons or areas. This kind of customization allows Reaper to be retooled for specialized areas like game development.
Key Features:
Customization: I can’t say this enough. The ability to customize Reaper’s GUI and workflow is unreal. Almost, all possible actions and options are tweakable and can be coded into macros. You can also save chains of FX plugins with all their tweaked parameters, to use them later.
Designer friendly: Reapers’ design is extremely minimal, but one look at the preferences menu will tell you how much there is under the hood. That being said, most of the usual options like buffer size, are easy to locate and tweak. Reaper also works quite well with video projects, with the ability to edit video files being fully realized.
FX processing on clips/regions: One thing I really liked about Reaper is the ability to add FX chains to individual clips on audio tracks. While other DAWs offer selection-based FX processing, their results are often bounced pieces of audio. But with Reaper, you can basically assign individual FX chains with individual automation to separate regions without having to bounce the audio in place.
Tracks are channel-agnostic: Audio Tracks in Reaper can support mono or multichannel audio clips on stereo tracks. In other DAWs, often clips cannot be dragged to tracks with a different number of channels, but within Reaper, there are no such limitations. Also, choosing particular tracks in multichannel audio is also just a few clicks away.
Bottom Line: Is It For You? Reaper is as close to a fully functional DAW you can try without getting annoyed by limitations.
If you’re new to the process of audio production or music-making, then Reaper may not be the right place to start. It is a highly functional piece of software that doesn’t really have the bells and whistles needed to inspire budding artists. But if you’re already working in some of the areas I’ve talked about earlier and are looking to switch from a legacy DAW, then you will be amazed at the power and functionality Reaper has to offer at such a low price.
7. FL Studio 20
Overview: FL Studio 20 was first launched with the name Fruity Loops by Belgium based Image-Line studio in 1997. It was my first DAW back in the day and for a whole generation of computer music enthusiasts on Windows, it was their first foray into the world of audio production. Fruity Loops was primarily a pattern sequencer, something that is still at the core of its workflow.
Cut to version 10, and it had blossomed into a fully functioning DAW ideal for making electronic music. Post version 10, Image-Line made a lot of updates to its feature set to give it more mainstream appeal and draw in users of other DAWs. In 2018, they skipped version 13, straight to version 20, to commemorate 20 years of the DAW, and introduced it to a whole new audience of macOS users. The version 20 interface looks better than ever and the functionality has also been improved. Let’s take a look at FL Studio 20.
Pricing and Upgrade Path: FL Studio has 4 basic tiers to choose from. The Fruity edition, at $99, is the basic sequencer and loop creator, it leaves out any audio arrangement or manipulation features and is primarily meant for loop or sample makers, giving them a limited but creative space with all major FX plugins and generators.
The $199 Producer edition unlocks all audio and time manipulation features, making it a fully functional DAW, but misses out on most of the major synths made by IL. The Signature bundle is $299 and adds some plugins like the NewTone pitch and time editor. And finally, there’s the Everything bundle, at a whopping $899, includes a huge amount of content, all of ILs additional plugins like the Harmor additive synth, Sakura string modeled synth, Toxic Biohazard FM/subtractive synth, and video player support too. While these prices may seem a tad higher, FL is one of the few DAWs to offer lifetime updates. This means it’s essentially a one time buy for ALL of FLs future updates. Makes this quite a good value for money DAW, I must say.
My Review: At the outset, let’s talk about some fundamental differences between FL Studio and most other DAWs. Every sample, audio clip, or VST instrument within FL is independent of the mixer, with the routing of channels to the mixer completely in the hands of the user. FLs interface can also feel a bit disorienting to traditional DAW users who may be used to seeing all the information upfront in a console-like fashion, but it is heavily conducive to loop-based production and making big, musical transitions like build-ups or drops.
The stock sample packs include some very usable sounds and the sampler wrapper is quite comprehensive, allowing you to make precise changes to the loaded samples in one interface. Dragging and dropping samples from the file browser is super intuitive to create custom drum kits and sounds.
The piano roll in FL is hands-down one of the best implementations out there. It is so fluid and seamless, with no annoying double-click maneuvers, with the brush tool being my favorite to edit and paint large swathes of midi information. Image line has also updated a quirk with the plugin delay compensation which has significantly improved performance and overall the interface looks better than ever, with a video-game aesthetic that is inspiring and makes the process a lot more fun.
The built-in FX plugins in FL are also a joy to use. Grossbeat is one of my favorites to make crazy tape-like effects and pitch variations on samples and instruments, with total visual feedback. Pitcher is an automated pitch correction plugin akin to Auto-Tune whereas the NewTone pitch editor gives you more granular control over the vocals. Drumpad is a drum modeling synth available with a ton of presets that act as great starting points for synthesizing unique sounds with its elder brother Drumaxx being a paid upgrade.
The arrangement and timeline view, called the Playlist, is not directly visible unless summoned by pressing the F5 button. Patterns and audio clips are arranged here, and since FL studio does not have VCA style tracks as such, even automation is done through clips, which behave just like patterns in the playlist. Ditching the console oriented workflow allows full control over parameters through these automation clips, allowing you to create long FX sweeps and filter movements. It also makes the playlist very modular, with entire sections of patterns, audio clips, and automation clips freely movable.
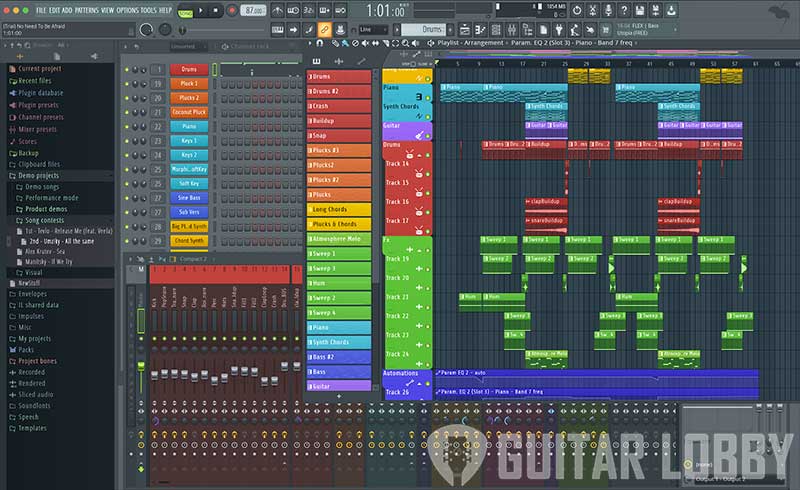
FL Studio’s layout – Channels, Playlist and the Mixer (from a demo project):
Key Features:
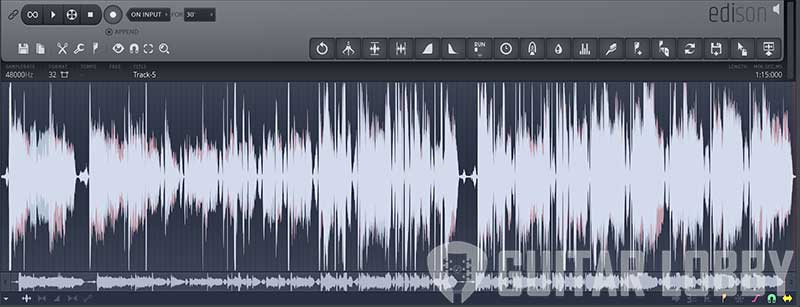
Edison: Edison is the built-in audio recorder and editor in FL Studio. It also serves as an audio analysis and cleanup tool. It’s not suited for longer recordings but more for editing vocal clips or samples. Edison can auto-slice the sample, add fades, de-noise, and de-click samples, add reverb, or can perform complicated tasks like cleaning up the audio, time and tempo stretching, or pitch-manipulation.
The spectrum view provides some additional detail for audio analysis and the tune loop tool can help you clean up loops by setting correct markers and fades. The Claw machine tool eliminates certain sections of the audio to create really interesting effects.
Patcher: Similar to Max for Live in Ableton, Patcher in FL Studio puts all the tools and plugins at your disposal to create custom signal paths for audio and MIDI information. Creating performance patches, automating FXs, or parts for other projects is possible through Patcher.
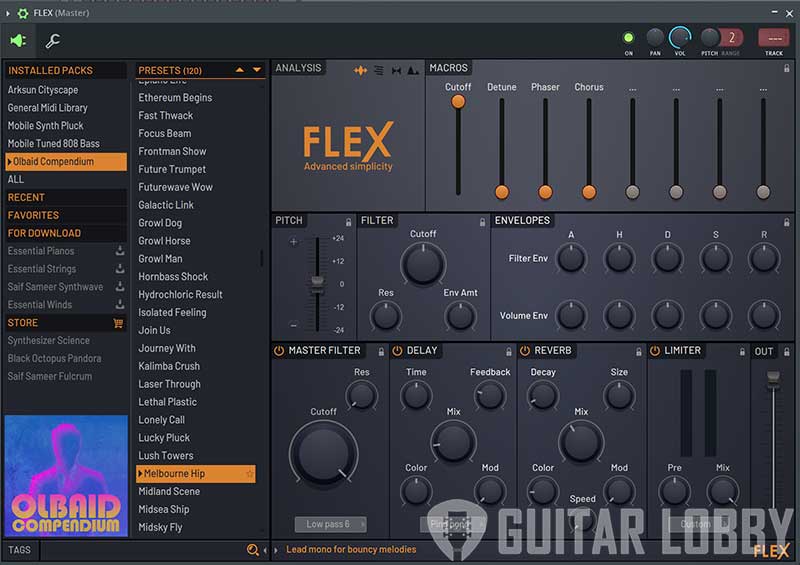
FLEX: FLEX is a combination of many different synths, combined into one user-friendly package. The synthesis engine in FLEX can perform additive, subtractive, FM/AM, wavetable, and even multisample synthesis The presets in FLEX are designed by popular electronic artists curated by Image-Line.
It comes with a complete suite of FX parameters like Pitch control, ADSR, Delay, Reverb, a Limiter, and 8 parameters called macros, to alter specific characteristics of the sound like crunch and wobble. I found it really easy to get unique and tailored sounds quickly. It’s a superb addition to FL studio.
Bottom Line: Is It For You? I strongly recommend FL studio if you’re someone who loves producing electronic music and needs fast, efficient, and rewarding workflows to get work done. FL Studio is gamified to a certain extent, no doubt, which can put off users of other DAWs but it is a very inspiring workflow nonetheless. FL has its own sound, which has found a lot of success with people like Avicii, Deadmau5, and Martin Garrix. If you’re planning to do other work though, like recording and overdubbing style production then it’s not the best but it does get the job done. Either way, FL Studio has really made a mark as one of the most unique and popular DAWs in the music scene.
8. Reason Studios Reason 12 (Formerly Propellerhead): The King of Synthesis
Overview: Towards the beginning of this article, I mentioned how certain DAWs are focused on the synthesis and making new sounds or effects. Reason Studios’ Reason 11 (earlier known as Propellerhead Reason) is a DAW from Sweden that’s been around since 2000. Featuring some of the best sounding rack module emulations for the time, Reason was built from the ground-up to suit the synthesis based workflow many trance and house producers prefer, but still keeping it real in terms of visuals, making sure that the rack units within the DAW look authentic and tactile.
Even today, the synthesis potential of Reason is famous among users of other DAWs as well, and with Reason always being a favorite of producers to ReWire into other DAWs, Reason Studios has decided to give this feature native support in version 11 and make all the rich sounds and synthesis mechanics available to everyone as a VST3 plugin, with support for Apple’s AU standard. Let’s take a look at Reason 11 and the Reason Rack plugin.
Pricing and Upgrade Path: Reason 11 starts at $99 with the intro package, which includes 11 synth modules or instruments including the popular Europa shapeshifting synthesizer, 11 effects, up to 16 usable audio tracks and 3GB of samples, which makes this a great deal as you get the Reason Rack plugin with it as well. Quite a cheap option to get 11 new synths and a ton of effects to use in your regular DAW. The $399 standard version comes with a lot more instruments and effects and all features within the DAW.
The $599 suite version includes a lot of content and dedicated plugins for multi-sampled instruments like acoustic drum kits and string sections. Advanced synths like Parsec 2 spectral synth and the surreal sounding Scenic hybrid instrument. Now all of the synths within Reason are sold separately, but if you’re planning to add some new sounds to your existing setup I’d recommend getting the Intro package.
My Review: Let’s get this out of the way first – Reason is purpose-built for synthesis, and not much else. While it’s a fully-featured DAW, opening it for the first time makes it clear what the folks at Reason Studios are trying to do with version 11. Prioritizing sound and synthesis, and putting workflow on the backburner. For users of other DAWs, Reason can seem like quite a head-scratcher at first. But the more you dive in, the more you are amazed at how detailed all the instruments really are, and how good they sound.
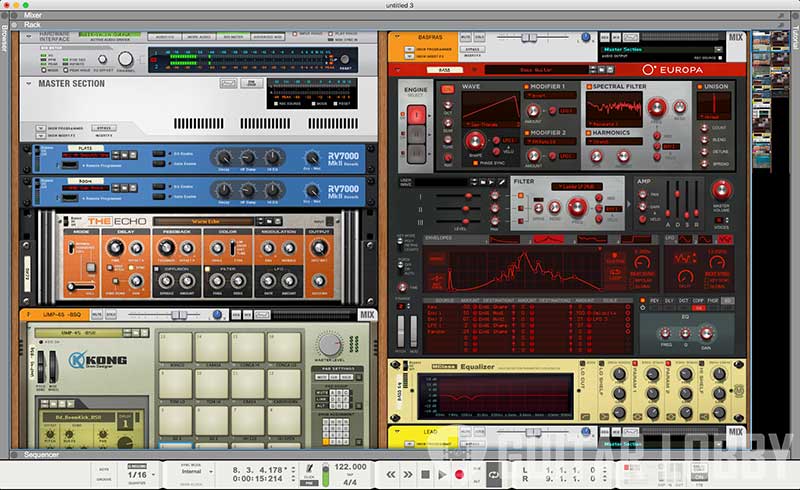
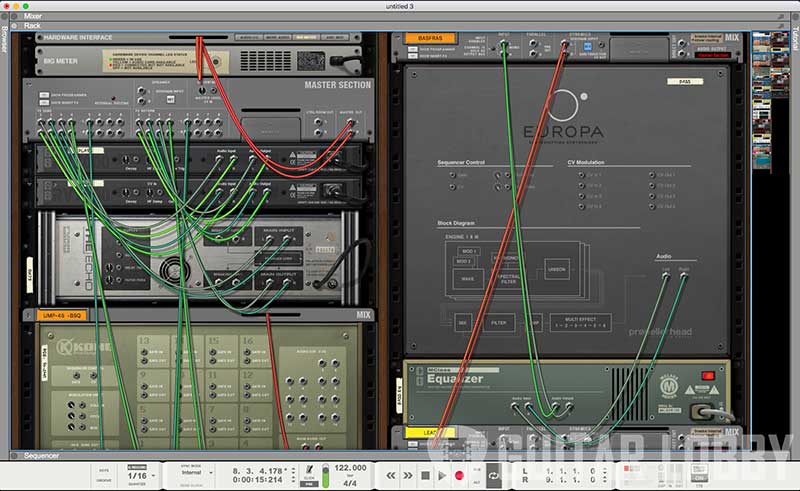
The GUI mimics a studio FX rack, and you can drag and drop synths on to the rack from the browser on the left, which seemed barebones to me at first, but it’s highly efficient. You’ll find all the transport controls at the bottom and a tutorial window to the right, quite handy. The main section of the GUI is divided into 3 spaces – a console-emulating mixer window at the top, followed by the main rack section and a sequencer/ editor at the bottom.
The rack is where all the magic happens, you can press Tab (or Toggle Rack) to access the rear section where the signal path can be designed via a series of cables that can be dragged and attached to different inputs on the devices.
Now while this whole process feels really intuitive, it’s not for everyone. Particularly for folks whose projects involve more than 20 or so tracks, the rack can become huge, and making basic changes in the devices becomes really complicated. But for folks who are used to physical synth devices and cables, it feels like second nature.
The sounds, however, are a totally different story. Using the relatively simple sequencer, I was able to get workable sounds within minutes. The devices are also quite complex in their operation but feel really easy to tweak and manipulate thanks to their skeuomorphic aesthetic.
Key Features:
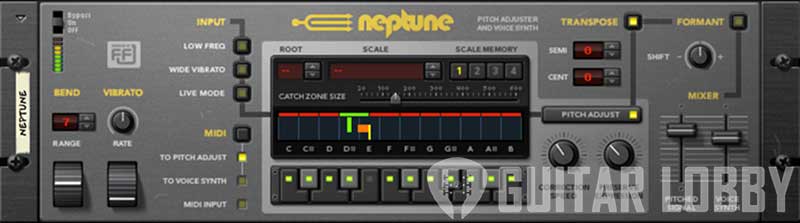
Neptune Vocal Tuner and Synth: The Neptune combines a sophisticated vocal tuner and pitch adjuster with formant control. This device can tune vocals, and allow you to either correct or reharmonize the pitch of live audio in realtime with a midi keyboard (like Jacob Collier).
The formant controls on the Neptune are designed for extreme results which allows you to get creative with vocal samples or tracks. The preserve expression knob helps to tone down some of the artifacts generated due to extreme vocal settings allowing for that classic autotune effect but with more nuance.
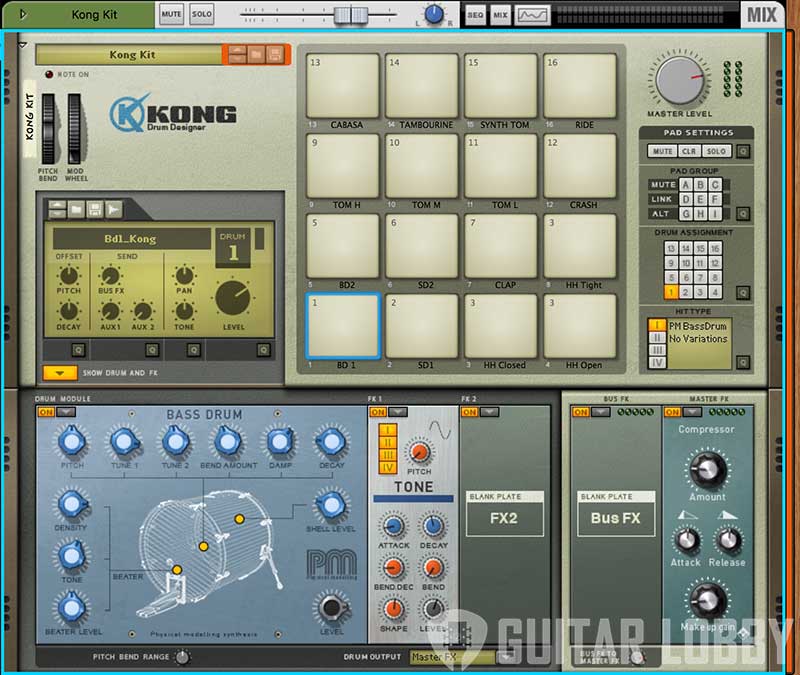
Kong Drum Designer: The Kong Drum Designer is essentially a drum synth, multi-sampler, and a pad controller all rolled into one. The various modules allow extreme customization over the sound source, from a physically modeled kick drum to chopped up loops, to a nano-sampler that works with one sample per pad. The built-in FX rack has a full set of FX, including a handy transient shaper, and a unique effect called rattler which adds very subtle analog characteristics to samples.
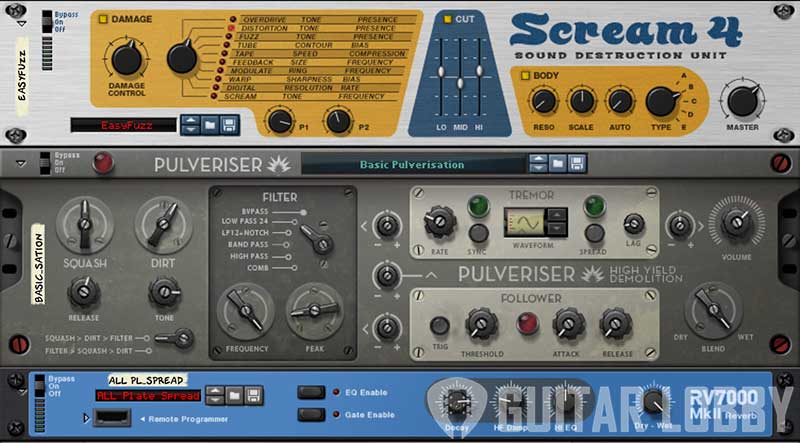
FX Plugins: Reason offers some powerful FX units like the Scream – 4 multi-FX unit, which includes tape effects as well, the pulverizer distortion and sound shaper for extreme effects, and The Echo delay unit with its unique diffusion controls for more subtle delay effects.
The Reason Rack also includes their high-quality channel EQ and compressor from their mixer and a new master bus compressor as separate units. Also included are MIDI FX, like a pattern sequencer, a dedicated polyphonic sequencer called Polystep, and an algorithmic drum pattern generator called Beat Map.
Bottom Line: Is It For You? Reason has always had a small dedicated audience, due to the fact that it’s so purpose-built. That being said, Reason 11 is a great option for synthesis enthusiasts looking to find a software alternative that sounds just like the real thing. But the fact remains, that it’s a little underwhelming as an audio production environment.
Reason Rack, however, is a must-buy, due to its strong selection of sounds, instruments, and FX, and the fact it comes bundled with the DAW is another positive. While it definitely is not for everyone, Reason continues to exist and evolve in the shadows as one of the best sounding synthesis-oriented DAWs ever.
9. Bitwig Studio 4
Overview: Bitwig Studio 3, in my humble opinion, is what you’ll get if you crossed a DAW with Lego bricks. The amount of customization and possibilities on this DAW is practically endless. While most DAWs on this list is at least a decade old, Bitwig Studio is relatively young at 5 years, but the workflow innovation in this DAW is tremendous, especially for synthesis enthusiasts and sound designers.
Bitwig was designed by some of the programmers behind Ableton Live, and the influence is obvious with some shared workflow features and terminology. But that’s probably where the similarities end, as Bitwig studio is really big on modularity. Combining some of the best features of different DAWs, the newest update also brings a completely modular workspace called the Grid. With that in mind, let’s take a look at the youngest gun on the block, Bitwig Studio.
Pricing and Upgrade Path: Bitwig has a slightly different pricing strategy from other brands, the base version called Bitwig 16-track, limits the number of audio tracks to 16, with only 2 effects and group tracks each, and up to 8 scenes. VST plugins are supported in both versions but sidechaining and multi-out come only to the standard version. 16-Track also doesn’t get The Grid editor, and Phase-4 synthesizer but includes most of the instruments, effects, and modulators. Audio export is also limited to 16-bit only which tells me 16-track is more tailored towards sound designers and sample makers.
16-track comes in at EUR 99 which is quite reasonable for the feature set when compared to the competition. The standard version of Bitwig Studio (and there’s only one) comes in at EUR 399 with a summer sale offering an additional EUR 100 off at the time of writing. Bitwig offers 12-month plans for upgrades, with any and all upgrades during the plan’s validity being included.
It’s not a subscription model though, so you can still retain the license after the plan expires but you might have to shell out EUR 49 for the 16-track version and EUR 149 for the standard version for any future updates. Bitwig has been quite steady with its rollout of updates and fixes so keeping that plan active might be a good idea if this is to be your primary DAW.
My Review: Coming back to that Lego bricks reference, that’s exactly the feeling you get when opening Bitwig because the focus on modularity is immediately apparent. With brightly colored tracks and modular components, the GUI looks quite refreshing. The interface is divided into 4 major zones, a timeline-based arrange to view in the center, a file browser on the right, a channel strip or file inspector on the left, and an Ableton-like plugin device panel at the bottom, that can switch for the detail editor for finer audio edits or an automation editor.
A control panel at the very bottom allows you to customize your setup. The workflow can be switched from clip launcher grid view to trigger clips, or an arranger timeline or both can be used in tandem. This view also has a few tricks up its sleeve, like the ability to quickly set up fades in audio files by dragging in from the edge beneath the filename.
The control panel features behave quite similarly to Ableton Live, clicking any ‘+’ button launches a browser that lets you add devices, directly launch presets, samples, plugins, FX, or any other files or media, and is quite hands-on. Any effect in the device panel can be used with over 100 modulation sources that can alter any parameters. For example, you could have an LFO modulating a band on the EQ, at the click of a button.
You can add as many modulators as you want, to any effect, and any plugin and watch the magic – it is quite intuitive. The mix window is basically like a performance console, with scenes laid out at the top, followed by track FX and the Device panel at the bottom allowing you full access to your set on one screen.
Creating tracks with lush sounds within Bitwig is a breeze, the only thing I find a little time consuming is the piano roll, which has a lot of absent features. But the overall tweaky-ness of all the parameters really help create some unique sounds. As far as all the devices and some of the more obscure modulators available, I’m sure folks deep into synthesis technology may find a use for them but for most general use cases, they’re more than adequate.
Key Features:
Device Nesting: A key feature in Bitwig is the ability to nest different devices into one another. A device can either be a chain of FX, or instruments, or both, and the ability to combine those into one device and add it to another chain is brilliant. Instead of having to deal with groups, the devices itself become completely modular. Bitwig also comes with Multidimensional Polyphonic Expression or MPE, which has increased MIDI response with more detail, making it compatible with devices like the Roli Seaboard.
The Grid: Introduced in version 3, the Grid is essentially a sound design environment, similar to Max for Live in Ableton. You’re given a sandbox and all the tools, like delays, LFO, and even mathematical logic elements for complex sound design. Poly grid allows you to create custom instruments or synths, and the FX grid is geared towards custom effects. There are basically no limits to how complex your internal routing can get. Different types of signals can be sent between the ports. Bitwig has managed to make a very complex and powerful system accessible with a few clicks.
Plugin sandboxing and modulators: Bitwig Studio can improve the stability of your projects by using Plugin sandboxing, which isolates every plugin or fx in the chain from interfering with anything else in the software. So if one of your plugins fails, it won’t crash the whole project. This feature is a big plus for live artists.
Bottom Line: Is It For You? I recommend Bitwig to sound designers and electronica artists who are looking for an alternative to either Ableton or FL studio, or just want a new environment to be creative with. You might almost never find this DAW outside the electronic music space, however, that being said, Bitwig Studio is stupidly powerful and while its best-of-all-worlds may not appeal to some users, folks just venturing into audio production will love its intuitiveness and the beautiful animations with which it shows signal paths and modulations. And experienced users and sound designers will appreciate the powerful tools that Bitwig has managed to make so easy to use.
The Best Free DAWs
While the following DAWs are free-to-use, they are jam-packed with features and ideal for beginners and hobbyists to try. And some of them are fully-featured with no limitations on creativity. Some of them like Audacity also have some tricks up their sleeve. Read on to find out more:
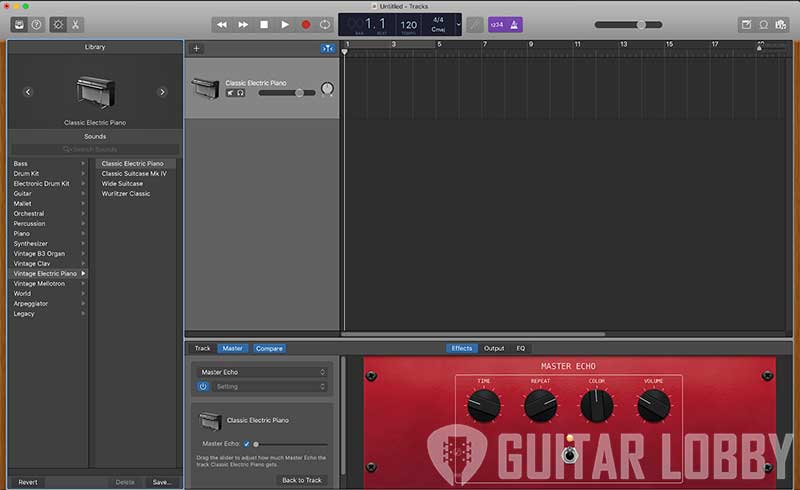
10. Apple Garageband (Best Free DAW for Mac)
Overview: For casual users, their first experience with an audio production environment, more often than not, is Garageband. Available on macOS and iOS devices, it’s on the iPad that Garageband really comes into its own. While Logic Pro may have finally gotten Live Loops in its latest update, this feature has been in Garageband for quite a while. And don’t get me wrong, it is not a toy by any means.
Garageband is a highly capable piece of software catered towards beginners and focuses on having fun while making music. It borrows all the same DSP technology from its elder sibling Logic Pro X while being fun and intuitive tool for beginners. In fact, some advanced synths like alchemy also feature heavily on the DAW. While on the surface it may seem restrictive, the options to arrange and produce songs are quite diverse.
On iOS devices, Garageband offers tracking vocals using the built-in microphone while providing FX while recording. Quite handy for quickly recording some vocals with reverb. For professional audio producers and musicians, Garageband is a great way to ideate material on-the-go and conveniently integrates with Logic Pro X where these sessions can be converted into full-fledged tracks while maintaining similar workflows.
Garageband also integrates with Logic Remote on the iPad or iPhone so using all those features like remix FX and triggering live loops becomes a breeze. And it’s totally free. Nuff Said.
Garageband’s interface is stripped down but otherwise identical to its sibling Logic Pro X:
Overall, I would say this is the best free DAW for MAc.
11. Audacity (Best Free Daw for Windows)
Overview: When you think about DAWs, their main utility is often the creation of new material like songs, background scores, and the like. But audio software is often used for other tasks, like on-field recording, making podcasts, and digitizing old tapes and LPs. Audacity is a free, open-source and easy to use the tool, with powerful audio manipulation features that are designed as an alternative to a full DAW for these particular tasks.
Getting started in Audacity is really easy, once installed you’re greeted with a bare-bones but functional interface. The ability to quickly change sound sources like mics and interfaces from the drop-down box below the transport controls is really handy. The clear focus of Audacity is sound editing and manipulation, so you won’t find the usual sample packs, plugins and effects, or even a MIDI sequencer for that matter. But it does contain a large number of plugins for audio manipulation.
You can clean up the audio by removing clicks and pops, add compression, distortion, filters or echo, or perform noise reduction and normalization. Audacity also comes with a full suite of spectral analysis tools to help you fix some harder to find issues in the audio. It even has a sound finder plugin that can detect and label events in the audio, to help with managing long audio files. Audacity has another cool little trick up its sleeve, with its vocal isolation function. With the way modern vocals are mixed, you can use it on any stereo track to isolate the vocal out of your favorite songs to sample or use them otherwise.
Audacity is built from the ground up to cater to audio enthusiasts who enjoy listening to the world as much as looking at it. While not a DAW in the traditional sense, it does the job of recording and arranging audio in a fast and fluid manner and its ability to clean up audio sources is as good as any professional solution.
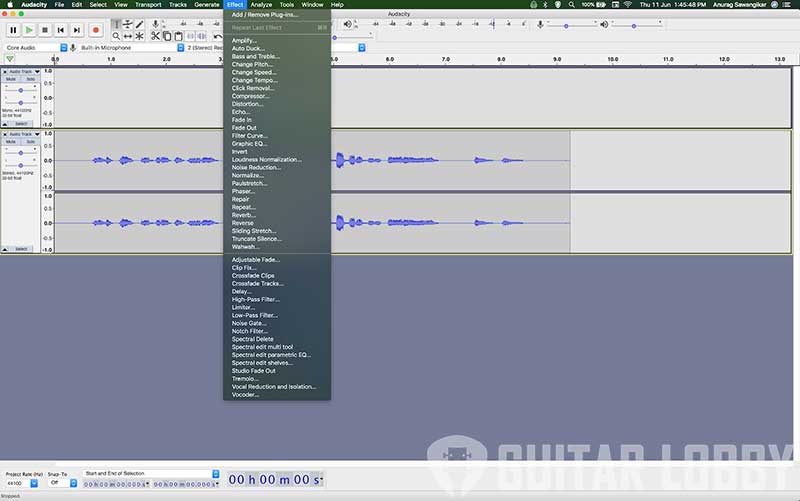
You can see and appreciate Audacity’s extensive effects menu in this snapshot:
Overall, I would say this is the best free DAW for Windows.
12. Cakewalk by BandLab
Overview: A famous music Youtuber once said, “Rock music is not pop anymore, and that’s a good thing” referring to how sometimes when things get too popular, commercial interests can dilute the original message or values. That sort of thing happened to Cakewalk’s SONAR, a DAW with a long history and heritage, and a limited but loyal fanbase. Their parent company Gibson decided to reprice and re-strategize the launch of SONAR Platinum back in 2016 which alienated long time users of SONAR.
In 2017, they decided to cease development on this platform until in 2018 it was acquired by BandLab and rechristened to Cakewalk. BandLab also went ahead and made the software free-to-use although only on Windows and integrated its social media and collaboration platform into Cakewalk.
Cakewalk is a fully-featured DAW with almost everything you need, including sounds, plugins, FX, and a mostly traditional workflow and GUI with some modern elements, although its readability and textures seem a tad out of date. It is basically SONAR and its audio processing engine and interfaces under the hood, which is great because SONAR has been a favorite of industry professionals for a long time.
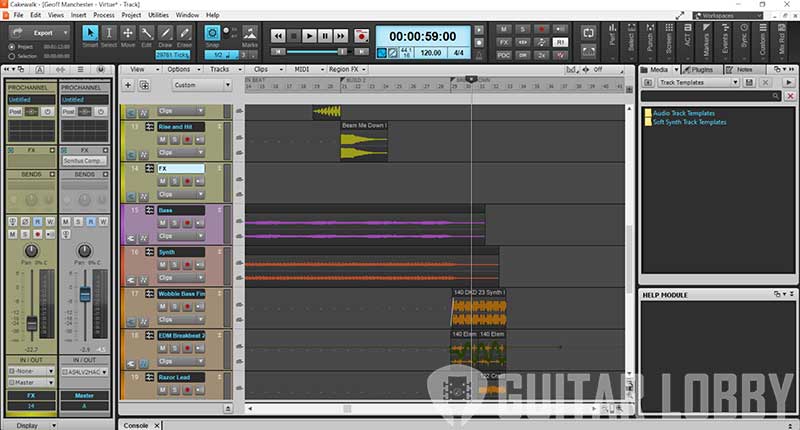
The mixer window reflects a mixing console, with the pro channel handling channel strips functions like an EQ, compressor, tube effect, and console emulation. These built-in effects can save some valuable CPU if needed. The built-in plugin suite courtesy of Sonitus is quite decent even if they look slightly dated. The timeline view displays tracks that can handle either audio or MIDI, whereas instrument tracks can handle a combination of both. For audio tracks, you also get features like take comping/folders which is really convenient. FX processing can also be performed on individual clips, but these will be destructive edits.
Overall, Cakewalk is a great free option for people just exploring how to record themselves and collaborate with others thanks to Bandlabs’ integration. However, underneath it is a fully functional DAW that can scale up to accommodate large projects if need be.
How to Choose the Right DAW (Buying Guide)
Buying a DAW is more than just a buying decision. You will be committing to its ecosystem for quite some time, and there are quite a few factors that you should consider. With so many developers vying for your attention, we are listing below are some of the things to keep in mind before going in for a DAW.
Operating System And Hardware
Most DAWs are compatible with either one or both of the two most widely used Operating Systems: macOS and Windows. Some DAWs were originally built to work only on one system such as Logic Pro X that became proprietary for MacOS and FL Studio for Windows. Since switching to a whole new platform for a DAW may be quite a giant leap for most people, it’s a good idea to factor in your preferred OS when making a buying decision.
In the early years, MacOS had a better built-in audio driver vis a vis Windows, which is why it caught the fancy of early DAW developers that found it to be a more conducive system to create their software on. However, the game changed with the launch of ASIO low-latency drivers for Windows. This standard was one of the things that helped pave the way, and now you find most DAWs like Pro Tools, FL Studio and Ableton function equally well on Windows.
For Linux users, you’ll find that certain popular DAWs have Linux-compatible versions, such as Audacity and Bitwig. This OS also has another proprietary, open-source DAWs as well such as LMMS, Rosegarden, and Mixxx.
Every OS comes with its own performance overhead, so it’s important to pay attention to minimum requirements for different DAWs to make sure your computer has enough processing power to run them efficiently.
Production Goals
Another crucial thing that can dictate which DAW is best for you is what you intend to do with it, and what style of music you primarily want to compose or explore. It’s true that innovation in recent years has made it possible for most DAWs to pretty much perform every recording and production task in the book.
However, most DAWs are created with a certain approach in mind that makes it easy to compose some genres and do some tasks on it more easily than others. For example, Studio One 4 is chock-full of features such as Chord Track and Harmonic Editing that help songwriters easily make changes in a song’s chord structure. These are valuable features that make this DAW very appealing to songwriters and bedroom producers.
In contrast, Ableton Live is replete with features that are created specifically keeping Beatmakers in mind. So it’s a good idea to not fight against the tide, and go for a DAW whose workflow is naturally geared towards the style of music you’ll mostly be using it for.
Your Budget
Here’s a simple but important tip – it’s not always necessary to straight away buy the most expensive, or the full-blown version of a DAW. Most DAWs are available in usually three different versions, 1) A free or low priced beginner version 2) A standard, mid-priced version and 3) A full-feature suite that’s the most expensive. Each of these versions is priced differently depending on the features they offer.
For example, Ableton Live is available in three versions: Intro (Free), Standard (Mid-priced), and Suite (Full feature). For most beatmakers looking to create and record tracks, the Standard version allows plenty of features and access to plugins for a musician to record their tracks, all for a much lesser cost than the full version.
Moreover, you can always upgrade to the full feature version whenever you feel you’re ready for it. In fact, some DAWs like Reaper also lets users access their full version on a 60-day trial, before asking them to purchase it – this helps in knowing exactly what you’ll be paying for. But buying the most expensive version of a DAW upfront may well burn a hole in your pocket, especially if you’re on a budget.
*Pro Tip: Some major DAWs like Reaper, Pro Tools, Bitwig offer their interfaces to music students at subsidized pricing. So, if you’re a student of audio engineering or any discipline of music, you can apply for an educational discount.
Beginner or Professional
It’s important to do a self-assessment and see how deeply you will be working with your DAW, and whether you will be using it as an enthusiast or a professional. While some DAWs like Garageband and Cakewalk are designed to keep hobbyists and beginners in mind, others are crafted to provide full support to professional musicians and composers that are working in demanding environments.
DAWs designed for beginners are cheaper or may even be available for free. However, they may have a limited set of plugins, effects, and features that will help you explore and put down your musical ideas, but will not work in a full-blown commercial project that requires tonnes of tracks, instruments, and plugins.
On the other hand, other full-fledged professional DAWs like Pro Tools are more expensive and are built to accommodate heavy collaborations and professional composing, scoring, and audio editing.
Plugin Compatibility
Simply put, plugins are virtual forms of real instruments like the keys, guitars, drums, or digital versions of effects like reverb, delay, EQ, and compression. Plugins are fascinating bits of software that often emulate the real thing to near-perfection, bringing the sounds of expensive, magnificent analog equipment within the reach of countless composers and producers.
Plugins are available in different formats such as VST, AU, RTAS, and AAX, and all plugin formats may or may not be compatible with every DAW. This is why it’s important to ensure that your to-be DAW will be compatible with your preferred Plugin formats.
For example, the VST standard for plug-ins was originally developed in 1996 by Steinberg initially for Cubase, but is now compatible and used across all DAWs. On the other hand, the AU or Audio Unit format is native to and designed by Apple for the macOS. This is why AU plug-ins will only work with DAWs that can function on macOS.
How To Pick A DAW Based On Your Production Goals
Your production goals and preferred genres can play a major role in narrowing down the right DAW for you. This is because Each DAW has a somewhat different workflow, which makes them more suited for producing some genres and tasks than others.
Songwriter Approach
For singers and songwriters, the ability to ideate and arrange freely on a time-line is essential. This kind of arrangement is called a linear arrangement and is the traditional approach to making DAW software. Songwriters are spoilt for choice with almost every DAW having a timeline or playlist view to arrange different clips or tracks in. What songwriters do need are good samples, loops, and virtual instruments to jam with and write parts and good sounding effects to achieve their goals. DAWs like Pro Tools, Logic Pro X, and Cubase 10.5 are great choices for this as they come with large sound libraries.
Beat Making Approach
In the world of Hip-Hop, samplers and drum machines are often used to create unique sounding beats and grooves. The Roland TR-808, for example, is one drum machine that is used on almost every hip-hop record. Popular grooves like the Amen Break and Funky Drummer are also sampled to make new beats for rap music. DAWs like Ableton Live and FL studio is quite popular with producers of Hip-Hop and Rap.
Synthesis-based Approach
In the world of EDM, genres such as trance, house, future bass are a mainstay these days and sound design and synthesis are crucial to their uniqueness. Synthesis is the ability to create sounds from scratch using oscillators ( sound sources) and modulating them to get the desired effect. The reason was one of the first DAWs to introduce a rack-mounted style synthesis workflow. But modern DAWs all mostly contain synthesizers and synthesis environments to a certain degree, but Bitwig Studio, Ableton Live, and FL Studio are popular tools.
Audio Recording and Programming, Mixing, Mastering
These 3 functions are the main stages of taking a song from an idea to a finished product. Programming refers to the process of using MIDI-based instruments in a track, and over-dubbing is the process of layering audio tracks to create the final performance. Both these activities are mainly how songs are constructed in a studio. DAWs were originally built to facilitate recording off an analog console which is why you’ll often find console-like features and aesthetics in most of them.
Dubbing, Sound Design and Background Scoring
With regards to audio production in Film, Movies, and TV, there are 3 major processes that go on behind the scenes. Sound Design involves both foley work like replicating sounds in the real world, like explosions, gunshots, ambient noises like people talking; and synthesis which is creating unique effects for things like transforming robots (*wink*).
Dubbing is the process of re-recording all the dialogue in the sequence by getting the actors into a studio to replicate their lines with clear audio. And background scoring refers to adding music to a scene to enhance the mood and vibe or add drama and tension. Most popular DAWs feature components to cater to these scenarios however in a bigger setup or for collaborative workloads, DAWs like Pro Tools or Cubase might be preferred.
Composing and Scoring
When composing music for film or for an orchestra, MIDI-based features in DAWs can come really handy. Many DAWs include score editors that transform MIDI information to readable staff notation that can be split and organized by section or instrument. Many popular DAW developers will also have dedicated score editors with additional features that work by themselves or in conjunction with their flagship product.
Which DAW Version Do I Need?
Most of the Major DAWs offer 2 or 3 versions of the same software, with each version offering a certain level of features. It’s a good idea to check which features each version offers you, and compare them against your needs as well as the price. The usual limitation is the number of tracks that can be processed. Do note that the terminology for the three different versions may differ among developers, but the extent of functionality each category offers may stay more or less the same.
Of course, there are exceptions like Logic Pro X that only offers its fully-featured version at a flat price. However, let’s discuss the most commonly found versions of DAWs that you’re likely to come across:
Free DAWs
There are a few DAWs that offer their full-featured software free of cost to users. Some notable examples are Garageband for macOS and iOS users, and Cakewalk by BandLab. With easy to navigate interfaces and user-friendly features, they’re a good way for music enthusiasts to explore composing and recording.
However, do note that most of these DAWs are geared towards beginners or hobbyists. Professional musicians and producers looking to compose more extensively may find their features limiting and not versatile enough. Also, customer support for these DAWs is often limited so you’ll have to go to their forums for any additional clarifications.
Basic and Limited Version
This is the most restricted or bare-bones version offered by DAWs, and as a result, the most affordable version as well. The limitations imposed may range from the number of tracks, plug-ins, effects, to the editing features available to you. These versions also often ship with other pieces of gear like MIDI controllers or keyboards.
For example, the basic version of Studio One 4 is called ‘Prime’ and offers limited recording and editing features to the user. Nonetheless, these basic versions are still a good way to acquaint yourself with the overall ecosystem of the DAW and to see if its workflow and interface works well for you.
Standard Version
The standard version of a DAW unlocks all of the DAWs structure and functionality but holds back on offering the full extent of plug-ins and effects available. This version of the DAW is definitely priced higher than the basic version but is still cheaper than the Flagship version.
This version offered by most DAWs is quite replete with features, effects, and plug-ins that work well for most working musicians who need versatility but can do without highly advanced tools. For example, the standard version of Studio One 4 is called ‘Artist’ which offers a wide variety of features, sounds, and effects for working musicians at an affordable price.
Keeping this in mind, this version of a DAW is often really good value for money for most producers and musicians, striking a good balance between functionality and affordability.
Flagship Versions
The Flagship version is the most advanced version of the DAW that offers all the features as well as audio tools, effects, and plug-ins that are particularly useful for professional musicians, composers, producers, and studios. This version is usually the most expensive one, simply because it gives you full access to everything that the DAW is capable of.
Going back to our Studio One 4 example, it’s Flagship version (called ‘Professional’) throws open a veritable goldmine of features like Harmonic Editing, multi-FX, native support for 3rd party sample formats, an integrated mastering suite, and lots more.
Some DAWs go a step further and offer similar but slightly different options of their Flagship version to choose from. Basically, they perform minor tweaks in their flagship version by adding/subtracting features and effects that are geared towards different types of producers and musicians.
Updates, Upgrades, and Crossgrades: What Is The Difference?
As a musician, you may have heard the terms ‘updates, upgrades, and crossgrades being used by fellow producers, reviewers, and elsewhere on the web. If you don’t know what each term means, it’s easy to get confused:
Updates
Let me explain this with an example. Apple recently released Logic Pro 10.5, the latest update of the DAW. When Logic Pro moves from 10.4 to 10.5, this is called a minor point update. These updates could either be incremental in nature by including bug fixes, new effects, plug-ins, and sounds. But sometimes, (like in the case of Logic Pro 10.5) it may also mean an entire redesign of the interface itself. When, however, Apple decides to release Logic Pro 11, that would be called a major point update.
While some DAWs, like Logic Pro X, offer minor point updates free of cost and charge only for major point updates. However, some may charge the user for minor point updates as well, as Cubase did for their 10.5 updates. It’s important to do research and check the pricing strategy of DAWs so you pick one that suits your budget and gives you value for money.
Upgrades
Remember the basic, standard, and flagship versions we talked about in the previous section? When you move from a limited version of a DAW to one that unlocks more features, that’s called making an upgrade. For example, if you shift from the Artist version of Studio One 4 to the Professional version, that would mean you’re making an upgrade.
Upgrades for a DAW will, of course, mean shelling out more money since the upgraded version will give you unrestricted use to previously inaccessible features, effects, plug-ins, and more.
Crossgrade
A crossgrade is a special discount or offers that a DAW developer offers if you want to shift from your existing competing DAW to theirs. For example, if you already own a DAW called ABC and want to try your hand at working with XYZ, you can contact XYZ, prove your ownership of ABC, and the makers of XYZ will offer you a crossgrade discount on their DAW. This can be quite helpful for musicians that are looking to experiment with different DAWs without burning a hole in their pocket.
Frequently Asked Questions About DAWs
I have the software, what else do I need to get started?
All right! Once you’ve made a decision about your favorite software, you’ll need a few more things to start recording yourself – a microphone, cables, and an audio interface.
An audio interface is a device that converts the analog signal from your microphone or electric guitar, into a digital signal via a process called AD-DA conversion. The mic or guitar will plug into a pre-amplifier or preamp that will boost the weak incoming signals to line-level signals which the computer can then process after the digital conversion.
Most interfaces available today can range from 1-channel to 8-channels of preamps, while some higher-end ones will feature more. For beginners and musicians, anywhere from 2 to 8 channels is adequate but professional recording studios can have 100s of inputs for recording anything up to a whole ensemble. Interfaces are powered by onboard USB or may have dedicated power supplies depending on the model. Some interfaces even have dedicated JFET Direct Inputs for signal clarity on high output instruments such as electric guitars and synths.
While for most people preamp quality is a non-issue as even basic recording gear can produce great results, it’s a good idea to do your research before getting an audio interface. Popular brands like Avid, PreSonus, Focusrite, Audient, Apogee, and MOTU manufacture a variety of audio interfaces to suit every need.
Without getting too technical, a good way to look at preamp quality is to check for two things – dynamic range and mic gain. The higher these numbers are, generally the more “headroom” you will get with your audio signal. More dynamic range will help in recording signals that are either too loud or too soft. A higher mic gain can allow you to amplify the source signal for more clarity and without any audible distortion or clipping.
I Don’t Have an Interface. Can I Still Record My Podcast?
Most people who only need a high-quality microphone for either producing podcasts or streaming games can go for a USB condenser microphone. These microphones have the same diaphragm and components as their traditional counterparts but also house a pre-amp and an AD-DA converter. USB mics are mostly plug-and-play and a great way to record at home without having to invest in interfaces or cables.
How Do you Fix Latency?
One of the first things to keep in mind while recording yourself is latency. This is the time it takes for a signal to be converted by the audio interface, processed by the DAW, and then reconverted by the interface before making its way to your speakers or headphones. This creates a jarring effect and prevents you from recording/performing in time with the music as you are not able to hear yourself in real-time.
It is always a good idea to check your DAW preferences for a parameter called buffer size, which may help you control or reduce latency. This will also affect your CPU usage so keep that in mind. Many DAWs also have some form of plugin delay compensation or a low latency mode that reduces the latency to a bare minimum but also disables some of the effect plugins to save CPU power.
For Windows users, having a good audio driver can also reduce the latency significantly. If you face any audio issues try and check if you have an ASIO-compatible driver installed.
Where Can I Find More Sounds for my DAW?
While most of the DAWs mentioned above will have a large library of sounds shipped with the software itself, over time you might want to explore more of what’s out there. A good way is to install 3rd-party plugins and sample libraries. External sounds come in a few formats.
Sample packs are curated sets of genre-specific kick, snare and other drum sounds, pre-processed samples of popular bass sounds like the 808, and other looped sounds like acoustic guitars or acoustic drum breaks. Often, these are entire song project files, deconstructed and sold as packs for immediate use in your projects. A lot of popular electronic and hip hop artists also sell their signature sample-packs.
Sample libraries are detailed software versions of an instrument or instruments. Most of them are richly detailed copies of famous instruments like drums, guitars, bass, or even entire orchestras. Every note is individually sampled multiple times and recorded with excellent gear with an experienced engineering team in a professional studio. Sample libraries are a great way to incorporate high-quality sounds in your music without having to hire actual musicians and a studio. Companies like Toontrack, Ample Sound, and Native Instruments sell individual sample libraries and curated collections that can enhance your sound selection.
You will also find many software synthesizers made by custom sound shops. Synthesizer brands like U-He, Reason, Image-Line sell individual soft-synths, and sound/preset packs for their plugins. Some of these replicate sounds from popular hardware synths made by Korg, Roland, or Yamaha. Artists also retail their signature presets for synths such as Spectrasonics Trilian or the popular Serum synth by Xfer and Massive by Native Instruments. This is a quick way to find and develop sounds inspired by your favorite artists.
A number of plugins can be used as effects, and companies will often make custom versions of compressors, delays, reverbs, and other modulation effects. These effects are usually either designed to have a similar sound to a popular hardware unit or they are more experimental in nature. High-end tape machines and other custom distortion/saturation units are modeled in software to create effects that give a warm and analog feeling to digital recordings.
What is a Software License and What are its Terms?
When you buy a copy of a DAW from the publisher, you’re basically purchasing a license or permission to use the software. This is different from earlier, when software copies were bought on physical hardware like CDs, so until you had the CD, that stand-alone version of the software was yours to use perpetually. These days, some DAWs either come with monthly payment plans, or a one-time license fee or will offer updates for a limited time.
Even though you still can obtain a perpetual license for most of the DAWs listed above, almost every software publisher includes some form of license management or DRM in their DAWs. Such a system does allow you to keep your software secure and updated, and even upgrade if required.
A software license is often just as good as a physical copy since in both cases, there is no inherent ownership of the software, rather just permission to use it. However, you are usually free to use the installed software copy even after the license period expires but you may not get access to any further updates or features. Since most DAWs have great software support and upgrade paths, a license can easily last you anywhere between 2-10 years.
Do all DAWs Sound the Same or is There a difference?
This is a common debate in audio engineering circles – whether all DAWs process the information similarly or there is a difference. Every DAW uses Digital Signal Processing algorithms or DSP that processes and outputs audio/MIDI information on the individual tracks into the master track. All these individual streams of data are then ‘summed’ into one stereo track by way of a summing engine.
Most DAWs perform digital summing in virtually the same manner as to how on every calculator if you entered 2+2, it would return 4. But with analog mixing desks, it used to be a whole different game as the preamps and converters would noticeably color any audio processed through it. Some DAWs like Harrison Mixbus have special summing engines modeled after the signature sound of their physical consoles and they may definitely have a sound, but for most digital summing engines that’s not the case.
Where they do differ, is in perceived loudness and that’s where most of this debate stems from. Every DAW uses a different law to process panning signals from left to right, this algorithm affects how loud sounds are perceived when they are in the center and how this changes when panned to either side. Without getting too technical, this is probably a major factor in the perceived differences of the various DAWs made today but for all practical purposes, DAWs sound the same.
Final Thoughts:
There you have it: an all-you-need-to-know guide to the best DAWs available today. While putting this list together, I’ve again come to appreciate just how varied this type of software is, just like the musical environments that led to their birth. While buying a DAW is definitely an investment, there are no wrong answers to what works for you. In fact, you may find yourself gravitating to different DAWs as your musicality and workflow evolves with time. And each one can bring out a refreshing new facet of your sound. We hope this guide helps you choose the right DAW for your lifelong journey of music-making. Let us know in the comments below what your favorite DAW is and what you like about it. We’d love to hear from you!

My name is Chris and I’ve had a passion for music and guitars for as long as I can remember. I started this website with some of my friends who are musicians, music teachers, gear heads, and music enthusiasts so we could provide high-quality guitar and music-related content.
I’ve been playing guitar since I was 13 years old and am an avid collector. Amps, pedals, guitars, bass, drums, microphones, studio, and recording gear, I love it all.
I was born and raised in Western Pennsylvania. My background is in Electrical Engineering, earning a Bachelor’s degree from Youngstown State University. With my engineering experience, I’ve developed as a designer of guitar amplifiers and effects. A true passion of mine, I’ve designed, built, and repaired a wide range of guitar amps and electronics. Here at the Guitar Lobby, our aim is to share our passion for Music and gear with the rest of the music community.
Chris:
I’ve been trying to do alot of online research and found your article helpful. However, all of the various DAW reviews and comments I’ve found don’t clearly answer my particular need. I have a relatively strong understanding of chord progressions, and variations from working as a lyricist with various musicians over the years, but do not play an instrument. I am trying to figure out which DAW or similar app/program has the best ability for a songwriter who is not an instrumentalist to simply type in chord names or select from drop down lists or libraries and have chords/notes/melodies etc played by assembled instruments. Since I am more classic and southern rock and folk oriented, I’m looking for a program with the necessary instruments instead of electronic/house or beats focus. Any thoughts?
I used Audacity for a bit and it works if you need something free but my friend has Studio One in his studio now its way way better.
What, no MOTU Performer? All of these other hacks got their ideas from that.