One of the best beginner chords to learn is the D guitar chord. As one of the most common guitar chords, you will encounter the D major chord in many songs from all genres. The D chord and its variations offer many possibilities for guitar players of all skill levels.
Whether you are learning your first chords or want to expand your knowledge of the fretboard with different shapes and fingering – this article will cover everything you need along with chord charts and short video lessons. While reading the article and going through the different D chord shapes, it’s best to have the guitar in your hands and try out our tips for a better learning experience. Here are the D chord guitar shapes you should know.
1. D Major – Open Chord (Most Common)
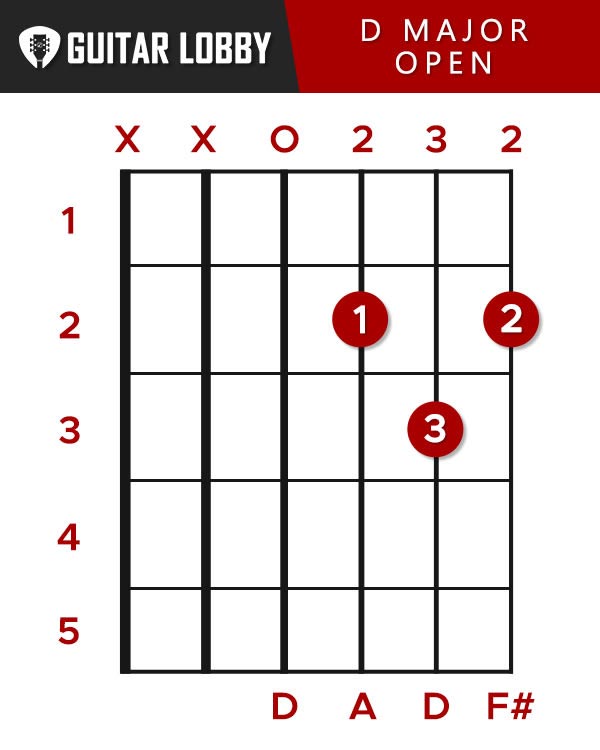
The D Major chord is part of the group of chords called open chords. Chords are called open when they involve at least one open, not fretted string and are usually fingered using only the first 3 frets of the guitar. Note that Open chords are also sometimes referred to as “cowboy” chords.
Open D major chord fingering is as follows:
- Place your first finger (index) on the 2nd fret of the G string.
- Place your second finger (middle) on the 2nd fret of the high E string.
- Place your third finger (ring) on the 3rd fret of the B string.
- Leave the D string open strum the D, G, B, and high E string.
If you already know this shape, try out to do some arpeggios and make sure each note rings out without any buzzes. Once you feel that you got the D chord fingering down, then work on transitioning from another chord while. Strum any other chord you may know and then switch to D major shape and strum. Practice being able to switch to the chord and strum while having all the notes ring out.
For a more detailed explanation, check out this video:
Tips, Tricks, and Common Challenges
The D major chord’s shape is easy to remember and finger, the challenge lies in not blocking the strings by touching them accidentally when you don’t have to.
For example, a common issue is the E string not ringing out because it gets blocked from the flesh on the 3rd finger. The most common reason behind this is not holding your fingers straight enough.
One way to fix this is to check the wrist and thumb position. Try to place your thumb closer to the center of the guitar neck and hold your wrist straight. This might feel a bit unnatural at first but it will prove to be much better after a few days of doing it.
One very important habit to build is to fret as close as possible to the fret, but not touch. The wrist and thumb position help with that too.
Keep in mind that the most important thing for beginner guitar players is not to learn bad habits.
Expert Insight
Try to not put too much pressure on the string. Press down as much as needed to assure that the note rings out, not any more or less.
Otherwise, you risk changing the pitch of the note and also really tire your hand when you don’t have to.
Brief Music Theory
All major chords apply the same formula based on the major scale.
All the D major scale notes correspond to a number from 1 to 7 starting from the D, which is also called an interval. The major scale is formed from the 1st, 3rd, and 5th intervals of the scale.
The notes of the C# major scale are:
| D | E | F# | G | A | B | C# |
| 1 | 2 | 3 | 4 | 5 | 6 | 7 |
The D major chord is formed from the notes D, F#, and A.
All the different fingerings you can find in the fretboard of these 3 notes form a D major Triad – meaning a 3 note chord.
Try out a cool exercise and find these 3 notes in the fretboard, then try to play them in any way you can, don’t worry if you don’t know the exact fingering.
You might surprise yourself with some really cool sounds and also learn the fretboard in the process.
2. D Major – Variation 1

You can get some amazing sounds out of the D major chord by trying out some alternate fingerings. The ones detailed below all use the D, F#, and A note and adds 2 other notes, the G and E. This is called an extended chord because it uses other notes besides the 3 main ones. For the moment focus only on learning how to play it.
One variation uses the D, F#, and A notes formed by a barre on the 7th fret D, G, and B strings. A barre chord is formed when the index finger is used to fret more than 1 string and serves almost a capo like the following:
- Put your first finger (index) as a Barre on the 7th fret of the D, G, and B string.
- Put your fourth finger (pinky) on the 10th fret of the high E string.
- Play the 4 strings from the D below one by one to make sure each note rings out.
This is probably the easiest barre chord shape of the D major chord to learn for a beginner. It’s not as popular as the other barre chord shapes we will look at but still sounds great.
Check out the video for a more detailed insight
(Video 2 Coming Soon)
3. D Major – Variation 2
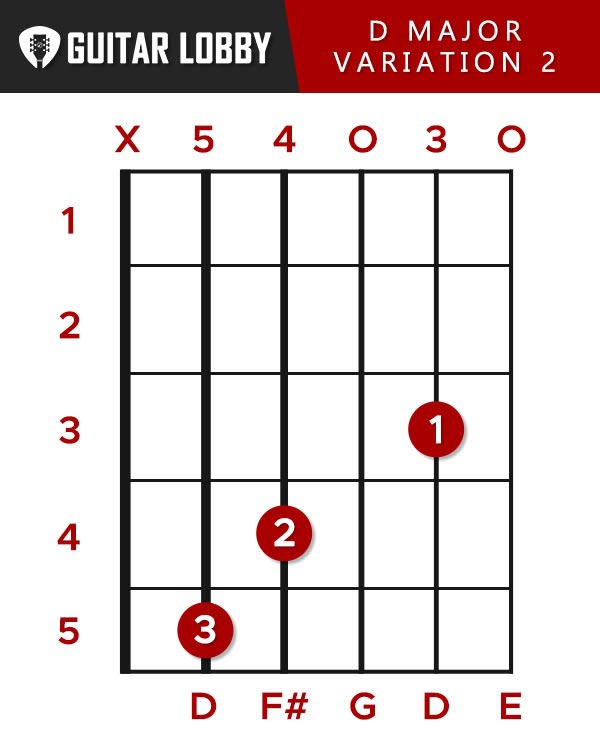
Another variation is easy to finger and sounds very “dreamy” and “open”, due to the open string involved.
The fingering is as follows:
1. Put your third finger (ring) on the 5th fret of the A string
2. Put your second finger (middle) on the 4th fret of the D string
3. Put your first finger (index) on the 3rd fret of the B string
4. Leave the G and high E open and play from the A string below
This chord is particularly interesting in the way it sounds and feels. Use it to add some flavor to the common D major chord.
We prepared the following video for a more detailed explanation
(Video 3 Coming Soon)
Tips, Tricks, and Common Challenges
The challenge is to get the barre to play all of the notes while muting unplayed strings, all without any buzzes and without tiring your hand too much in the process.
Try to hold the guitar on the left leg (right for lefties) and point the guitar neck up. This position is what classical guitar players learn to use when they first pick up the instrument and it helps them to get a better hand position and makes barres and stretches easier.
Expert Insight
You do not always have to play the bass notes on a chord. Bass notes are found on the A and E strings and are called that because of the low bassy sound they produce.
Sometimes, when you are playing with other instruments, for example, another guitar player and bass player, it’s enough for only one of you to play these notes. Usually, it’s up to the bass player to cover this area.
However, if you are the only one playing an instrument and backing yourself up or any other person singing, then you should play the bass notes to get a fuller sound.
4. D Major – Barre Chord
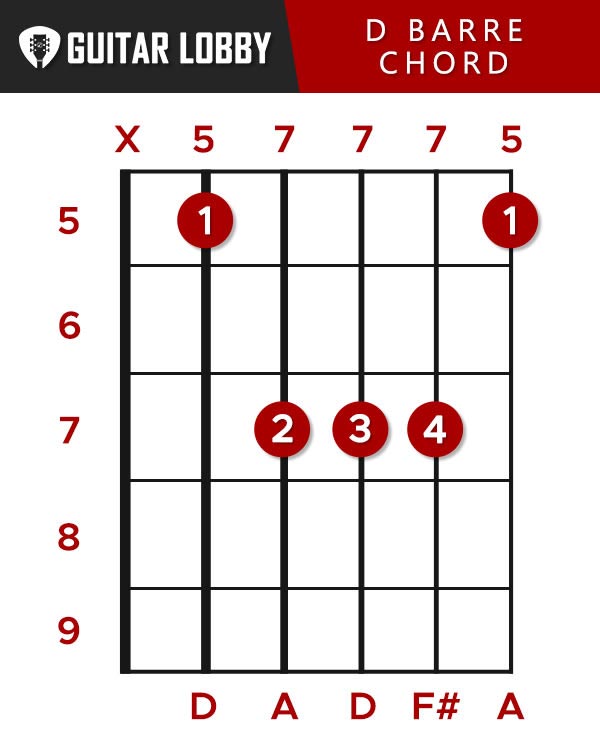
The next chord shapes to learn are the barred D major chords. There are 2 main shapes of the D major barre chord with different root notes positions.
If you are new to the concept of root, what it refers to is to the note after which the chord is formed – in the case of barre chords is usually the note on the lower strings where the barre starts.
The first shape of the D major barre chord uses the following fingering:
- Place your first finger (index) as a barre on the 5th fret of the A, D, G, B, and E strings.
- Place your second finger (middle) on the 7th ret of the D string.
- Place your third finger (ring) on the 7th fret of the G string.
- Place your fourth finger (pinky) on the 7th fret of the B string.
- Make sure the low E is muted and strum gently and check that each note rings out.
This chord can be tricky to get due to the barre and the 3 fingers compressed on the 7th fret. What will help you the most is the classical guitar position explained above and also the thumb position on almost the middle of the back of the neck is critical.
Check out this video for a more detailed insight on this chord:
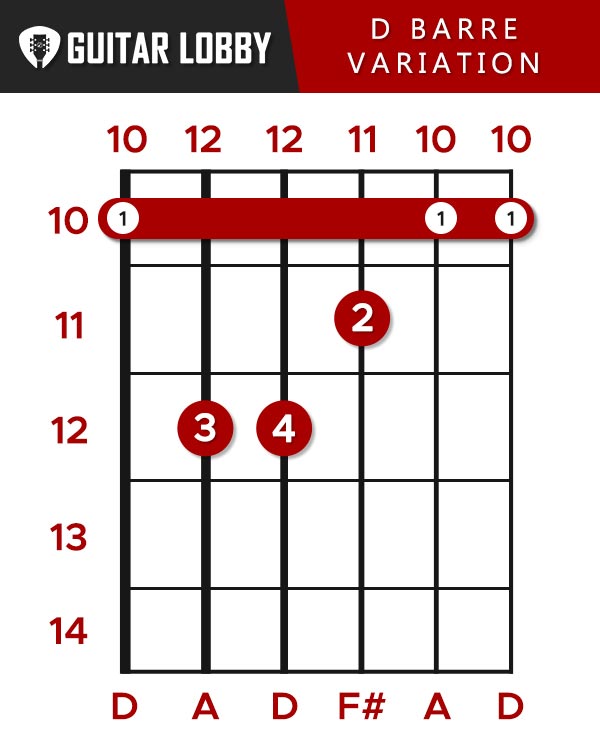
5. D Major – Barre Chord Variation
Another way to finger this shape uses a barre with either the ring or pinky on the 7th fret of the G, B, and E string. This shape sacrifices the high E string by blocking it with the barre, but it’s easier for most people to get and deals
The second common D major barre chord is built around the root note on the 10th fret of the E string and chord shape of the common ones to use all 6 strings.
This D Barre Chord is played as follows:
- Use your first finger (index) to barre all 6 strings from the 10 fret of the E string.
- Place your third finger (ring) on the 12th fret of the A string.
- Place your fourth finger (pinky) on the 12th fret of the D string.
- Place your second finger (middle) on the 11th fret of the G string.
- Make sure when you strum that each note rings out.
This chord can be challenging for the hand, especially for beginners in their first weeks of learning. It takes some time to build up the strength and technique to barre all 6 strings without pressuring the hand too much.
Tips, Tricks, and Common Challenges
The most difficult part of any barre is to fret the notes on the B and high E string and not have buzzes.
This can be solved by combining the proper thumb position discussed above with a small trick – try to raise the barre a bit, literally, this means to lift your index finger so that the part with most flesh barres the high E and B string.
Also, always start building the chord from the barre, get the barre right and the other finger will follow
Expert Insight
Practice the D major barre chords in short bursts of chord change exercises. A very good exercise involves a timer set to 1 minute that measures how many shapes can you change in 1 one minute.
Try this exercise out with open shapes first then with barre chords. Choose for example only 3 chords – The D major, G major, and C major.
Alternate between changing these 3 chords in one minute, first the open shapes and then barre chords. Do this for at least 5 – 10 min with pauses in between takes and measure your improvement each week.
6. D Major – Power Chord
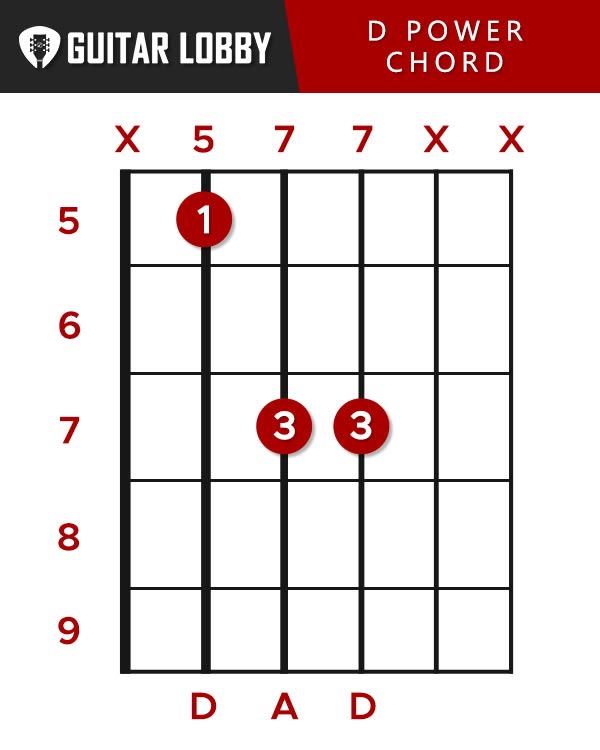
Power chords, or else called 5th chords are used in most rock and metal songs. Power chords sound great with a distorted tone on electric guitar and are very easy to play.
A power chord in itself is not major or minor, since it does not have the 3rt interval (F# note), but it works great in both situations.
The fingering for the D power chord:
- Place your first finger (index) on the 10th fret of the Low E string.
- Place your third finger (ring) on the 12th fret of the A string.
- Place your fourth finger (pinky) on the 12th fret of the D string.
- Use your first finger (index) to help mute the other 3 strings by only touching them gently.
After learning this shape you can easily learn some classic rocks riffs that you always wanted to play
An alternate way of playing power chords is to use the same shape but on the A, D, and G string. Find the root of the D chord on the A string (5th fret) and apply the same concept.
See this video to hear the chord in action and for a more detailed insight
(Video 5 Coming Soon)
7. CAGED D Major Chords
The CAGED system is your next step in mastering the fretboard and different chord shapes.
This system helps us to organize the fretboard and basically, it suggests that every chord can be formed in (at least) 5 different shapes on the fretboard. The shapes are the open C, A, G, E, and D transposed in the fretboard to where the root note the chord is located.
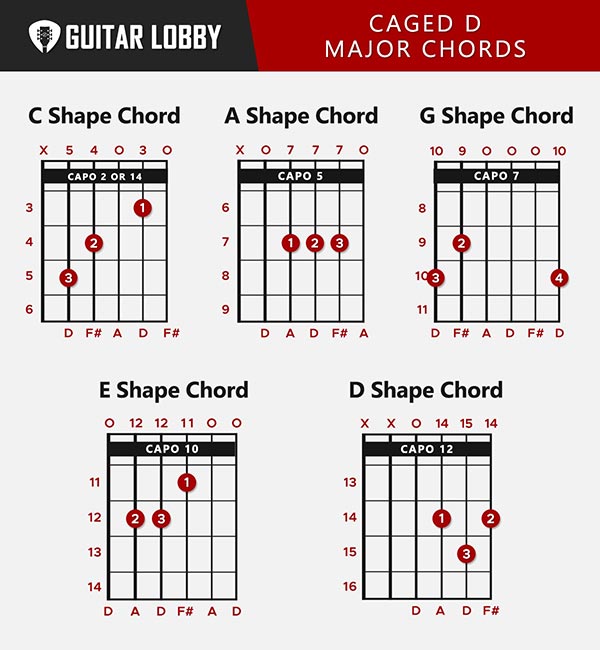
So for example the D Major can be played in C shape if you take the open C chord and move 2 frets up the fretboard – the distance between the C note and the D note.
To replace the guitar nut you should apply a bare on the second fret or use a capo.
The same concept applies to the other shapes on the chart above. Check out this video for more detailed insight.
(Video 6 Coming Soon)
Expert Insight
The CAGED system is your key to unlock the fretboard for both rhythm and lead guitarists. If you are determined on advancing with your playing, then you should start to mix up some CAGED shapes during your practice or jam sessions.
Don’t forget to always find the root not first and then build the shape based on it.
Related Article: C Guitar Chord Guide
8. D7 – Blues Chord
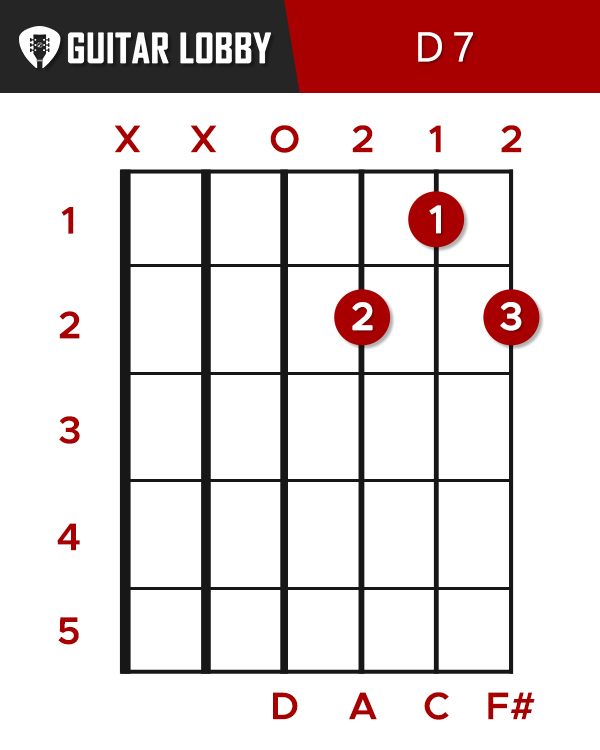
The D7 is a great chord to add a blues flavor to your playing. The 7 refers to the 7th intervals on the D major scale, the Bb note.
7th chords sound more “tense” and build up pressure that goes back to the time where the blues was first played on acoustic guitar, to later becoming what it is today.
The fingering for the D7 chord is the following:
- Put your second finger (middle) on the 2nd fret of the G string.
- Put your first finger (index) on the 1st fret of the B string.
- Put your fourth third finger (ring) on the 2nd fret of the high E string.
- Make sure that the low E and A strings stay muted.
This fingering is based on the open D chord shape. The other shapes of the D7 chord are also based on the other shapes of the D major chord with the Bb note added.
Try to see if you can play any shape you know with this added note without referencing to charts.
Check out this video with more detailed insight into this chord.
Expert Insight
Try out this fun blues chord progression next time you practice the 7th chord. This particular progression makes up 90% of all classic blues songs with some slight variations from song to song.
Play the G7 chord, then the C7 chord then the D7 chord. For now, don’t focus on the particular order, but just start it with the G7 and end it with the G7 for a sense of resolve.
It’s the basics of what is called 12 bar blues which is one of the must know things to play on guitar. If you are not familiar with the other chord then you can learn them all on our website.
D Major Chord on Electric Guitar
Electric guitar playing is very different from acoustic guitar for various reasons. The main one is that you can play around with many tones from clean to distorted on the electric guitar, all of which require different playing styles.
One general rule on an electric guitar is to not strum in the same way as you do on an acoustic. Even if you choose to play clean, the tone of an electric guitar can still sound muddy if you strum like on an acoustic.
If you are playing in a band, then try not to play the full chord shapes, instead play only the D, G, B, and E strings. The bass notes are usually played by the bass player of the band.
The fingering of the chord can also be trickier since the neck of an electric guitar is usually thinner than that of an acoustic.
A thinner neck makes it more difficult for the thumb to be placed properly, so pay close attention to that too.
Related Article: B Guitar Chord Guide
Final Tips on Playing the D Major chord
Mute with both your hands.
Muting with both your hands is a skill that develops and evolves through time. For now, you should know that muting with your right means resting your hand on the string near the bridge while muting with your left hand involves lifting your hand up and gently touching the string when you want to mute.
Another great tip is to mute the low E string with the tip of your index finger when playing a D major barre chord with the root on the A string.
Practice with a metronome
A metronome is crucial for getting your timing right. That means playing along to the beat and changing chords on time. To practice with a metronome effectively start with a slow tempo of approx 60 bpm and play along each of the metronomes one downstroke. Then gradually play 2 strokes in between the 2 beats and then 4 strokes.
Gradually start adding some upstrokes in there and focus on playing in time with the metronome more than getting all notes accurate. Always count when playing and move a part of your body, it can be the foot, your head, or your whole upper body. That will help you immensely in feeling time when you play.

My name is Chris and I’ve had a passion for music and guitars for as long as I can remember. I started this website with some of my friends who are musicians, music teachers, gear heads, and music enthusiasts so we could provide high-quality guitar and music-related content.
I’ve been playing guitar since I was 13 years old and am an avid collector. Amps, pedals, guitars, bass, drums, microphones, studio, and recording gear, I love it all.
I was born and raised in Western Pennsylvania. My background is in Electrical Engineering, earning a Bachelor’s degree from Youngstown State University. With my engineering experience, I’ve developed as a designer of guitar amplifiers and effects. A true passion of mine, I’ve designed, built, and repaired a wide range of guitar amps and electronics. Here at the Guitar Lobby, our aim is to share our passion for Music and gear with the rest of the music community.
Thanks for a really useful guide to the D-major chord. I have just started my guitar-playing journey and was looking for alternative fingerings for chords. I found your site via a search engine (Yahoo!) and I am really glad that I did.