In this article, you’ll learn how to play the A guitar chord and some of the A chord variations you can easily play as a beginner guitarist. Grab your guitar and work through these instructions, tips, and videos for a better understanding of how exactly to play the different A chord guitar shapes and effectively incorporate them into your playing.
Table of Contents
1. A Major – Open Chord
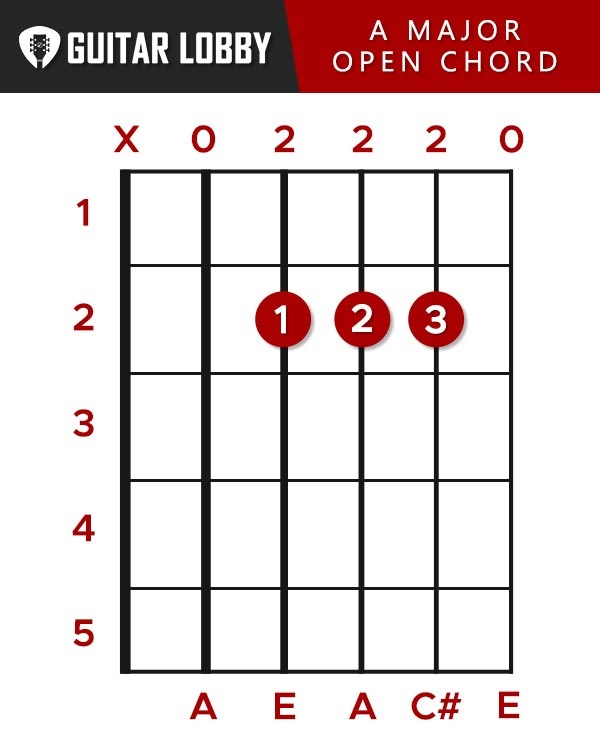
The first chord shape you should learn is the classic open chord position of the A major chord. To play this A chord, place your fingers as follows:
- Place your first finger (index) on the second fret of the D string.
- Place your second finger (middle) on the second fret of the G string.
- Place your third finger (ring) on the second fret of the B string.
- Keep the low E string muted when you strum.
- Allow the A sting and the high E string to play open.
A little fun fact, In the guitar player lingo, a slang term you might hear open chords referred to as is “cowboy” chords.
In the video below, we’ll teach you exactly where to put your fingers and how to get a clean sounding A major chord with ease.
Tips, Tricks, Common Challenges
The main challenge of the A Major chord is to compress your 3 fingers on the 2nd fret and avoid the buzz on the D strings.
Whenever you struggle with this or with chords in general, the first thing you should do is to check your wrist positions, the fault is usually where you least suspect it and not necessarily in your finger!
If this challenge resonates with you or if you feel any pain, try to raise your wrist up and place your thumb further in the center of the back of the neck, having your wrist as close to a 90 angle as you can. It might not feel very “natural” at first but it usually helps a lot many beginners and intermediate players to get the chord to sound just right and will feel natural in time! Playing the guitar takes practice for both the muscle memory but also the dexterity of your hand, wrist, and fingers.
Expert Insight
When choosing the fingering for the A guitar chord, other than having all the notes ringing out nicely there is also one very important aspect you should focus on, and that is:
How easily can you change chords after playing the A major?
This may seem a bit too obvious but actually is very important to play on time and also avoid playing open strings if you can between chord changes.
Playing open strings between chord changes is an advanced technique that many guitar teachers instruct students to do and also many guitar players do instinctively. However, to completely master your chord changes, playing the open strings between chords should be a choice that you do on purpose, not out of habit or because you can’t change chord shapes fast enough.
An alternate fingering to try, I would suggest playing the A major chord as follows:
- Place your fourth finger (pinky) on the B string
- Place your third finger (ring) on the G string
- Place your second finger (middle) finger on the D
This way you will have a free index finger that can easily go to other chord shapes, most notably you can easily go to an E, F, and also chord to an A barre chord (which we will look up below).
Brief Music Theory
To understand how the A major chord is formed you should have a basic knowledge of intervals and their role in music.
For the moment you should memorize intervals in this easy way. An interval refers to the distance between 2 notes. An Interval can be half-step or full step, one fret is a half step.
In a major scale, there are 7 notes and each of them corresponds to a number. The distance between the 1st note and the 4th note is a “fourth”, and the distance between the 1st and the 5th is a “fifth”, etc
The notes of the A major scale are:
| A | B | C# | D | E | F# | G# |
| 1 | 2 | 3 | 4 | 5 | 6 | 7 |
The formula of a major chord is Root or 1st, 3rd, and 5th. So the A major chord has the notes A, C#, and E.
If you are wondering why you usually play 5 or 6 strings and there are only 3 notes, know there are the same notes that get repeated or in some cases some of the other notes to form what we call Extended Chords.
Do a little exercise and try to find these 3 notes on the fretboard. Anywhere will be fine and you will have a nice sounding A major chord that sounds a bit more “fancy”. Further below we are going to look up that concept in more detail.
2. A Major – Variation 1
There are so many A major chord guitar variations that you can play easily now that you know you “cowboy” open chord A major chord.
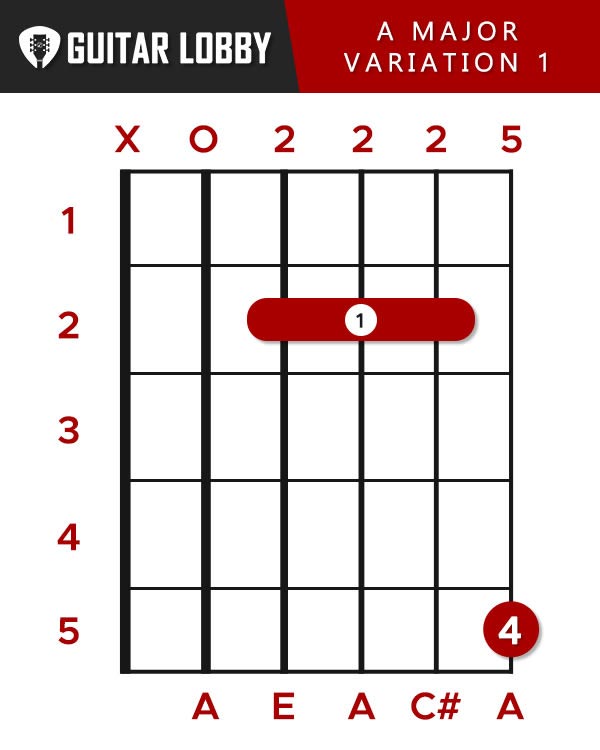
The first A Major Chord Variation variation uses a barre (with meaning placing your index finger as a bar to cover more than 1 string)
- Put your first finger as a barre on the 2nd fret of the D, G, and B
- Put your pinky on the 5th fret of the High E (a big stretch, but you can make it if you adjust the position of your wrist!)
Have a look at the video to see how the chord is played and also a bit of insight on the fingering.
(Video 2 is coming soon)
3. A Major – Variation 2
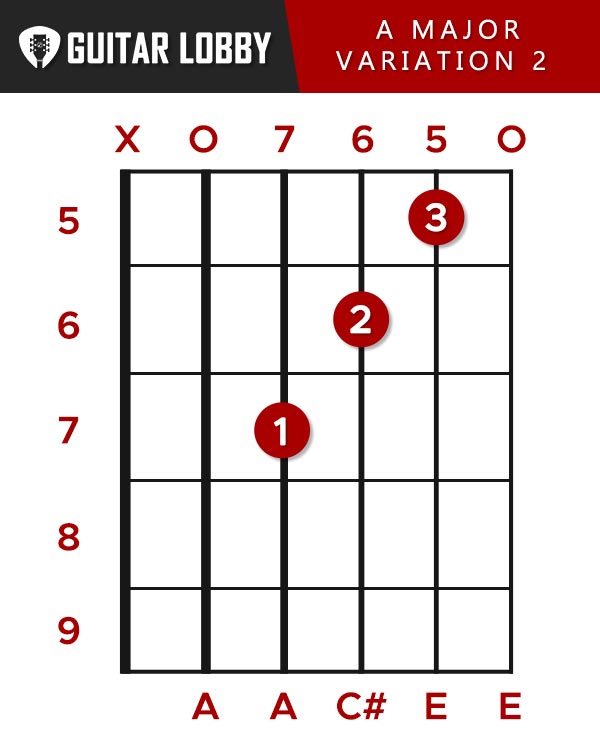
The Second A major variation is easier to play than the common cowboy chord and sounds very open and bright. This shape will make your chord sound Special and quite “fancy”.
- Put your first finger as a barre on the 2nd fret of the D, G, and B
- Put your pinky on the 5th fret of the High E (a big stretch, but you can make it if you adjust the position of your wrist!)
Have a look at the video to see how this A Major chord variation is played and some help on the fingering
(Video 3 is coming soon)
Tips, Tricks, Common Challenges
The challenge on the A major variation 2 is the big stretch of the pinky to the 5th fret of the high E String. As for the cowboy chord, the problem (and solution) lies in your wrist and hand positioning.
The classical guitar position helps out a lot here. Try to hold your guitar on your left leg (right if you are a leftie) and keep the neck at a 45 degree angle. You will find it much easier to play the big stretch like this rather than chilling on the couch.
The second shapes challenge is having the open high E ring out nicely. For that same logic of the wrist technique applies.
Expert Insight
Do you know why the 5th fret of the high E works that well? The 5th fret of both the high and low E strings is an A note.
What makes the shape special is that playing a high note inside a chord usually makes it sound like you are playing a melody over the chord.
Keep also this simple concept in mind regarding playing chords on guitar, Whenever you can add an open string, do it!
Open strings tend to always sound fuller and brighter since they resonate better than any fretted note. A recording trick that many session guitar players use in the studio is to always find shapes that have some open string in there – a simple trick that can be useful to both beginners and pros alike.
Brief Music Theory
The only thing, theory-wise, you should know is that there are NO changes in the way the chord is formed, the only thing that changes is the shape in the fretboard and the way that change makes the chord sound.
That’s why the guitar is such a cool instrument! You get tons of different sounds out of the same few notes with just a position change.
4. A Major – Barre Chord Root E String
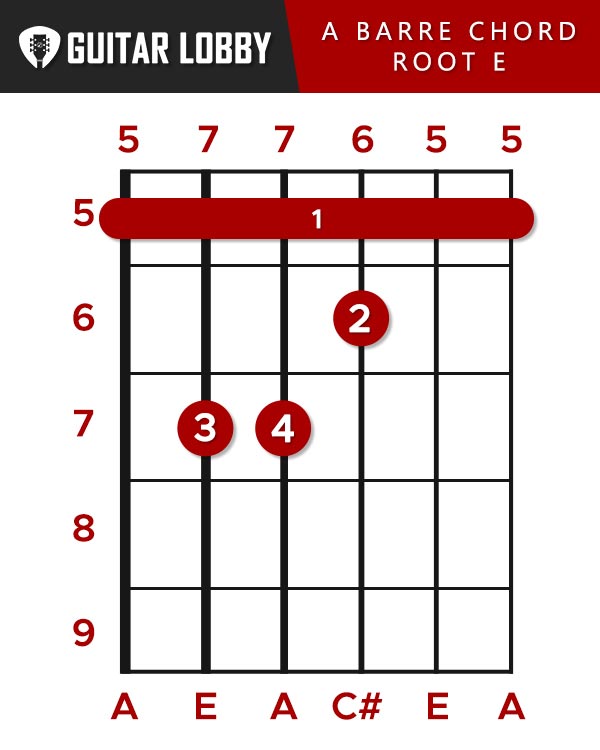
The A major Barre chord is probably the most challenging to get if you are new to the instrument and to the concept of barre chords.
The only difference between the open chords and the barre is that your first finger takes the role of the guitar nut and blocks the string, thus imitating a sort of “barre”.
To form the A Major Barre chord shape you should follow this fingering:
- Put your first finger (index) as a Barre on the 5th fret.
- Put your second finger (middle) on the 6th fret of the G string.
- Put your third finger (ring) on the 7th fret of the D string.
- Put your fourth finger (pinky) on the 7th fret of the A string.
- Strum and make sure all strings ring out.
Barre chords can be a bit tricky to get right at first, so have a look at the video below for a more detailed look and some help on avoiding the buzzes and usual wrist discomfort.
(Video 4 coming soon)
Tips, Tricks, Common Challenges
One of the most common challenges you can face while playing the A Major Barre Chord is 2 getting all of the notes with your index/barre finger, not having your wrist positioned correctly, or lacking strength can cause pain on the wrist/index finger.
This is very common especially if you are just learning about barre chords. With open chords, you can sometimes get by without having the right technique and make the chord sound full and clean. Barre chords can require some more work on getting them right, the secret here lies in the wrist with a bit of help from the index finger.
Hold your guitar in the ‘classical’ position we explained above and make sure your thumb is almost in the middle of the guitar neck’s back. Make sure the B and the high E strings not ringing out
If the wrist technique doesn’t give you results for the B and E strings then try to lift your index finger just a bit. What I mean by that is that while you hold the chord, raise your barre and then place it again, positioning the index finger a bit higher than previously. What this does is makes sure that the B and E string are barred by the more fleshy part of the index finger – which is the lower part.
Expert Insight
Don’t feel discouraged because your wrist hurts or you get tired quickly from playing the A major bar chord. Building up the dexterity and muscle memory in your hand, wrist, and fingers will take a bit of time and practice.
Whenever you find that your wrist, or more importantly if the inner part of your hand hurts, take a 5 min break.
Brief Music Theory
Theory wise the chord structure and build remain true to the original formula. It’s still the same notes on a different part of the fretboard, and that’s what’s cool about it!
5. A Major – Barre Chord Root A String
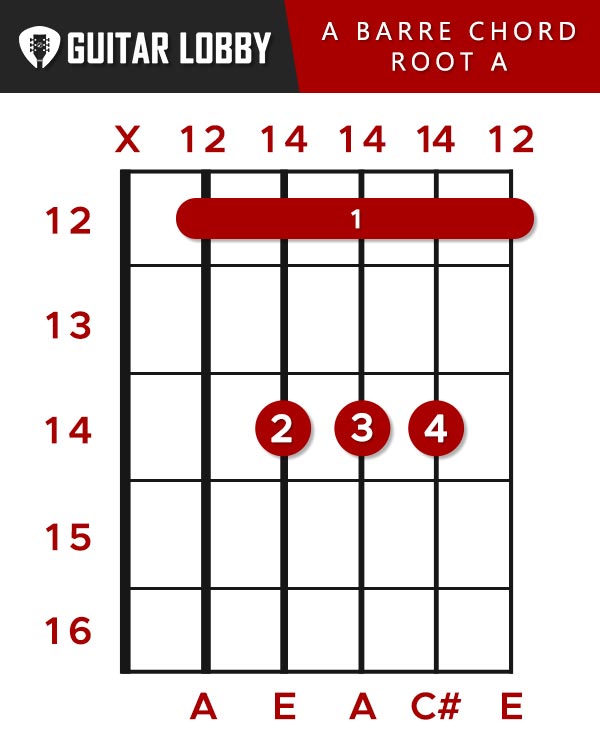
Another way to play the A major Barre chord is to play it with the root on the A string. You will find that way up on the 12th fret, where the notes on the guitar start to repeat. In theory, terms that is called playing an octave above the original open chord shape.
To form this A Major Barre chord variation shape you should follow this fingering:
- Put your first finger (index) as a Barre on the 12th fret.
- Put your second finger (middle) on the 14th fret of the D string.
- Put your third finger (ring) on the 14th fret of the g string.
- Put your fourth finger (pinky) on the 14th fret of the B string.
- Strum with your right hand gently and make sure all strings ring out.
This chord shape can be a bit tricky to get at first, if you need some more help have a look at the video giving some more details on the fingering.
(Video 5 coming soon)
Tips, Tricks, Common Challenges
The challenge here is to have your 3 fingers all compressed on the 14th fret – which is a much smaller space than the 2nd fret of the same. If you have big fingers like B.B. King, then you might encounter some more difficulties on this one.
How I suggest approaching this is to apply an alternative Barre with your 3rd finger on the 14th fret of the D, G, and B String. This shape is easier for some people than the first one, but it sacrifices the high E string, which Is very hard to make the notes ring out in this variation of the A major chord.
Expert Insight
One tip I can give you that will save a lot of effort is to not pay much attention to having the High E String ring out. What I mean is that in this chord all the notes are in a high register way up the fretboard, so the 12th of high would not add as much as it would if you were playing for example some chord on the 5th fret. If you can play it, great but if you leave it out, that’s ok too.
Another great tip is keeping the Low E muted by slightly touching the string with the tip of your index finger that is playing the A string. This makes sure that you can inadvertently strum all the strings and the low E will not ring out.
6. CAGED A chord guitar
The caged system is a way of organizing the fretboard based on 5 different chord shapes. As the name suggests, the shapes of open chords C, A, G, E, and D.
The concept is that by applying the same shapes but changing the root note you can play the same A chord in 5 different shapes on the fretboard. Let’s take a look at the A major chord shapes based on the CAGED system.
For a better understanding of the concept have a look at this short video.
(Video 6 coming soon)
Tips, Tricks, Common Challenges
The most common challenge in playing all the 5 CAGED shapes of the A major is to find the root note.
As you can tell we already covered some of the shapes, for example, the usual cowboy open chords and the barre chords. However, to play all the other shapes the first thing is to visualize where the A major is in each string.
A good way to approach is to spell out the names of the notes you are playing while practicing and gradually memorize the fretboard in a practical way.
Expert Insight
The CAGED system is much more than a way to play different chord shapes. Even if you are a beginner, start working on it and when you start playing lead guitar, the CAGED system will become useful in more ways you can imagine.
Popular Related Article: D Guitar Chord Guide
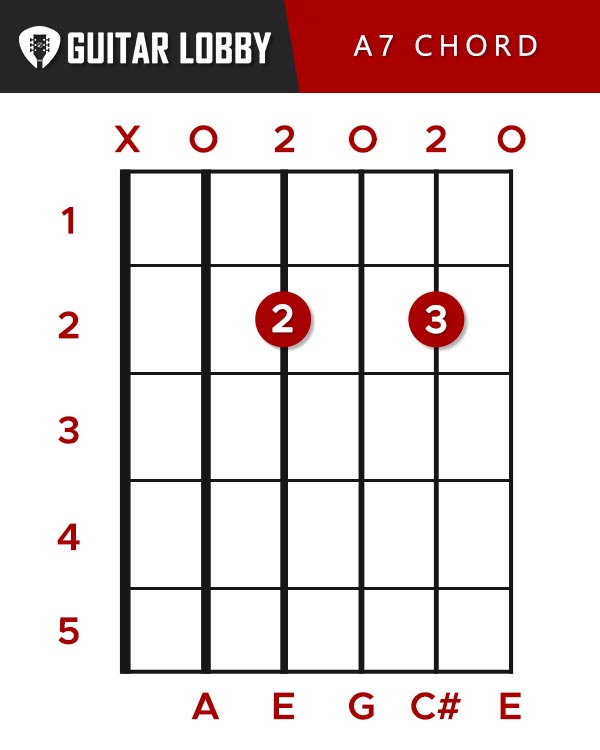
7. A7 Chord – Blues Chord
If you want to add that bluesy flavor to the A major chord then just try out this finger shape, the A7 Chord
- Place your middle finger on the 2nd fret of the D
- Ring finger on the 2nd fret of the B
- Leave the G open and High E open
What’s cool about this chord is that it is basically the same shape as the A Major open chord with just a small change, you just add an open G string.
Have a look at the video for a bit more detailing on this cool-sounding blues chord.
Difference between the playing A major on electric and acoustic guitar
The main difference lies in the tone of the instrument. In an acoustic guitar, the more strings you play the “fuller” the chord is going to sound since the instrument has a clean acoustic tone.
When playing an electric guitar, when you play lots of notes, depending on the tone that you choose sometimes the chord can sound “muddy” or “dirty” and like there is too much going on. Sometimes simplicity is key, especially with distortion tones involved.
Playing An A Chord On Electric Guitar
Here we will explain how an A major chord should be approached when played on an electric guitar. You don’t need to learn new shapes for this, it’s the same shapes but players more simply.
Have a look at the video to have a better understanding of this concept.
Tips, Tricks, Common Challenges
The secret is to sometimes play only the high notes of the chord on the D, G, B, and high E strings.
Take the A major barre chord and apply only a small barre on the B and High E while holding down on the 6th fret of the G string. This is only half the chord but will work great with a clean guitar tone.
This is one of the ways to do it and does not apply to every situation, but if you are into blues or rock music then you might have a natural feel of where you should use these shapes.
The biggest challenge here is to visualize these chord shapes in the moment. I would suggest always start out by first visualizing the A note on the low E string, then the full barre chord before playing the simplified version of it.
Expert Insight
If you are playing in a band or jamming with some friends and a Bass player is there you should probably “stay out of his zone”. That is a way of saying that if the bass player is playing the low notes then you can play the high notes.
8. A Power Chord – A5
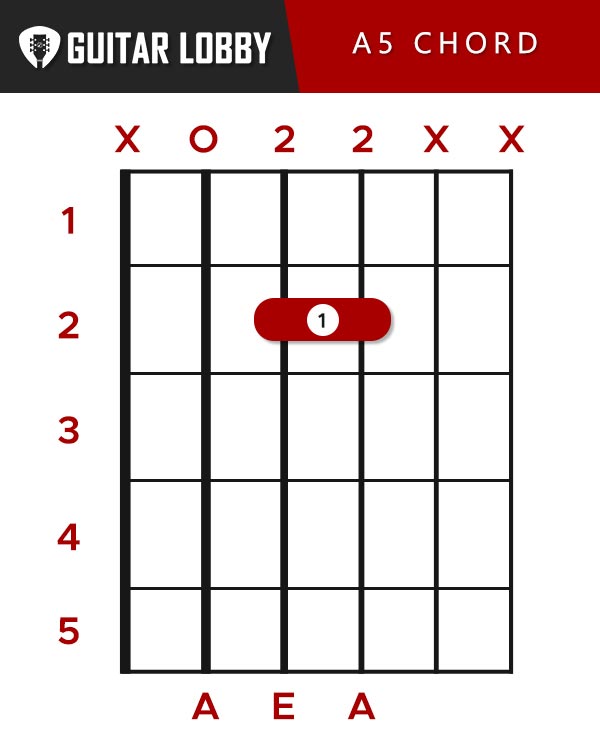
If you want to play an A major chord with a distorted sound, then you will find there are some specific shapes that will help you out. The most popular is the famous power chord. As I pointed out early, sometimes when playing a distorted tone on an electric guitar simplicity is key to a great sound. The A Power chord or aks the A5 chord removes the “3rd” note of the key signature which is C#, and only plays the 1st and 5th notes which are A and E. By simplifying the notes in the chord we get a tighter sound and by electronically amplifying this sound, the chord doesn’t have to sound less “full” like it would on an acoustic guitar.
A power chord can be both a major or minor chord, that’s why it’s so great to use for rock music!
The fingering is the following:
- Barre with your first finger the 2nd fret of the D and G
- Play only the Open A, D, and G
Have a look at the video to see how a power chord is formed and how to play one with ease.
(Video 9 Will be inserted here)
Popular Related Article: C Guitar Chord
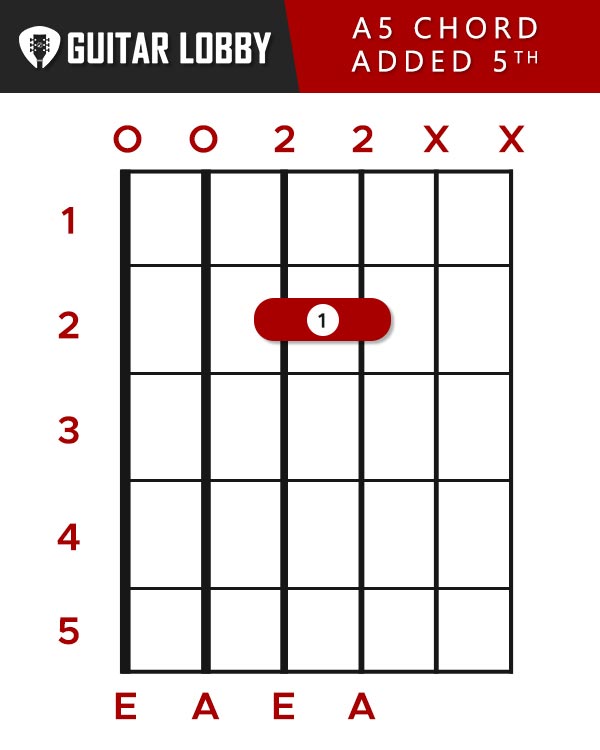
9. A Power Chord – A5 added 5th
Tips, Tricks, Common Challenges
The main challenge of playing power chords lies in muting all the other strings except for the ones you are playing.
You can do this by gently resting your index finger on top of the strings you are not playing. This way it’s guaranteed that you can strum all the strings without hearing any unwanted notes and also have a nice percussive effect when doing it.
Expert Insight
One great tip on playing the A power chord is to try and play the open low E string along with the chord.
A power called is alternatively called a 5th chord. The reason is because the formula of the chord includes the 1st (root) and 5th interval of the A major scale, the A and E notes.
So if you are playing the shape above you are just playing the E note on the lower string which produces a unique heavy sound.
Power chords are usually used in rock music and depending on the context of the song they can take major or minor properties. So for the moment just rock out on the power chord and know that it will work in most situations.
Popular Related Article: B Guitar Chord Guide
Final Tips on Playing the A Major chord
Think about which chord comes next
Whenever you play the A major chord think what chords come next so that you can plan ahead your chord change and can make it on time! This is very important, especially if you want to switch from a power chord to an open chord and vice-versa.
Practice strumming and developed finesse with your strumming hand
There is no great left hand without a great right one and vice-versa. If you strum too hard with your right hand or are fingerpicking and missing the strings then probably the chords will not ring outright.
Try to strum gently and then pick all the strings one by one to figure out if you are playing the chord right, and if not, find out where the problem lies.
Leave space in the mix for other guitar players/instruments
If you are jamming with a friend and he plays an A open chord then you should follow up by playing the same chord but in a different position! That will sound way better than playing the same A major shape.
The reason behind that is to fill all the spectrum of sounds and create more variations with the music. If you try to play the same chord shape as the other player then the sound gets mixed and sometimes it becomes less powerful than playing 2 different shapes.
That does it for this guide, let us know if you have any questions about the A guitar chord below.

My name is Chris and I’ve had a passion for music and guitars for as long as I can remember. I started this website with some of my friends who are musicians, music teachers, gear heads, and music enthusiasts so we could provide high-quality guitar and music-related content.
I’ve been playing guitar since I was 13 years old and am an avid collector. Amps, pedals, guitars, bass, drums, microphones, studio, and recording gear, I love it all.
I was born and raised in Western Pennsylvania. My background is in Electrical Engineering, earning a Bachelor’s degree from Youngstown State University. With my engineering experience, I’ve developed as a designer of guitar amplifiers and effects. A true passion of mine, I’ve designed, built, and repaired a wide range of guitar amps and electronics. Here at the Guitar Lobby, our aim is to share our passion for Music and gear with the rest of the music community.