After learning the basic open chords, a great next step for mastering the fretboard is to learn chords with sharps (#) and flats (♭) like the C# Chord. In this article, I will cover the most common shapes of the C# guitar chord, as well as a couple of lesser-known, yet extremely useful, variations of the chord that add a unique flavor to it. I’ll also offer you some expert tips and insight on getting the chord shapes right with ease.
Learning chords with flats or sharps are not different than learning chords without them. As always, we will start by finding the root of the chord, and then many of the chord shapes will probably already be familiar to you.
Here Are The Common C# Chords and How To Play Them On Guitar
1. C# Barre – Root A String
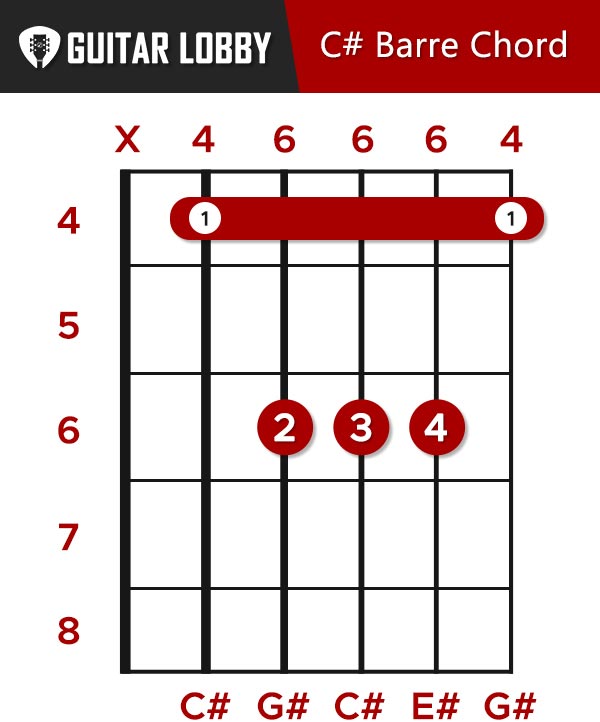
The first position we will learn is the barre chord position of the C# chord with the root on the A string. That means that the chord is formed based on the C# note on the A string, which is found on the 4th fret.
Unfortunately, there are no open chord shapes available for the C# chords, unless of course your use a capo, a topic which we will also cover.
Follow the following fingering in detail and also refer to the chord chart for help.
- Put your first finger (index) as a barre, starting on the 4th fret of the A while applying pressure to the D, G, B, and E strings as well.
- Put your second finger (middle) on the 6th fret of the D string.
- Put your third finger (ring) on the 6th fret of the G string.
- Put your fourth finger (pinky) on the 6th fret of the B string.
If you are just starting with barre chords, imagine your index finger in the role of the guitar nut (where the strings rest on the edge of the guitar neck) and place the finger as straight as possible covering all the strings. Apply as much pressure as needed to make the string ring but no more than that since you might feel some pressure on the hand and wrist.
2. C# Barre – Root A String (Alternative Fingering)
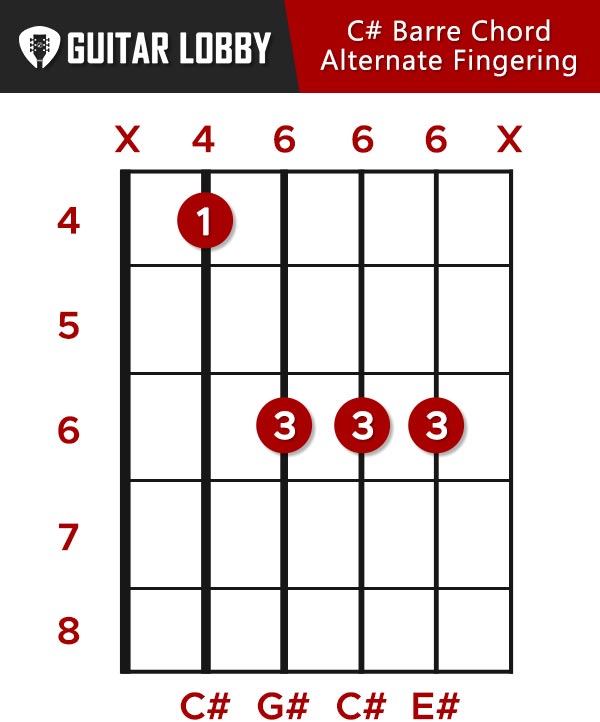
Another way to play this chord is by applying a barre on the 6th fret as follows:
- Put your first finger (index) finger on the 4th fret of the A string.
- Put your fourth finger (pinky) or third finger (ring) as a barre on the 6th fret of the D, G, B, and high E strings.
The downside of this chord shape however is that the high E string does not ring out since it’s blocked by the bar at the 6th fret.
3. C# Barre – Root Low E String
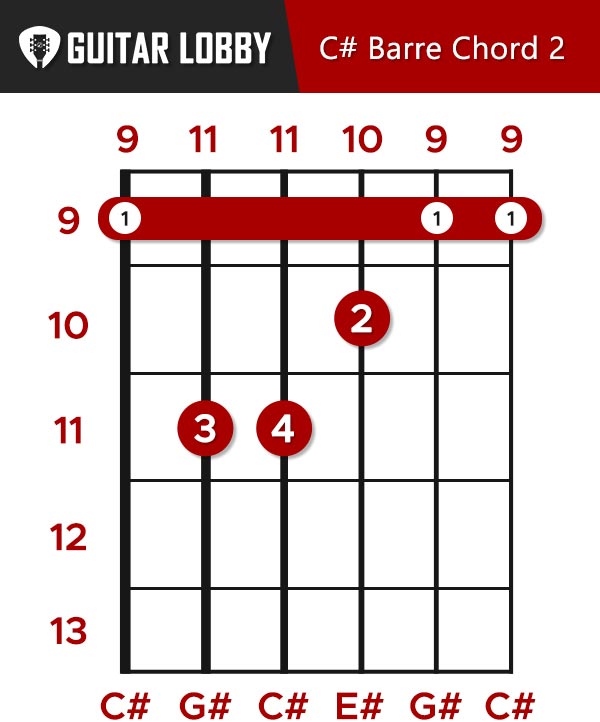
Another common C# chord is rooted on the low E string, played as follows:
- Put your first finger (index) as a barre on the 9th fret of the E while applying pressure to all the strings.
- Put your second finger (middle) on the 10th fret of the G string.
- Put your third finger (ring) on the 11th fret of the A string.
- Put your fourth finger (pinky) on the 11th fret of the D string.
This shape produces the “fullest” tone as it uses all 6 strings. Depending on the situation, this is a great alternative to playing the previous variation.
Tips, Tricks, and Common Challenges
Getting the barre just right can be challenging until you build the finger strength, but this will come with practice.
Pay attention to your playing hand positioning. Try to keep the wrist in a position that assures that the index finger is straight when holding a barre with it. Also, try to place it as close as you can to the freet to avoid string buzzes.
Slightly touch the low E string to mute it. The bar with the index finger can be very useful if you use all its potential. To avoid the unwanted E string ringing when you strum, then just slightly touch it with the tip of the index finger.
Raise the index finger barre just a bit if you have problems with the 2 lower strings. The B and high E strings are usually the hardest ones to ring out if you are playing the shape with the root on the E string. At first, try to raise the first finger so that the B and E are pressed with the lower part of your finger that’s closer to the hand.
Brief Music Theory
The basic rule of all major chords applies to this chord as well. The C# major chord is formed from the 1st, 3rd, and 5th intervals of the C# major scale.
Each note of the major scale corresponds to a number from 1 to 7 on which chords are built.
The notes of the C# major scale are:
| C# | D# | E# | F# | G# | A# | B# |
| 1 | 2 | 3 | 4 | 5 | 6 | 7 |
Thus, the C# Major Chord is formed from the C♯, E♯, and G♯ notes.
4. C# Chord – Variation 1
The C# has several other variations other than the barre chords. What makes these variations worthy to learn is the fact that each one adds something extra to the chord and makes it a unique sounding.
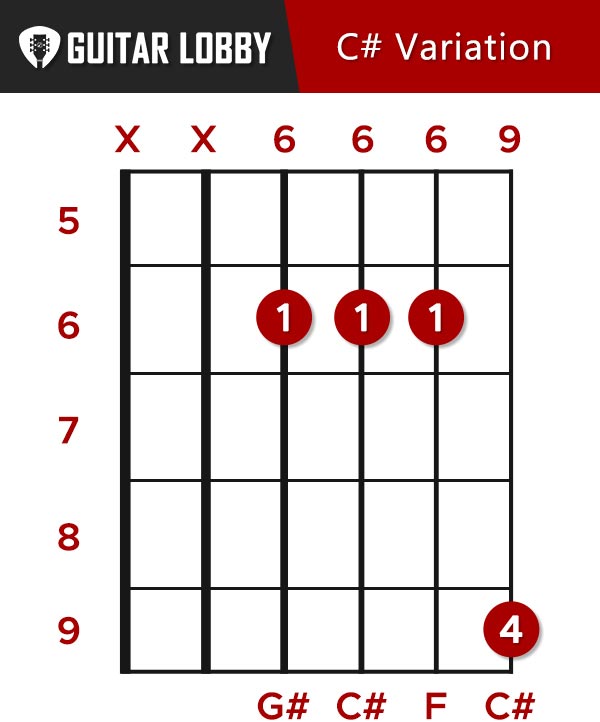
- Put your first finger (index) as a Barre on the 6th fret of the D, G, B, and E string.
- Put your fourth finger (pinky) on the 9th fret of the high E string.
This chord is a great choice for all players from beginners to professionals as it’s easy to play and the extra 9th fret of the high E adds a “flavor” to the chord.
The main challenge is not playing the A and low E strings. There are 2 helpful tips for this common issue. First, use the tip of your index finger to mute the A string. Your index finger is barred on the 6th fret and the tip of your finger is playing a G# note on the D string. With that finger reach just a little bit further while playing that G# note allow your pointer to gently touch the A string to assures the string doesn’t ring out.
The second tip involves some precision work with the right hand. Not strumming the low E string is essential to get the sound of the chord just right. One way to practice this is to focus on the right hand and consciously an angle while strumming. The angle should be minimal and supported by a wrist movement.
5. C# Chord – Variation 2
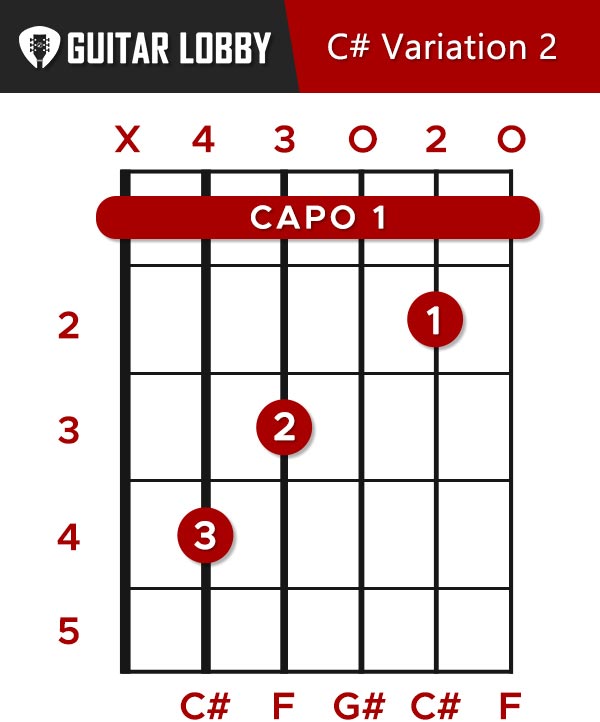
Another variation of the C# chord is based on the CAGED system C chord shape, on which we will get into more details after learning first how to play the shape.
- Put your first finger (index) as a Barre on the 1st fret of the D, G, B, and E string.
- Put your fourth finger (pinky) on the 4th fret of the High A string.
- Put your third finger (ring) on the 3rd fret of the D string.
- Put your second finger (middle) on the 2nd fret of the B string.
- Play the G and high E open from the barre/cap on fret 1.
you may notice this is a C shape chord. The difference between a C and C# is 1 half step which is equivalent to 1 fret. Therefore, all of the C open chord notes moved up 1 fret is a C# chord.
The main challenge of this shape lies in the barre which is why this chord is typically played using a Capo on the 1st fret.
Expert Insight
You don’t always have to play all the notes of the C# guitar chord for it to sound right.
Sometimes, especially when playing with a bass player or with another guitar player, it’s that each of you plays a different chord shape.
If you are playing with a singer in a duo formation or you sing while playing guitar, use the chord shapes that include that bass note.
6. CAGED C# Chords
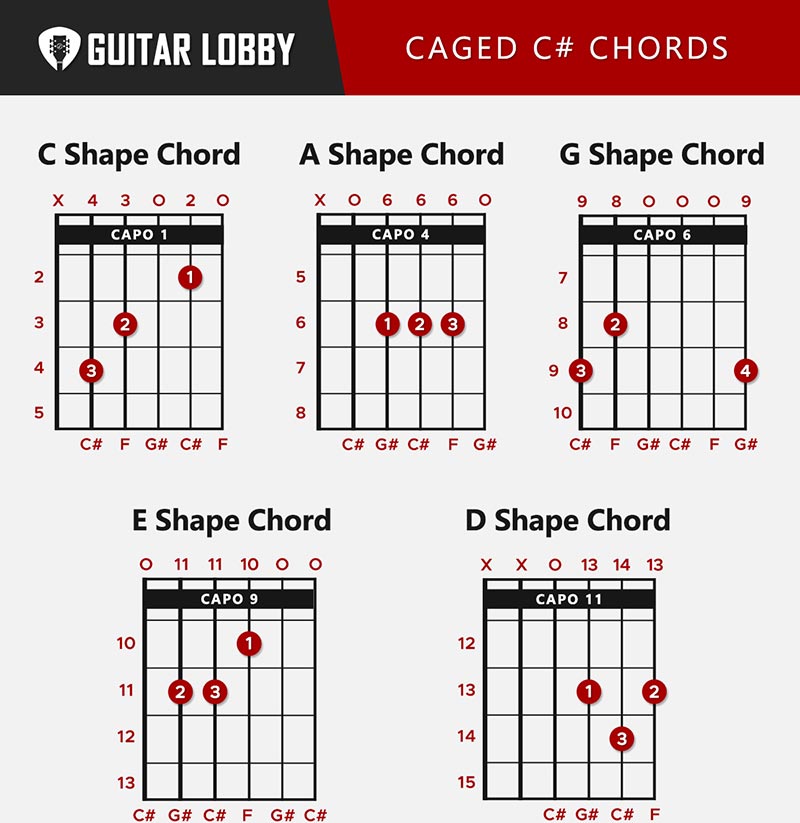
We gave a brief introduction to the CAGED system in the section above, but now we will get into more detail at all of the C# CAGED chords and where they are located on the fretboard.
This system is a very popular way to organize the fretboard and different chords shapes on the guitar. Basically, there are 5 main chord shapes, the ones suggested by the name C, A, G, E, D.
So for example the C# Major Chord can be played in the 5 shapes as shown in the chart above.
Tips, Tricks, and Common Challenges
The challenge of these shapes is most commonly finding them on the fretboard then incorporating them into your playing. Guitar playing is often situational. If you are playing with a band, certain variations of a chord will “mix” better with the rest of the band than other variations of the same chord would. Fretboard location is another key factor. Knowing where to find a chord in several locations is an extremely useful skill.
Expert Insight
Try to play also arpeggios of the CAGED C# chords. That means picking strings one by one. Also saying the note that you play as you play them is an extremely worthwhile exercise. This will help you a lot in your process of learning the fretboard.
7. C#7 Chord – C# Major Blues Chord
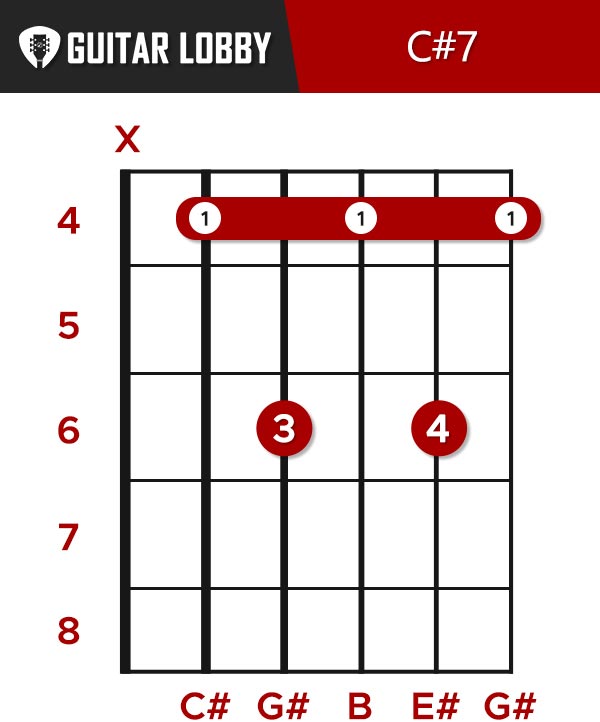
7th chords are very common in blues music. 7th chords, like the C#7 chords are perfect to add some bluesy flavor to the chord and to change the mood.
The fingering is based on the C# barre chord with the root on the A string.
-
- Barre with your first finger (index) on the 4th fret of the A, D, G, B, and high E strings.
- Place your third finger (ring) finger on the 6th fret of the D string.
- Place your pinky on the 6th fret of the B string.
- Keep the low E string muted.
Many find this shape can a bit easier to get right than the standard C# sharp barre chord since you don’t need to play all 3 fingers on the 6th fret of the D, G, and B string.
C# Major Chord on Electric Guitar
Electric and acoustic chord shapes are the same, but the way you should approach them is a bit different. The C# Major chord is no exception. Acoustic guitars are relatively consistent, with some dependencies on playing technique. With an electric guitar, tones still vary based on technique but there is also the added dynamic of technology. Your tone can vary from completely clean to extremely distorted, and not all shapes sound great with different tones.
For example, one great tip on playing the C# Major chord with a clean tone on an electric guitar is to not strum hard and resonant chords like you would on an acoustic. Acoustic guitars keep a clean tone when strummed and have a good percussive effect, clean electric guitar tones sometimes tend to get “muddy” or too “bright”. Strumming all the strings with the same intensity as on an acoustic can make the chord sound very chaotic. Instead, try to apply a more gentle touch and continuously mute the string with your right and left hand to avoid having unwanted sounds. Let your guitar amp do its job and work on playing clean, smooth notes and chords.
7. Play a C# major Power Chord

Power chords are what are generally considered Rock chords. They are used extensively in almost every rock and metal sub-genre.
Playing a C# Power chord, or else called a 5th chord, is pretty easy. The fingering is the following
- Place your first finger (index) on the 9th fret of the Low E string.
- Place your third finger (ring) on the 11th fret of the A string.
- Place your fourth finger (pinky) on the 11th fret of the D string.
A power chord by itself is neither major nor minor since it does not contain a 3rd interval note, which is what dictates if a chord is major or minor.
However, this chord works great in both situations and can be very handy to learn classic rock and metal riffs.
Expert insight
Power chords are great because they are movable shapes. Just move up or down the fretboard and you will have the power chord named after the note on the low E string.
Also, take the same shape 1 string below and apply the same concept. Power chords can be formed also on the A, D, and G strings by applying the same shape with the root on the A string.
Popular Related Article: Basic Beginner Guitar Chords
Final Tips on Playing the Bb Major chord
Mute what you don’t play. Muting the notes that should not be played is as important as playing the notes that should be played in a chord. There are generally 2 ways to mute.
Mute with your strumming hand. You can mute with your strumming hand by placing it gently near the bridge of the guitar, across the string you want to not play. Muting is very difficult to explain because it starts to develop as a natural habit for most guitar players, so for the moment just know the basic concept the farther from the bridge your hand is placed, and the harder your press, the more you mute the strings.
Mute with your fretting hand. Your fretting hand is muted by lifting the chord shape or finger and resting on the string, not fretting it. Another way to mute is to touch a string with a part of a finger that you can spare.
Muting is a skill that continues to develop for guitarists of all levels, so don’t feel down if you are having problems at first, and also, don’t worry too much if some unwanted sounds ring out of chord shapes at first.
Practice short bursts of chord changes and rest. Try to apply a routine where you play 5 minutes of chord changes, then rest for 2-3 minutes before doing so again. This will help out if you are a beginner and have some issues with your fingers or wrist hurting.
They say no pain, no gain, but if you are encountering pain on the inner side of your arm, then take a pause. Building up your playing strength and dexterity won’t happen overnight but you will get there in no time.
That does it for this article, if you have any questions or comments about the C# guitar chord let us know below!

My name is Chris and I’ve had a passion for music and guitars for as long as I can remember. I started this website with some of my friends who are musicians, music teachers, gear heads, and music enthusiasts so we could provide high-quality guitar and music-related content.
I’ve been playing guitar since I was 13 years old and am an avid collector. Amps, pedals, guitars, bass, drums, microphones, studio, and recording gear, I love it all.
I was born and raised in Western Pennsylvania. My background is in Electrical Engineering, earning a Bachelor’s degree from Youngstown State University. With my engineering experience, I’ve developed as a designer of guitar amplifiers and effects. A true passion of mine, I’ve designed, built, and repaired a wide range of guitar amps and electronics. Here at the Guitar Lobby, our aim is to share our passion for Music and gear with the rest of the music community.