Due to the vast range of effects pedals for musicians to choose from, determining the best way to assemble them in the signal chain can be a difficult task. Each different guitar pedal order produces a varying result which impacts the way the effects interact with one another, and how they impact your tone.
Tone is subjective, and there is no definitive right or wrong way to order your pedals in an effects signal chain. It’s a case of understanding which combinations you should use to produce the sounds that you’re aiming for.
In this definitive guide, we’ll analyze the different ways that you can order your pedals in the signal chain and the sonic results they will provide.
Pedal Groups
Before we get into the various effects orders you can use, it’s important to discuss the main pedal groups. Effects pedals are categorized based on the way that they interact with the signal of a guitar, bass, or another instrument.
It’s useful to become familiar with the different groups of effects pedals as they are often deliberately positioned in the signal chain according to the category they belong to.
Here’s a breakdown of the various categories of effects:
- Dynamics (Compressor, Limiter, Noise Gate)
- Filter Effects (EQ, Wah, Talk Box, Envelope Filter)
- Pitch Effects (Tuner, Pitch Shift, Octaver, Octave Fuzz, Harmonizer)
- Volume (Volume, Tremolo, Boost)
- Gain Effects (Overdrive, Distortion, Fuzz)
- Modulation Effects (Chorus, Flanger, Phaser, Vibrato, Ring Modulator)
- Time Effects (Delay, Reverb, Looper)
Example Guitar Pedal Order Setups
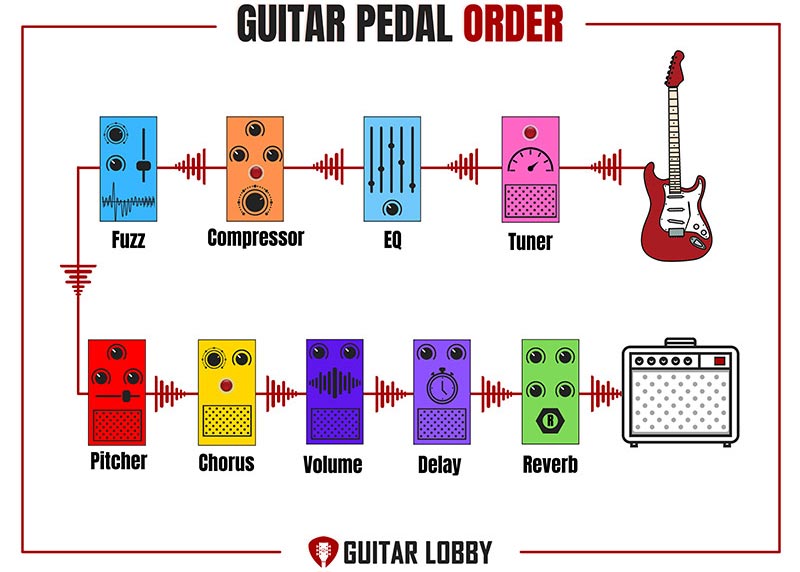
Setup 1
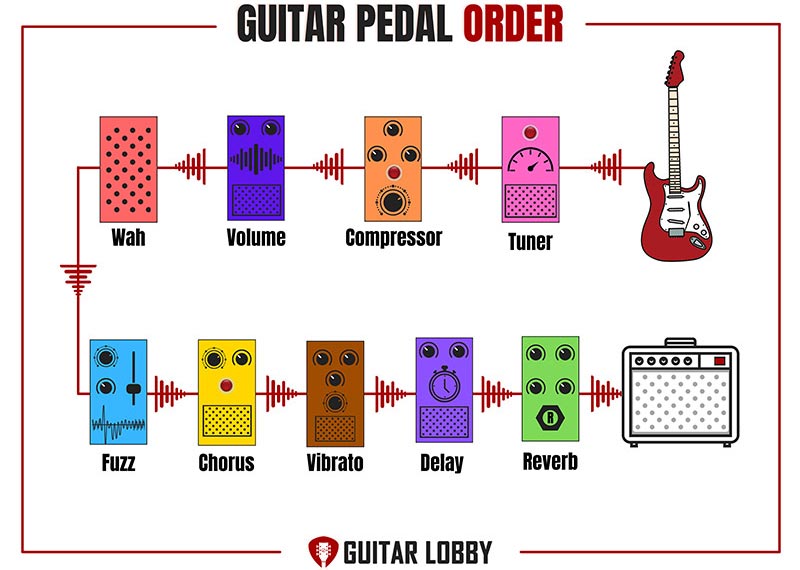
Signal Chain Breakdown:
Guitar > Compressor > Volume > Wah > Fuzz > Chorus > Vibrato > Delay > Reverb > Amp
What Does This Pedal Order Offer?
The above setup is assembled to provide you with complete control over the dynamics of your signal before it reaches distortion, modulation, and timing-based pedals.
By positioning the compressor and volume pedal early in the chain, the guitar’s level is optimally prepared to ensure that it is dynamically consistent throughout the pedalboard. The volume pedal can be used to reduce or increase the level depending on the subsequent effects you’re using at any time.
Fuzz, distortion, and overdrive pedals increase the gain of the signal and therefore having the volume pedal before these effects allow you to compensate for this by lowering the level accordingly.
This pedal order also uses the conventional method of placing delay and reverb after gain and modulation, which prevents the tone from becoming muddy when you engage multiple pedal types simultaneously.
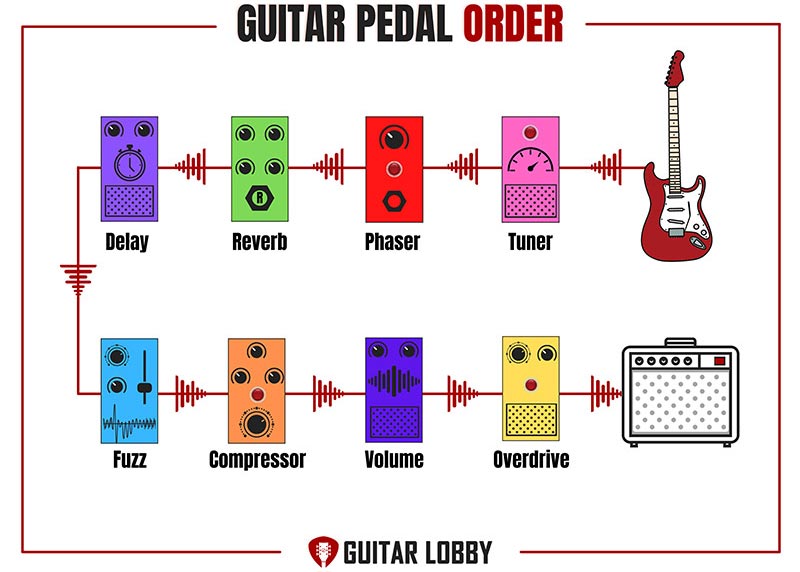
Setup 2
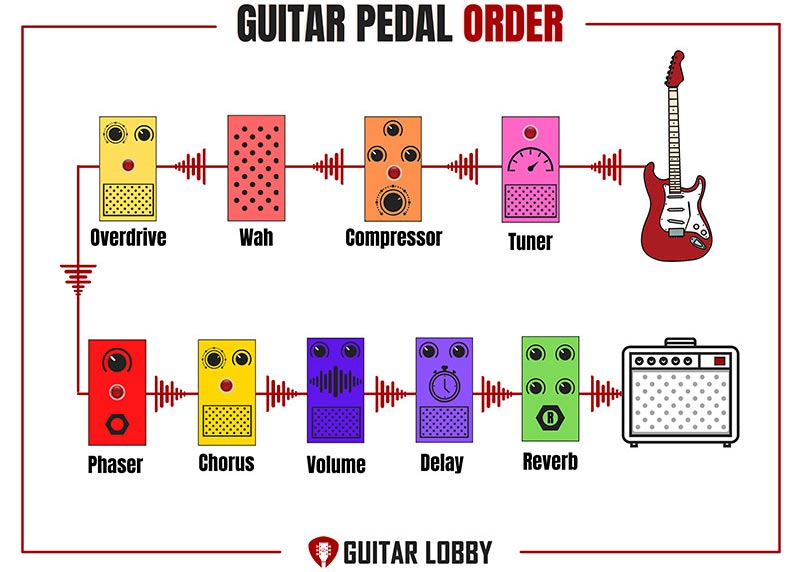
Signal Chain Breakdown:
Guitar > Compressor > Wah > Overdrive > Phaser > Chorus > Volume > Delay > Reverb > Amp
What Does This Pedal Order Offer?
This pedal order shares similarities with the one I previously described, except there is one significant difference. Rather than using the volume pedal to control the level before it enters the distortion, modulation, and reverb effects, it is placed nearer the end of the chain.
This slight modification produces notably different results. Having the volume pedal positioned before delay and reverb, but after all the other pedals provides you with complete dominion over your timing-based effect levels.
You can therefore gradually increase the volume of an overdriven or modulated signal while leaving the reverb and delay pedals unaffected in terms of their dynamics. The time-based effects are free to affect the signal without being limited by the volume pedal.
Your wah pedal, overdrive pedal, and modulation pedals can all be faded in without reducing the prominence of the delay and reverb, which allows you to create saturated yet dreamy tones and textures.
Setup 3
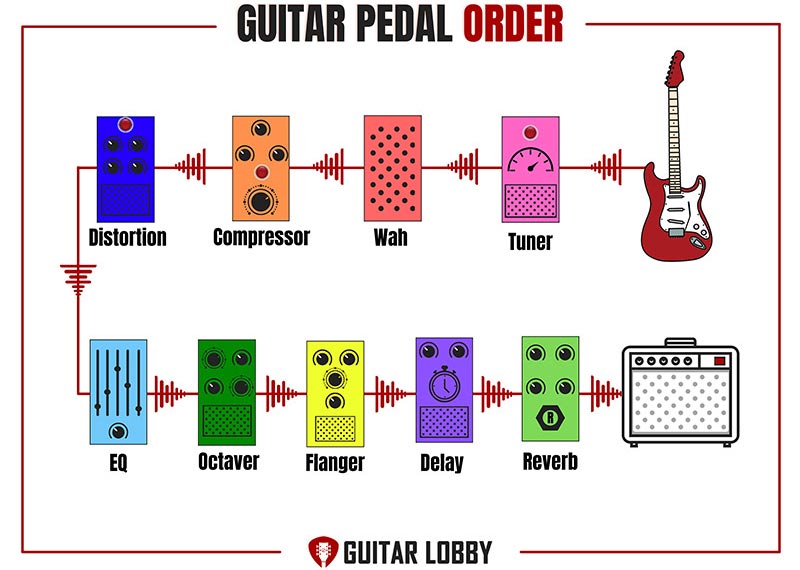
Signal Chain Breakdown:
Guitar > Wah > Compressor > Distortion > EQ > Octaver > Flanger > Delay > Reverb > Amp
What Does This Pedal Order Offer?
Many iconic guitarists, perhaps most famously the one and only Jimi Hendrix, positioned their wah pedals before distortion-based effects. Having the wah at the start of the chain makes its impact more prominent throughout the pedalboard.
Incorporating the EQ into the signal chain after distortion allows you to tailor the frequency output to avoid any harsh tones being caused by the interaction between the wah and distortion.
EQ can also act as a useful way to boost the signal before modulation pedals are used, ensuring that they produce their tone-bending effects to their fullest capacity.
This signal chain setup is highly compatible with a valve amp because you can use the EQ pedal to boost the specific frequencies which causes the amplifier to heat up and cause the sought-after effect of tube saturation.
Setup 4
Signal Chain Breakdown:
Guitar > EQ > Compressor > Fuzz > Pitch Shifter > Chorus > Volume > Delay > Reverb > Amp
What Does This Pedal Order Offer?
This guitar pedal order features the EQ pedal at the very beginning of the signal chain, before even compression. The advantage this offers is the opportunity to shape your guitar’s clean tone using EQ and set the tone for the remaining pedals in the chain.
When the EQ pedal is engaged on its own, the only aspect it will affect is the clean tone of your guitar going straight into the amplifier. You can then switch on the compressor to tame the dynamic range of the clean sound.
This setup is useful mainly for guitarists who struggle to get the clean tone they’re looking for by simply sending the guitar directly into their amplifier. The remainder of the chain is pretty conventional, apart from the volume pedal’s position.
Similar to the second setup I described, the volume pedal comes after all of the other effects barring reverb and delay. This means the rocker plate can be used to fade certain effects and in and out of the amplifier’s output.
Setup 5
Signal Chain Breakdown:
Guitar > Phaser > Reverb > Delay > Fuzz > Compressor > Volume > Overdrive > Amp
What Does This Pedal Order Offer?
Finally, this setup is the least conventional, but it is deliberately assembled to maximize the psychedelic elements of the signal chain. It’s ideal for creating dreamy, mind-bending effects.
The phaser pedal plays a pivotal role in this signal chain. By placing it at the very beginning, you can use reverb and delay to alter the decay and timing of the modulated signal, creating swirls of psych-rock goodness.
The fuzz pedal is positioned after reverb and delay aren’t recommended in most scenarios, but for this particular sound, it works perfectly. When the phaser, delay, and fuzz are all engaged, the signal becomes chaotic and certainly attracts attention.
The compressor comes just before the volume and overdrive pedals, which ensures that the signal doesn’t become too muddy and unpredictable. This allows the final pedal, the overdrive, to add more grit to the signal and increase the gain when necessary.
Guitar Pedal Effects Loop Setups
What is an Effects Loop?
If your amplifier has an effects loop, you can place certain pedals within it. The effects loop consists of audio input and an output loop. It is positioned before the power amp section and comes after the preamp section of the amplifier.
Amplifiers that have inbuilt effects loops commonly have two extra jack plugs. In most cases, they are labeled ‘send’ and ‘return’ or sometimes ‘preamp out’ and preamp in’.
An effects loop is an additional input/output that makes it possible for you to position-specific effects between the preamp section of your electric guitar, and the power section of the amplifier. The preamp section shapes the tone, while the power section amplifies the signal.
Rather than having to be placed at the very end of the effects chain, the preamp can be positioned anywhere in the signal chain when using an effects loop, depending on what you’re trying to achieve sonically.
One example of when using the effects loop would be beneficial is if you’re engaging the gain channel on your amp, or cranking it to the point of saturation, and need to keep this tone intact before modulation effects manipulate it.
The pedals that have the most notable difference on your guitar signals, such as chorus, phasers, delay, and reverb, cause significant alterations to your preamp when they are run directly into the front of the amplifier. Many guitarists like to avoid this, as it tends to create a muddy, unpredictable tone.
Indeed, natural reverb applied to a distorted guitar tone sounds great. However, when a reverb pedal is used for this purpose, the amplifier compresses the sound, which reduces the authenticity of the blended reverb and distorted tone. This is where effects loops can be highly useful.
Do I Need an Effects Loop?
Not all guitarists choose to use an effects loop. If your pedal selection is quite minimal, you may not require one. For example, if you only use a compressor, overdrive, and boost pedal, the effects loop wouldn’t offer any real advantages over simply plugging into the front of the amp.
Nevertheless, using an effects loop can offer many guitarists a more efficient way to assemble their signal chain. I’d recommend using one if you are combining heavy-gain tones, whether they be produced by the amplifier or by distortion-based pedals, with modulation pedals, such as flangers, chorus, phasers, and tremolo.
Positioning a pedal before the preamp causes the tone to be colored. Alternatively, placing the effect after the preamp provides you with the natural sound of the guitar’s tone and that is used by your pedals, as opposed to the pedals having a larger influence on your clean tone.
What is an Effects Loop Used For?
Modulation, reverb, and delay pedals are amongst the most fun and most transformative effects available for guitar. If you were to simply place these effects before the preamp, their influence can be limited, and you run the risk of them being subdued.
By using an effects loop for these pedals, you allow the amplifier’s overdrive to remain intact, which also frees up the aforementioned pedals to produce their fullest effects without any dulling.
There are many ways that you can use the effects loop to alter the performance of certain pedals. Some setups are more conventional than others, while some are more experimental and designed to produce interesting, unique tones.
Let’s take a look at some examples of the ways that you can use your amplifier’s effects loop.
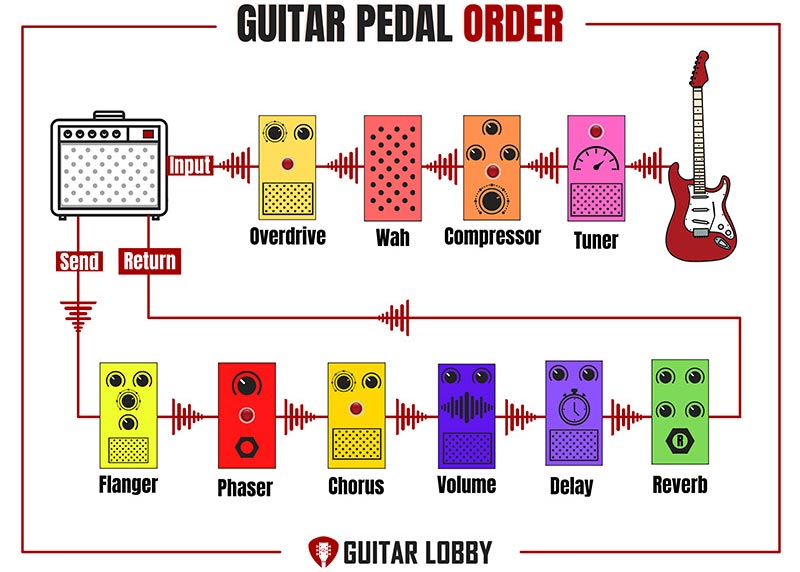
Effects Loop Setup 1
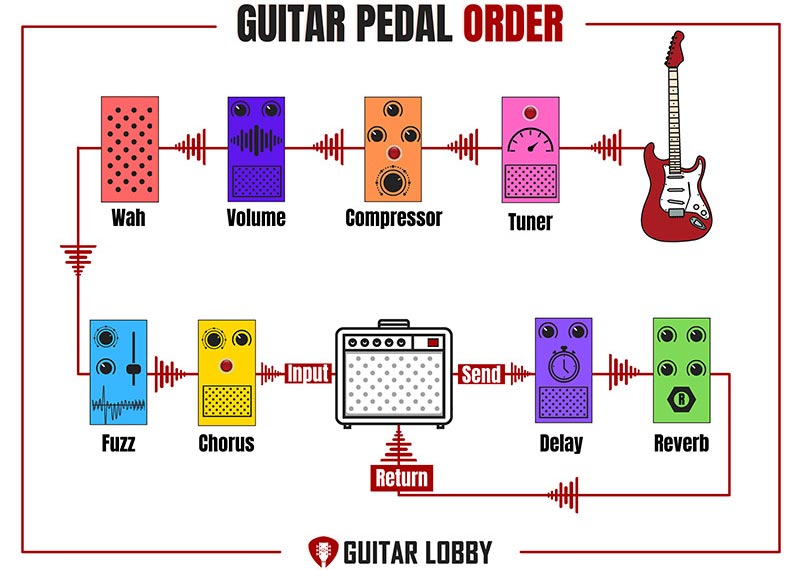
Signal Chain Breakdown:
Guitar > Compressor > Volume > Wah > Fuzz > Chorus > Amp Input > Amp Effects Loop Send > Delay > Reverb > Amp Effects Loop Return
What Does This Pedal Order Offer?
This setup is the most common method when the effects loop of an amplifier is used. The delay and reverb pedals are exclusively included in the effects loop, which permits the preamp section of the amp to influence these effects.
The main advantage of only placing the delay and reverb pedals in the effects loop is that it ensures the clarity of the saturated and distorted tones which are produced by the amplifier’s gain settings.
This relates to the general rule of thumb regarding placing distortion before reverb and delay in the signal chain. Allowing the distortion from the amp to operate independently from the modulation effects causes it to interact more cleanly with delay and reverb.
The remaining pedals, such as the compressor, volume pedal, wah pedal, and modulation pedals, all work in the same way as they would if the effects loop wasn’t being used in this setup.
Effects Loop Setup 2
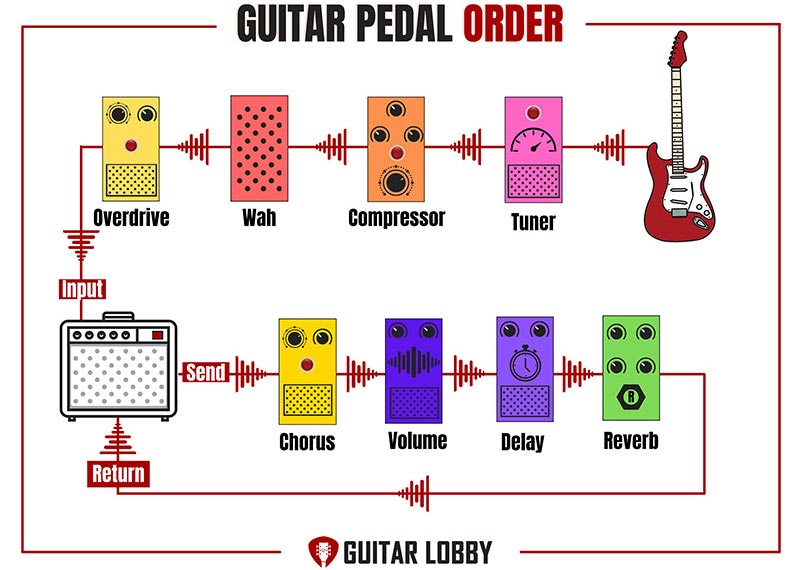
Signal Chain Breakdown:
Guitar > Compressor > Wah > Wah > Overdrive > Amp Input > Amp Effects Loop Send > Chorus > Volume > Delay > Reverb > Amp Effects Loop Return
What Does This Pedal Order Offer?
This signal chain order differs from the previous one in that rather than solely having the reverb and delay pedals in the effects loop, they are joined by chorus and volume pedals.
This changes the sound of the chorus pedal because it is positioned after the amp’s preamp section, rather than before it as illustrated in the first effects loop setup. The chorus pedal isn’t impacted by the other pedals which precede it in the signal chain.
Having the volume pedal in the effects loop also causes a noticeable difference in the way the dynamics can be controlled. The delay and reverb pedals can be tamed by using the rocker plate of the volume pedal.
Again, the distortion which is generated by the amplifier can interact more clearly with the chorus, volume, delay, and reverb pedals due to their isolation within the amplifier’s effects loop.
Effects Loop Setup 3
Signal Chain Breakdown:
Guitar > Compressor > Wah > Overdrive > Amp Input > Amp Effects Loop Send > Flanger > Phaser > Chorus > Volume > Delay > Reverb > Amp Effects Loop Return
What Does This Pedal Order Offer?
The final setup example which uses the amp’s effects loop includes three pedals before the preamp section, and six pedals after it. All of the modulation pedals in the signal chain are included in the effects loop.
This results in all of the most transformative effects pedals in the signal chain being grouped. The saturation from the gain setting on the amplifier can color these effects, which changes their overall sound significantly.
Guitarists who use a lot of modulation pedals, such as phasers, chorus, tremolo, and flangers may want to consider using this effects loop set up as it ensures that these effects play a prominent role in their signal chain.
The inclusion of the volume pedal in the signal chain provides you with a little more control over the dynamics created by the compressor which is applied to the clean signal, and the overdrive which is positioned before the preamp section.
Multi-Effects Pedal Setups
Multi-effects pedals are a great tool for guitarists who want to save space on their pedalboard, but still, require access to a wide range of processing options. They come in a wide range of shapes and sizes, and some are more focused on certain effect groups.
In theory, you could simply use a multi-effects pedal to provide you with your dynamic, modulation, distortion reverb, and delay effects without needing any other pedals. However, most guitarists like to incorporate a multi-effect pedal into the signal chain with a variety of single-purpose devices.
Generally speaking, multi-effects pedal’s strongest points are their modulation effects. They often include variations of chorus, phasers, flangers, vibrato, and tremolo, because these effects are all produced using a similar double-tracking process.
Some of these devices are designed like your average stompbox, with rotary controls allowing you to toggle through the various effects. Others include powerful digital processors, LED displays, and a wide range of processing options.
Assembling your guitar pedals when you are using a multi-effects unit requires a different approach than when you’re using single-effect pedals exclusively. Let’s take a look at some example setups.
Multi-Effect Pedals Setup 1
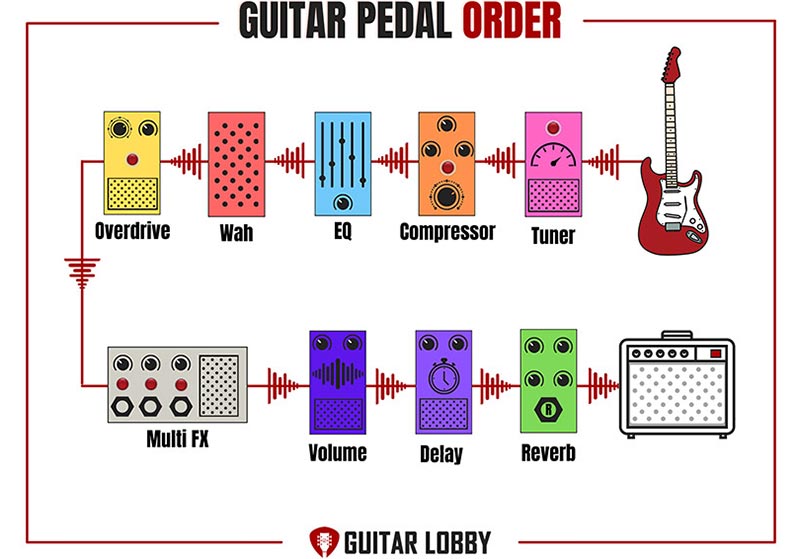
Signal Chain Breakdown:
Guitar > Compressor > EQ > Wah > Overdrive > Multi-FX > Volume > Delay > Reverb > Amp
What Does This Pedal Order Offer?
In this setup, the multi-effects pedals are positioned where modulation effects would usually reside. This is ideally suited to multi-effects pedals which include high-quality modulation effects, like chorus, phasers, and flangers.
The volume pedal is positioned after the multi-effects pedals allow its dynamics to be controlled by adjusting the rocker plate, which facilitates fade-ins and fade-outs, and allows you to compensate for the different tones and levels of the effects it includes.
The compressor and EQ pedals at the very start of the signal chain ensure that the clean tone of the guitar is optimally balanced before it enters the distortion-based pedals, the multi-effects pedal, and finally the delay and reverb pedals.
This same setup can be used without the wah pedal if the multi-effects pedals already include this effect. Some multi-effects pedals do include a wah pedal, but if yours doesn’t you can follow this setup as it is presented.
Multi-Effect Pedals Setup 2
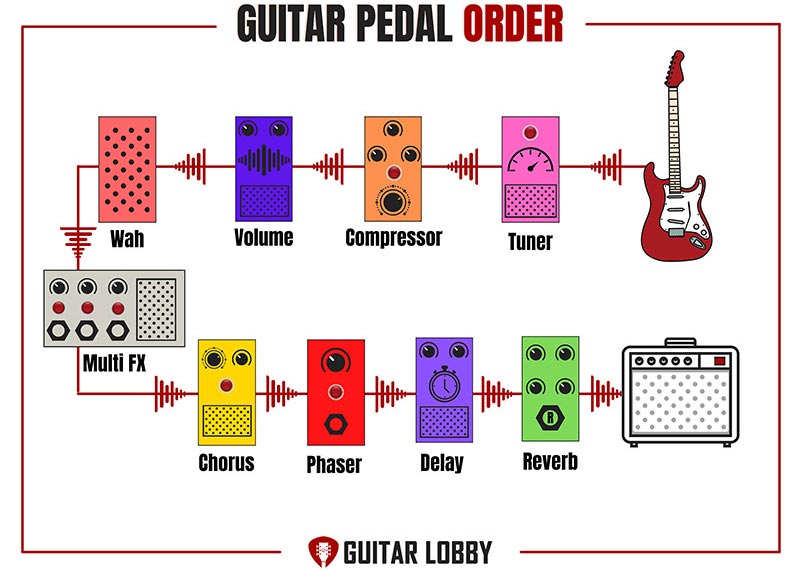
Signal Chain Breakdown:
Guitar > Compressor > Volume > Wah > Multi-FX > Chorus > Phaser > Delay > Reverb > Amp
What Does This Pedal Order Offer?
In contrast to the previous setup, this example features the multi-effects pedals placed after the dynamic and filter pedals, around the middle of the signal chain. Modulation pedals are positioned after the multi-effects.
This results in the multi-effects pedal being used more for the purpose of adding distortion, fuzz, overdrive, or octave shifter effects to the signal chain. The wah is positioned just before it so that the filter can be applied directly to any of those effects.
This signal chain setup is a great choice if you don’t have any distortion-based pedals, and would rather switch between them using your multi effects device. Perhaps you use a tube amplifier that naturally saturates when the gain is cranked.
The compressor and volume pedals being placed at the very beginning of the signal chain, before the multi-effects pedal ensures that the dynamics can be set to the desired level before the more transformative effects are applied.
Multi-Effect Pedals Setup 3
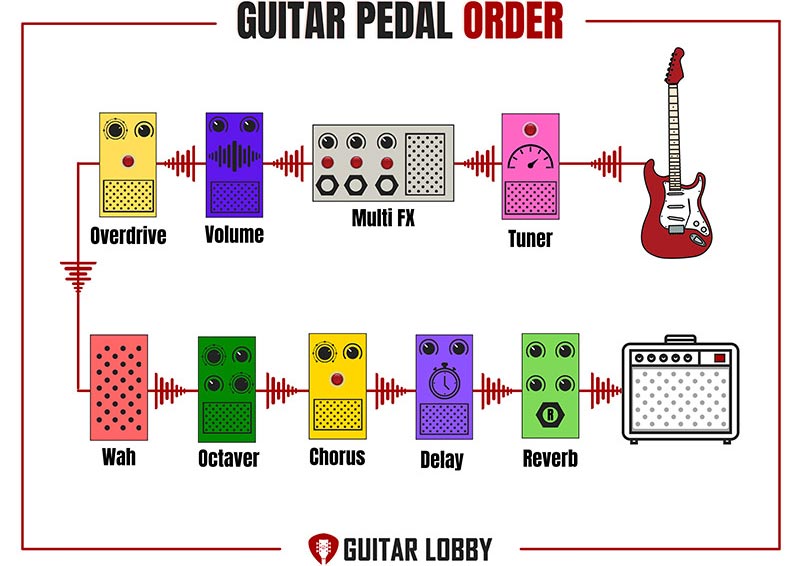
Signal Chain Breakdown:
Guitar > Multi-FX > Volume > Overdrive> Wah > Octaver > Chorus> Delay > Reverb > Amp
What Does This Pedal Order Offer?
The final example is a little more experimental compared to the previous two multi effects signal chain setups. Here, we have the multi effects device at the very beginning of the signal chain.
Some guitarists would shriek at the idea of beginning the signal chain with a multi effects pedal, but if you’re playing ambient or textural styles, this order can offer some interesting tonal options.
For example, if you use the multi effects pedal to create modulation effects, they will be applied to every other effect in the signal chain. This will create swirling, psychedelic layers that sound unpredictable and unique.
When the delay and reverb pedals are engaged simultaneously with the multi effects pedal, things are likely to become chaotic. This can be controlled using the volume pedal and is likely to lead to some weird and wonderful results.
Buffer vs. True Bypass
An important aspect of effects pedals that are often misunderstood or overlooked is whether they are of the buffered or true bypass variety. Both of these designs relate to the way that the instrument’s signal passes through the pedal’s inner components, and each offers various benefits and drawbacks.
The reason that buffered and true bypass is used in effects pedals is to combat the potential signal loss which occurs due to the use of long cable lengths. If a guitar is plugged directly into an amplifier using a single cable, the signal will be strong and the sound will be an accurate representation of the instrument’s interaction with the amplifier.
However, when effects pedals are introduced into the musician’s signal path, this causes the cable length to inevitably increase. Once the total cable length exceeds 18.5 ft, sonic degradation occurs and the signal becomes weaker. Simply put, this is a result of the signal having to travel a greater difference from the guitar to the amp.
Once you incorporate several effects pedals into your chain, the cable length increases further and the risk of signal dilution becomes greater. That’s where buffered and true bypass pedals step in to save the day!
What is True Bypass?
True bypass pedals work by allowing the signal of the instrument to pass freely through the device when it is turned off. This results in the tonal qualities of the guitar, or other instrument remaining unaltered, with no color being added by the inactive pedal.
This is particularly effective if the signal chain comprises a cable run that doesn’t exceed the 18.5 ft length limit. Below this length, true bypass pedals work brilliantly to ensure that your tone and dynamics are preserved at all times.
However, they become less effective when used with long cable runs as part of an extensive signal chain. This is because true bypass pedals don’t boost the original signal at all to compensate for the weakening effect that particularly long cable runs cause.
What is a Buffered Pedal
Unlike true-bypass pedals, buffered pedals enhance the strength of the signal to minimize the effects of long cable runs. They do this by driving the signal through the chain, essentially amplifying it to its original level.
Another key difference between buffered and true bypass pedals is that the former performs its function all of the time, rather than only when the pedal is switched off, as is the case with true bypass devices.
It is recommended that if you are using over 18.5 ft of total cable length in your signal chain, buffered pedals should be used to preserve the strength of the signal and ensure that no tonal degradation occurs.
Combining Buffered and True Bypass Pedals
Thankfully, you don’t need to decide on one type of pedal and stick with that choice exclusively. Most guitarists and bassists use a combination of buffered and true bypass pedals so that they enjoy the benefits of both pedal types.
If you choose to combine the two, the key is to start your signal chain with a buffered pedal. This will result in the original tone from your guitar or other instrument being strengthened by the buffer before it passes through the subsequent pedals.
The vast majority of guitarists and bassists start their signal chain with a tuner pedal, and many great buffered options on the market will ensure that your signal strength is at an optimal level at the start of the chain.
If most of the effects in a signal chain consist of true bypass pedals, and as a result, the signal is weakened, using a buffered pedal at the end of the chain as well as at the start is a great way to inject a boost which will compensate for the slight loss caused by the true bypass pedals and long cable lengths.
Low Impedance Pedals
Some devices, such as volume pedals, are commonly rated as low impedance. Using one of these pedals will result in a higher current, and therefore can degrade the signal strength and tonal qualities of an instrument.
To combat this, placing a low impedance pedal after a buffered pedal is a reliable method. This will ensure that the loss of signal strength is minimized due to the enhancement that the buffer provides.
Guitar Pedal Order Tips
Although there’s certainly no harm in experimenting with guitar pedal orders, there are some generally accepted guidelines that many musicians follow. These rules of thumb are great if you want to produce conventional sounds with your effects pedals.
Starting With a Compressor
Most guitarists agree that it is best to place a compressor at the very beginning of the signal chain. This is because the role of a compressor is to reduce the dynamic range of a guitar’s signal. It tames the peaks in volume, raising any quiet notes by adding gain or reducing the volume of louder notes to smoothen the dynamics.
Positioning the compressor at the beginning of the signal chain means that any of the pedals that follow them will receive a nicely compressed guitar signal that isn’t too loud or quiet.
Why Reverb & Delay Come After Distortion
Another general rule is that in most cases reverb and delay pedals are positioned after distortion-based pedals, such as fuzz or overdrive. The reason for this concerns the way that these pedal types affect the guitar’s signal.
Delays and reverbs create their desired effect by making a copy of the original signal and varying certain elements such as an attack, timing, decay, and color. Distortion pedals simply add gain to the signal, which causes it to saturate and clip, resulting in a gritty tone.
If distortion is applied to a guitar signal after reverb and delay, things tend to get a little messy. Adding gain to the duplicated signal causes the tone to become muddy, whereas positioning the distortion pedal before reverb and delay improve the clarity of the repeated signals.
Ordering Gain Pedals
Another useful tip for assembling your pedals in the signal chain is to position your gain pedals so lower-gain devices run into higher-gain devices. This ensures that the signal is as clean as possible before it enters the pedals which increases the gain the most.
To illustrate this, let’s imagine you have three gain-based pedals: fuzz, overdrive, and distortion. In most cases, fuzz pedals add the most gain to your signal, followed by distortion, then overdrive which adds the least gain.
In this case, positioning your overdrive first, then the distortion, and finally the fuzz pedal would mean that you could engage more than one of your gain-based pedals simultaneously and have the cleanest signal possible.
If you started with the fuzz pedal, it would be very difficult for the overdrive pedal to create the headroom required for both effects to be used together. The result would be a highly saturated, chaotic tone.
Exceptions & Special Cases
Now that we’ve covered the conventional ways to set up your effects signal chain, let’s take a look at some exceptions to the rules. Over the years, many innovative guitarists have used pedals in their own unique ways to create their signature tones.
Certain pedals may have been designed for a specific purpose, but through experimentation, it may have been discovered that they are capable of playing different roles within the signal chain.
These innovations lead to new artists being inspired to build upon the discoveries of their idols, and as some pedals are passed through the generations they gain a reputation for their unconventional capabilities.
In the following sections, we’ll take a closer look at some specific pedals that are designed uniquely, and stand out from the crowd. These ‘rule-breakers’ refuse to stay in their lane, and that’s what makes them so appealing to guitarists.
Digitech Whammy
Popularized by legendary blues guitarist Jack White of The White Stripes, the DigiTech Whammy pedal is one of the most unique pedals to ever be created. It’s also been used by Tom Morello of Rage Against The Machine fame.
The Whammy can be placed in a number of positions in the signal chain, and it’s so versatile that it produces varying results depending on where it is positioned. Its main effect is pitch shifting, but this is no ordinary pitch shifter pedal!
With a large rocker plate installed in the center of the pedal, the guitarist controls the number of steps that the pitch is shifted either up or down. If it is placed after distortion in the signal chain, it can be used to create red-hot wails which sound incredible and unique.
You can use the Whammy to shift up or down by a whole octave, or any interval of steps in between. Interestingly, when it is positioned after delay and reverb, the Whammy creates a sharp wah-like effect that can’t be replicated by any other pedal out there.
Fuzz Face
The Fuzz Face distortion is one of the most iconic pedals in history. It was used by Jimi Hendrix to create his signature red-hot tone, and when coupled with a wah pedal, it sounds incredible.
The reason that the Fuzz Face is a true rule breaker amongst regular fuzz pedals, is that no matter where you position it in the signal chain, it produces a roaring tone that merges beautifully with modulation, reverb, and delay.
A popular position for the Fuzz Face, which was used by David Gilmour of Pink Floyd, is toward the beginning of the signal chain. This means that when reverb is added later in the chain, the tone that is produced is thick, dreamy, and psychedelic.
The original Germanium PNP transistor design of the Fuzz Face is legendary. It’s considered to be a simple design these days, but when it was first introduced this pedal was a true innovator. Its creamy, rich distorted tone cannot be replicated by any other pedal and that’s the reason it’s been so popular for so many decades.
Electro-Harmonix POG
First introduced in 2005, the POG by Electro Harmonix is an incredibly unique effects pedal that creates layers of different octaves and plays them back simultaneously. The reason this pedal is considered to be an exception to the general rule of octave-shifters is that it also thickens the tone of the guitar considerably.
Placing the POG before distortion pedals in the signal chain makes things very interesting indeed. The thickness that the octave layers add to the guitar’s tone is ignited by the addition of saturation, and this creates a huge-sounding output which is perfect for playing stomping riffs.
The POG is also unique in that it can be used to make the electric guitar sound like a bass. By increasing the prominence of the sub-octave, the guitar’s tone deepens, and this sounds particularly interesting when the pedal is positioned towards the end of the signal chain.
There are many octave shifters on the market, but none have come close to the truly unique and strange sound of the EHX POG.
Which Cables Should I Use?
For your guitar pedals to work properly in a signal chain, you’ll need to use specific cables. Connecting guitar pedals involves plugging a cable into the input of one pedal, then coming from the output of that pedal into the input of the pedal which you want to come after it in the signal chain.
The guitar pedal jacks are 1/4″ which are the same size as the cables you plug into your guitar and amp. However, guitar cables are too long to use for these connections, so smaller versions known as patch cables are preferred.
Patch cables are very short, and they are designed for the specific purpose of linking guitar pedals in your signal chain. Their short length helps to keep your pedalboard tidy and prevents excess cables from hanging over the pedals, which could potentially obstruct the controls or switches.
For powering your pedals, if you’re using a power supply, you’ll need small power cables which are connected to the output on the unit and then into the small power input socket on the effects pedal.
Like patch cables, these thin power cables are usually short in length, although it’s a good idea to acquire a variety of lengths just in case you need to stretch the cable a slightly longer distance across your pedalboard in order to reach a particular pedal.
Another method that some guitarists use to connect their pedals to mains power is known as daisy-chaining. This involves powering multiple pedals from one plug, with several power cables running from it.
Cable Length
When using your guitar pedals to record or perform, it’s important that you take into consideration the impact cable lengths have on the effects. This is often overlooked, but using cable lengths that are too long can result in tonal degradation and signal-related problems.
Generally speaking, it’s not advised to use any unbalanced cables farther than 30 ft in length. Guitar jack cables are classed as unbalanced, whereas microphone XLR cables fall into the balanced category.
Ideally, you should keep your guitar cables under 20 ft to ensure that your signal doesn’t get adversely affected by the extra distance that it has to travel in order to reach your amplifier or your effects pedals.
There is a solution that can be used if you do need to use unbalanced guitar cables that stretch further than around 20ft. This involves converting the cables into balanced lines at the end which connects to your guitar, then converting them back to unbalanced at the end which connects to your amplifier.
To do this, you’ll probably need to use a device known as a ‘Studio Gear Interface’. These devices make it possible to create cable runs that stretch up to 300 ft in length using standard XLR mic cables.
This is commonly used at large gig venues when the sound engineer’s desk is a long distance from the band onstage. It ensures that no tonal degradation occurs despite the extensive length of the guitar cables.
Powering Your Pedals
When it comes to powering your pedals, you essentially have three options. Firstly, you can use individual power supplies or plugs for each effect. This isn’t very practical, as it requires you to have access to a large number of plug sockets, and the cables are likely to get messy.
The second option would be to power your pedals using batteries. Most stomp boxes can be powered using 9-volt batteries, but larger pedals may not offer this possibility. Batteries also run the risk of dying midway through a performance, rehearsal, or recording session. Consequently, relying solely on batteries is too risky.
That brings us to the most effective and efficient method for powering your pedals in the signal chain, and this is the method that the vast majority of guitarists who use multiple pedals choose.
PSUs, or ‘power supply units’, are devices that localize all of the power required for a guitar pedal signal chain. They are often designed in a brick shape and are plugged into the mains power.
A PSU offers multiple outputs of varying voltages. Some offer a large number of outputs, combining 9 volts, 12 volts, 18 volts, and 24 volts. Others are designed for minimalist pedalboards, offering the necessary number of outputs for a smaller setup.
One of the advantages of using a PSU to power the pedals in your effects signal chain is that you can leave the device permanently mounted to your pedalboard, with all of the patch cables plugged into the pedals.
This means that when it comes to setting up your gear, you don’t need to hook up each pedal to the power supply, saving you time and effort to focus on your performance or rehearsal.
Many guitarists choose to use a combination of batteries and a PSU to make their power supply as reliable as possible. All electronic devices have a certain risk attached to them, and there is a chance that the PSU could cut out unexpectedly.
That’s why installing batteries in your pedals as a backup is a good idea. If the PSU cuts out for some reason, the batteries are there to pick up the burden, and your signal will still be able to travel through the chain.
Battery Draining
The way that guitar effects pedal’s batteries drain is often misunderstood, so I’ll clear it up here. Effects pedals are commonly wired with a stereo input jack, which has two ground contacts. This essentially acts as a switch.
When the jack cable is not inserted into the pedal’s input, the two found contacts are separated. As a result, there is no electrical current drawn from the pedal’s battery, so it doesn’t get drained.
Alternatively, when a jack cable is plugged into the input, both of the ground connections become connected. This connection is made by the large ground surface on the part of the jack plug which is commonly known as the ring.
When this connection is made, the electrical current is able to flow, causing the battery to be drained. That’s why when you leave a jack plugged into the pedal’s input, the battery is likely to be dead the next time you use it.
This draining of the battery occurs, regardless of whether the effect is being used. Therefore it’s not the engagement of the effect which solely causes the battery to drain, but rather the fact that the jack cable is plugged into the input.
To summarize, the input jack acts as a simple switching mechanism for the power section of the pedal’s circuit. To avoid your batteries draining when you’re not using the pedals, be sure to unplug the inputs from the jack plug and this will preserve the battery for longer.
How Amplifiers Impact Pedal Performance
We’ve discussed at length how the way you order your guitar pedals affects your tone and dynamics, but another factor that shouldn’t be ignored is your choice of amplifier. There are two main types of amps, which both interact with your effects signal chain differently.
Tube amps, or valve amps as they are commonly also called, have been used for the best part of seventy years. These devices use small preamp and power amp tubes, which produce an electrical current that is eventually converted into your guitar tone.
These amplifiers are preferred by tone purists and lovers of vintage guitar sounds. One of the best things about a tube amp is that when the gain is cranked, you can access the sought-after tone of tube saturation, which is mild for distortion that sounds warm and immersive.
The second type of amplifier is solid state or transistor based amps. These often feature digital modeling and include a plethora of onboard effects. It’s also very common to find effects loops included on these amplifiers.
The main advantage of using solid-state amplifiers is that they can house a vast range of presets and tones, which can be instantly accessed. They lack the ability to produce tube distortion, but they can add distortion to the signal digitally which results in a very different tone.
The makeup of an amplifier impacts the way that your signal chain sounds because the effects pedals ultimately prepare the signal for the amp. It’s accurate to say that the amplifier is the final piece of the puzzle, and no matter how meticulously you assemble your pedals, the amp decides how they are projected in the end.
If you use an extensive selection of pedals in your signal chain, it’s important to have an amplifier with a clean tone that sounds good to you. This clean tone acts as the foundation upon which the pedals build sonic layers.
Recording With Your Effects Pedals
Once you’ve successfully decided on a guitar pedal order that works for you, you might be wondering what the best methods for recording your processed tones are. Thankfully, it’s not too difficult to get the sound of your pedalboard translated into a high-quality recording.
One way to achieve this is by simply placing a microphone in front of the speaker on the amplifier, with one end of your signal chain going into the amp’s input, and the other end into your guitar.
You then connect the microphone to an audio interface via one of the mix preamp inputs, set the levels, and record into your chosen DAW. This is a great method if you want your live guitar tone to translate into your recordings, providing you use the same setup as you would onstage.
The second method you could use to record the effects in your signal chain would be to bypass the amplifier and plug the pedals directly into the audio interface. This keeps the tone very clean, and no coloration from the amplifier occurs.
As a result, the effects pedals you use aren’t affected by the compression or other aspects of the amplifier. This usually makes them sound clearer and clearer, but the recordings lack the warmth that an amplifier provides.
If you don’t have an amplifier and therefore would like to record your effects directly into the DAW using an audio interface, one solution would be to use an amp modeling plugin in your recording software. Modelers allow you to recreate the tones of real amplifiers digitally.
It’s a good idea to experiment with these two methods of recording your effects signal chain. You can try out different condenser and dynamic microphones, or see how using a preamp or D.I box impacts the way your guitar pedals sound.
Pedalboards
An underrated aspect that has an influence on the way you order your guitar pedals, is the design and type of the pedalboard you use. Pedalboards are available in a variety of sizes, and some are more reliable than others.
To state the obvious, the larger the surface area on your pedalboard, the more extensive your effects signal chain has the potential to be. Some guitarists use pedalboards with multiple tiers to allow them to incorporate more effects into their chain.
The effects pedals are commonly attached to the board using Velcro or another sticking mechanism. Keeping the pedals firmly secured to the board minimizes the risk of them being moved around and potentially damaged in transit.
Another undeniable advantage of having a good quality pedalboard to store your effects is that it prevents you from needing to reassemble your guitar pedals in order each time you use them.
You can simply leave the pedals in your chosen order, put the pedalboard into its case and they’ll be ready to use instantly the next time you need them. Additionally, all of the patch cables and power cables can be left plugged in at all times.
Some pedalboards also have specially designed holes and gaps for the patch and power cables to slot through, preventing them from being strained or overextended.
Although the effects pedals are undoubtedly the most important part of your signal chain, the pedalboard you choose also plays a pivotal role, so it’s important to take care when setting it up to maximize efficiency.
The Importance of Experimentation
Although as I’ve described in this guide, there are some general rules of thumb that most guitarists follow when ordering their pedals, many of the most innovative tones have been a result of experimentation.
The tone is ultimately subjective, and therefore I’d encourage you to mess around with different guitar pedal orders to find what works for you. It’s always a good idea to start with a standard assembly, then see what happens when you swap certain effects around.
Not only does this increase your chances of coming up with your unique tone, but it’s also a valuable exercise for learning more about the way that guitar effects pedals interact with each other, and this knowledge can be applied to other areas such as mixing and using VST plugins when recording.
It’s a very rewarding experience when you stumble across a tone that sounds incredible and unique as a result of experimenting and tearing up the rulebook. This is how guitar pedal orders have evolved since they were first introduced in the 1960s.
The guitarists who achieve the most unique tones aren’t afraid of going against the grain. This doesn’t mean you need to use unconventional orders for the sake of it, but rather that you should be willing to try out new things and analyze the results they produce.
Placing reverb pedals before distortion, or starting your signal chain with a delay pedal may seem counter-intuitive, but this kind of experimentation may just lead you to discover the signature guitar tone that defines your sound.
Another enjoyable way to discover new methods of assembling your effects signal chain is by analyzing the way that your favorite guitarists ordered their pedals, and combining this with the methods used by other guitarists.
Often, the ones that are considered to be original are simply a result of guitarists taking certain elements from others who they admire, and repeating this process with several musicians.
It’s important to keep in mind that you can’t go wrong when it comes to your guitar pedal order. You may find that a particular order doesn’t sound good to you, but this is simply a learning curve that allows you to move closer to the ideal signal chain placement to suit your requirements.
Final Thoughts
Guitar pedal orders are a very important part of creating your desired tone. The way that you assemble the effects in your signal chain should be considered carefully, as this will ensure that you get the maximum performance out of your pedals.
The various examples I’ve outlined in this guide are to be used as guidelines upon which you can add your personal preferences. This will lead to you creating unique tones, or at the very least recreating the tone of the guitarist’s that you admire.
It’s important to keep in mind that there is no set in stone rules to follow. However, if you deviate from the conventional pedal orders too much, it’s likely that things will get a little unpredictable.
Then again, unpredictability can be a lot of fun! As your tastes change, you’ll likely want to incorporate new pedals and effects into your signal chain, so it’s good to learn as much as you can so that you can create the tones you want to access when the opportunity arises using specific pedal orders.
Hopefully, you’ve now got all of the knowledge you need to assemble the effects in your signal chain to create the tones that you desire. Most of all, it’s important to have fun and enjoy the process of learning!

My name is Chris and I’ve had a passion for music and guitars for as long as I can remember. I started this website with some of my friends who are musicians, music teachers, gear heads, and music enthusiasts so we could provide high-quality guitar and music-related content.
I’ve been playing guitar since I was 13 years old and am an avid collector. Amps, pedals, guitars, bass, drums, microphones, studio, and recording gear, I love it all.
I was born and raised in Western Pennsylvania. My background is in Electrical Engineering, earning a Bachelor’s degree from Youngstown State University. With my engineering experience, I’ve developed as a designer of guitar amplifiers and effects. A true passion of mine, I’ve designed, built, and repaired a wide range of guitar amps and electronics. Here at the Guitar Lobby, our aim is to share our passion for Music and gear with the rest of the music community.
Thank you for your very useful article, Christopher. I’m trying to deal with my stompboxes and multi FX pedals and this Is really a good starting point. Very well explained. I’m m going to start new experiments from here. Cheers, Luca
I have a engineering question/comment , the Fuzz Face in kit form from Grate Britten offers me 2 kinds of circuits using either the NPN or the PNP transistor . same circuit design but the polarized components diodes, capacitors, battery transistor is reversed on one ..How does that my peddle chain when or if I use a peddle with positive shield on input and outputs ? I am worried of burning out the other peddles
Where does the Looper pedal go in the chain?????????
@Ari I’ve only seen them at the end of the chain. I guess that’s to capture all the effects in use at the time of looping.