One of the most rewarding things you can do as a musician is building your equipment. DIY guitar pedals provide you with a perfect way to learn about the manufacturing of effects, and to create unique, individual tones.
Of course, the easy option would be to simply buy a pedal from a trusted manufacturer. But where’s the fun in that? Although the task of making DIY pedals may seem insurmountable at first, I can assure you that anyone can do it, providing you are willing to put in some time and learn the fundamentals of the craft. When it comes to taking on a DIY guitar pedal project there are different approaches to consider. Over the years, I have modified a number of pedals and have tested many DIY pedal kits. In this article, I’ll cover all the things I wish I knew when I got started.
The Different Levels for Building Your Own Guitar Pedals
You don’t need to have any previous experience to build your DIY pedals. Of course, it helps if you have some prior knowledge, especially a fundamental understanding of electronics. There are different entry points that you can take depending on your knowledge level and eagerness to tinker. In the list below you can find all of the various ways to build guitar pedals.
1. Modifying Your Existing Pedals
Sometimes the best entry into the DIY pedal building is modifying your existing effects. This doesn’t require you to build your pedal from scratch, and therefore there is typically a smaller work scope and learning curve placed upon you. Still, the process you will go through and the skills you will take away are similar to the process that you will follow when building a pedal from scratch.
There are plenty of modification guides online, which explain how to adjust popular effects pedals. You can replace certain components, upgrade circuitry, and increase the number of features. The only skills you’ll need are the ability to follow instructions and to do some basic soldering. Continue reading below in the next section as I cover some great ways to modify your existing pedals.
2. Using a Guitar Pedal Kit
We cover several great options for DIY pedal kits above in this article. This is the perfect introduction to creating your effects, because it provides you with the room to be individual, while still sticking to a blueprint for guidance.
Guitar pedal kits simplify the process dramatically. They include all of the necessary components and provide you with clear instructions. After building a pedal using his method, you will have gained a good understanding of the various steps involved, which you can use for more complex builds in the future. Later on in this article, I will give an overview of some of our favorite DIY guitar pedal kits.
3. Building from Scratch
Designing a guitar pedal completely from scratch requires an advanced skill level and a good deal of prior knowledge. I wouldn’t recommend jumping straight to this step if you have limited experience. Build your way up to this method by undertaking some of the easier ones a suggest previously.
If you feel ready to construct a DIY pedal on your own, you’ll need to begin with a prototype board, and continue to adjust your circuit design until you reach the desired results you’re looking for. This requires a lot of patience, and many hours of reading and watching tutorial videos online.
You should take encouragement from the fact that many of the most iconic guitar pedals were created using this method. An audio enthusiast takes matters into his own hands and creates the tone that he wants to hear from his guitar. You know how the story goes.
One thing to note is that to build your DIY pedal from scratch you will need a good understanding of circuit design. Although it may seem complex at first, this is a skill that anyone willing to research can learn. If you’d like to learn about some great starter projects for pedals you can build from scratch, be sure to read my section below on Pedal Designs To Build From Scratch.
5 Ways To Modify Existing Guitar Pedals
1. Improving Sound Quality or Adding Function
In this video, you’ll find thorough instructions on how to modify a guitar pedal to improve sound quality and expand its functionality. The pedal used to demonstrate this is the malleable BOSS DS-1 distortion, which is one of the easiest pedals to modify. The video focuses on improving the low-end frequencies of the distortion pedal.
Along with a soldering iron and solder, here is the list of components required to perform this modification:
- 5 capacitors
- 3 resistors
- 2 diodes
- 1 LED
2. Modifying a Cheaper Model to Sound like a More Expensive Model
Rather than spending a small fortune on a new pedal, you could attempt to modify your existing, cheaper device to improve its capabilities. In this video, you are presented with a step-by-step walkthrough of how to transform the low-priced BOSS SD-1 Super Overdrive into the revered Ibanez Tubescreamer TS808 type circuit.
This modification is relatively easy, and if done correctly, you’ll have the legendary Tubescreamer tone and have gained some valuable pedal-tweaking experience in the process! You can find the extensive list of required parts in the video description.
3. Modifying for True Bypass & LED Indicator
Since it was first introduced to the masses in the autumn of 1950, the Fender Telecaster has built a legacy that other electric guitars can only dream of. Responsible for some of the most iconic guitar tones in music history, the Telecaster’s popularity continues over 70 years after its original inception.
4. External Tap Tempo Mod
Tap tempo may seem like a complex modification to make to a pedal. In reality, it’s surprisingly straightforward. By following the instructions in the video, you can add a tap tempo build to a delay or modification pedal in no time. This will allow you to synchronize the pedal’s tempo to that of an existing backing track or live band.
To perform the tap tempo mode, you’ll need:
- Small metal enclosure
- Drill
- Footswitch
- Jack connector
- Momentary switch
5. Modifying a Volume Pedal to be a Pedalboard Interface/Patch Bay
Volume pedals should be a staple of any guitarist’s pedalboard. In this detailed video, you can learn how to modify this dynamic-controlling device to expand its capabilities. You learn how to create an interface/patch bay for your entire rig, and what’s more, it costs very little and is extremely easy to do!
Here are the components and equipment you’ll require:
- Octopus arms
- Wire strippers
- Touch labeler
- Electrical Tape
- Multimeter
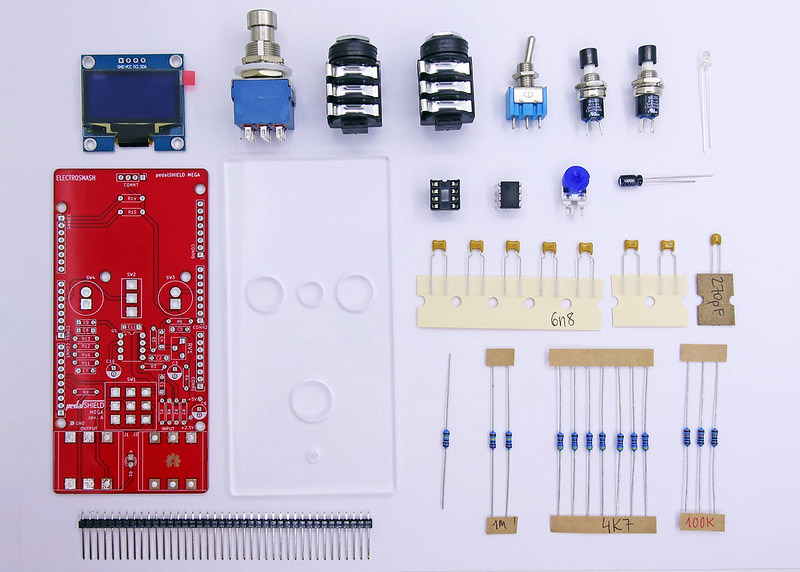
Here Are The 8 Best DIY Guitar Pedal Kits (All Types)
1. TTone DIY Overdrive Kit
Estimated Price: $30
Effects: Overdrive
Dimensions: 112mm x 61mm x 31mm
Difficulty Level: Beginner
My Review: This DIY Overdrive Kit by TTone allows you to build a classic, vintage-style pedal. It’s designed to simplify the process as much as possible and is therefore perfectly suited to those who are attempting their first pedal build.
Included with this kit are clear, step-by-step instructions, all of the necessary hardware and electronic components, and of course, a sturdy metal enclosure. The PCB itself is professionally designed, and all of the holes on the enclosure are pre-drilled, making it very easy to assemble.
Bottom Line: If you’re looking for a simple DIY pedal kit so that you can gain confidence and learn the fundamental skills, this Overdrive pedal by TTone is a great place to start. It includes three rotary knobs, a high-quality PCB, and all of the switches and connectors you need.
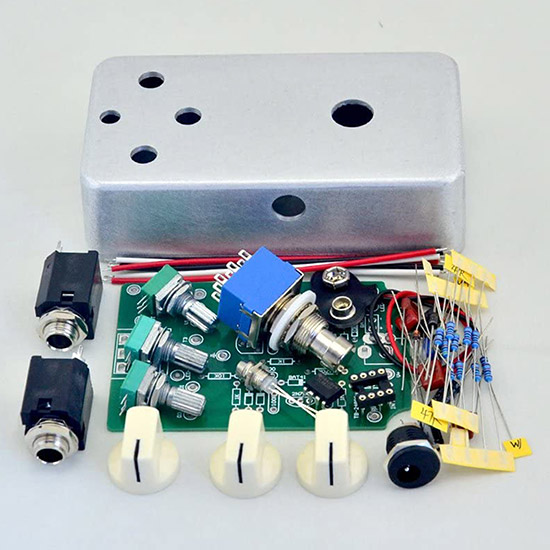
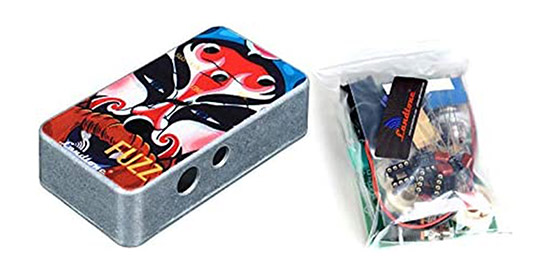
2. LandTone DIY Fuzz Pedal Kit
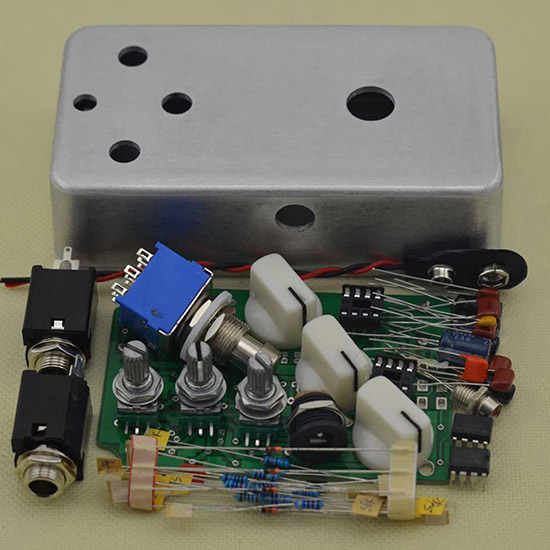
Estimated Price: $30
Effects: Fuzz
Dimensions: 112mm x 61mm x 31mm
Difficulty Level: Beginner
My Review: Fuzz pedals are regarded as one of the easiest guitar effects to build yourself. With this LandTone offering, you can learn all of the basic processes that need to be followed to successfully assemble your pedals.
With a hand-polished aluminum chassis that is perfectly sized to accommodate the PCB, assembling this fuzz pedal is a breeze. There are some challenges presented when you come to connect the various switches, but this provides you with a valuable pedal-building experience that will help you when you move onto more complex build kits.
Bottom Line: For guitarists, there’s nothing quite as satisfying as blasting out a powerful riff or shredding a solo with a fuzz-drenched tone. With the LandTone DIY fuzz pedal kit, you also get to enjoy the fact that you have built and assembled the pedal.
3. TTone DIY Tremolo Kit
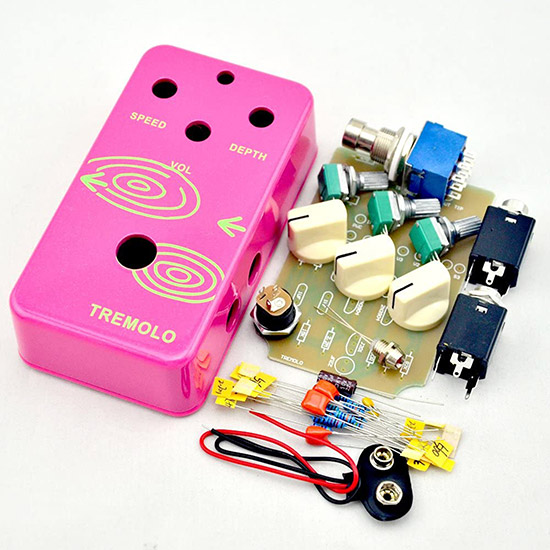
Estimated Price: $30
Effects: Tremolo
Dimensions: 112mm x 60mm x 32mm
Difficulty Level: Intermediate/Advanced
My Review: Slightly more complex than the basic DIY pedal kits, this Tremolo build kit by TTone is a perfect step up for those who are familiar with the basic principles of assembling effects pedals. With its flamboyant pink housing, the pedal is bound to draw attention from other guitarists.
Unlike beginner-level build kits, TTone has designed this tremolo pedal so that you can drill the holes in the enclosure yourself. There are detailed instructions on how to do this, in addition to information about how to weld the components correctly, and clear schematic diagrams.
Bottom Line: Although this DIY Tremolo Kit may pose a few challenges, it’s a lot of fun to build. Tremolo is regarded as a step up in difficulty from fuzz or overdrive pedals, so this is the ideal build kit for those who feel confident in their abilities. And what’s more, the effect it produces rivals any high-end tremolo on the market.
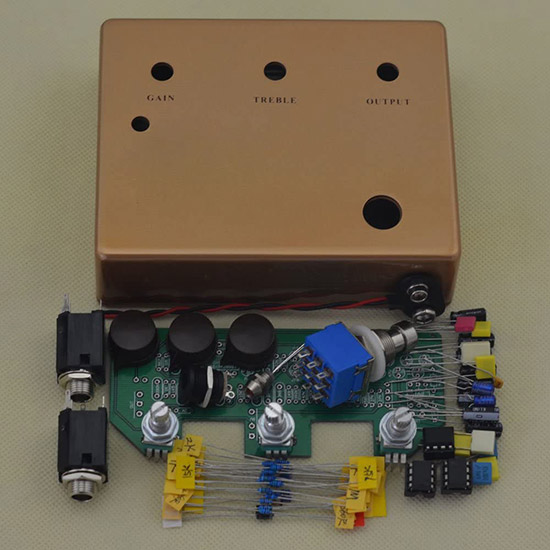
4. LandTone DIY Overdrive Kit
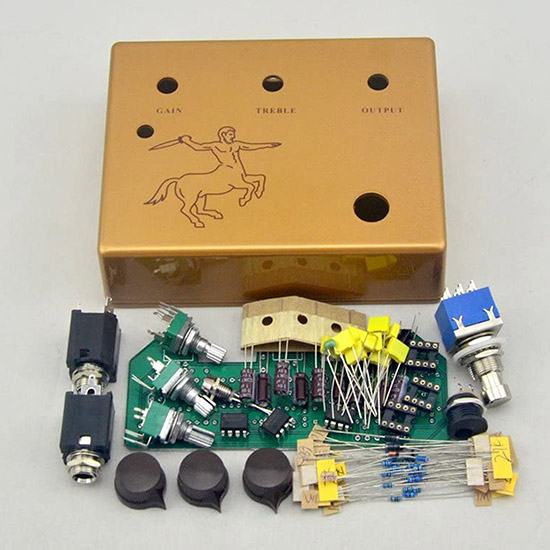
Estimated Price: $45
Effects: Overdrive
Dimensions: 112mm x 61mm x 31mm
Difficulty Level: Beginner/Intermediate
My Review: With a distinctive horse design etched on the solid metal chassis, this overdrive pedal kit is ideal for beginners who have little experience but aren’t quite ready for more advanced builds yet. It utilizes a classic, vintage PCB that produces a warm, immersive overdrive fit for many musical styles.
Everything from the styling of the knobs to the FET-based op-amps is designed to replicate the classic overdrive pedals that have defined genres over countless decades. It’s pretty simple to assemble providing you follow clear instructions.
Bottom Line: Overdrive is one of the most-used guitar effects ever to be invented, and now you can enjoy high-quality breakups without needing to purchase an over-priced pedal. Plus, with this DIY kit, you get the satisfaction of knowing that you played a large role in the creation of the pedal.
5. TTone DIY Delay Kit
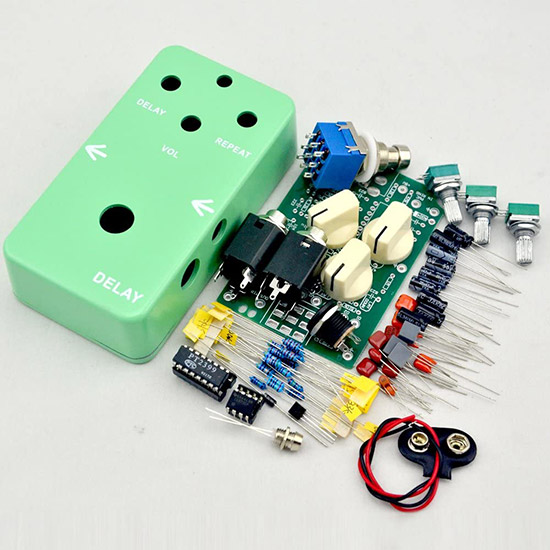
Estimated Price: $30
Effects: Delay
Dimensions: 112mm x 61mm x 31mm
Difficulty Level: Intermediate
My Review: Delay is a notoriously difficult effect to build, but with this TTone DIY kit, the process has been significantly simplified. The kit contains all of the switches, transistors, and wires that are required for sculpting this immersive effect so that you can follow the instructions and assemble it piece by piece.
Perhaps the standout quality of this delay pedal kit is the high-quality aluminum chassis, that is perfectly molded to encase the various inner components and the PCB. Once you’ve assembled the effect, you can enjoy versatile delay with varying timings, controlled using the three included rotary knobs.
Bottom Line: Once you’ve successfully built your fuzz or overdrive pedal, you’ll likely be looking for the next challenge to expand your skills. Delay is the ideal effect for this, as it combines tone and timing. This detailed kit provides you with everything you need to create a solid, reliable delay pedal for the guitar.
6. TTone Klone Kit
Estimated Price: $45
Effects: Klone Overdrive/Boost
Dimensions: 119 mm x 94 mm x 39 mm
Difficulty Level: Beginner
My Review: The legendary Klon overdrive pedal has long been popular amongst guitarists. However, the limited production of the original has led to many musicians deciding to create their versions of this overdrive pedal.
With the TTone Klone kit, you gain access to identical components used to sculpt the original pedal. This kit is extremely simple to build and is therefore suitable for people of all experience levels. The PCB is built to a very high standard, and the overall tone of the pedal is impressively close to the original Klone.
Bottom Line: Now and then, a guitar pedal is created that revolutionizes its effect category. The Klon is one of those pedals, and conveniently, it is very easy to assemble. With this replica kit, you get all of the individual parts that combine to create the classic Klon tone.
7. TTone DIY Compressor Kit

Estimated Price: $30
Effects: Compression
Dimensions: 112mm x 61mm x 31mm
Difficulty Level: Beginner
My Review: Although compression may not get the credit it deserves, it is undeniably an essential part of any guitar effects pedal chain. Indeed, there are more transformative and perhaps exciting effects out there, but the dynamic control that compressors offer allows those effects to flourish.
This DIY compressor kit is suitable for novices with no previous experience in pedal builds. It comes with a stylish, black chassis, that is specifically designed to house all of the resistors, transistors, switches, and cables.
Bottom Line: Extremely easy to build, this DIY compressor build kit is both rewarding and educational. It teaches you the basics of guitar pedal builds, with some slightly challenging aspects along the way. The compression it provides is very clean and reliable and makes a worthy addition to any pedalboard.
8. TTone DIY Fuzz Kit
Estimated Price: $30
Effects: Fuzz
Dimensions: 112mm x 60mm x 32mm
Difficulty Level: Beginner/Intermediate
My Review: The majority of fuzz pedal build kits are so simple that even those who lack any experience in this field can assemble them in a short time. However, this TTone kit is more complex than your average fuzz offering.
The PCB is made from a high-quality PCB board and can be welded on either side. There’s also the slightly eccentrically designed aluminum shell, which is joined by all of the necessary wires, electronic components, and connectors required to build this fuzz pedal.
Bottom Line: If you’re looking for a slightly more challenging build than your stereotypical fuzz kit, this TTone offering is an option worthy of consideration. Featuring interesting artwork, and with a huge-sounding tone, it’s a very enjoyable build kit.
With so many pedal kits and schematics out there, it can be difficult to know which to attempt first. It’s important to start with a pedal build kit that is aligned with your level of experience and knowledge of schematics.
Here Are 4 Guitar Pedal Designs To Build From Scratch – Schematics and Parts
In this section, we’ll look step-by-step at how to build a guitar pedal from scratch. I’ll show you a list of all of the components and equipment you’ll need to complete the builds, and detailed instructions to guide you through each phase of constructing and assembling the pedal.
1. Build Your Own TS9 Tube Screamer Pedal Replica
Creating your pedal from scratch is a highly rewarding and satisfying experience. The iconic TS9 by Ibanez is a great entry point for building your first pedal, and this video explains all of the necessary measures you need to take and you can find additional circuit board layout guidance here. Even if you have limited experience in this field, you’ll be able to follow the steps outlined in the video and enjoy creating your version of the TS9 to add to your pedalboard.
There’s quite a long list of components required for this build, all of which can be found in the video’s description.
2. Build Your Own Buffer Pedal
If you want to learn how to build your DIY guitar pedal but don’t have the time to invest countless hours into it, you’ll love the concise and simple instructions in this video. It focuses on building a buffer pedal, with an op-amp design, to add brightness to your guitar tone. The whole process only takes around ten minutes, and you don’t need to invest in a whole lot of equipment or components.
One of the most rewarding things you can do as a musician is building your equipment. DIY guitar pedals provide you with a perfect way to learn about the manufacturing of effects, and to create unique, individual tones.
3. Build Your Own Fuzz Pedal
Fuzz pedals provide the perfect introduction to the world of schematics and DIY build kits. Specifically, vintage-style fuzzboxes like the legendary Fuzz Face are well suited to beginner pedal builders. Undertaking the task of building this pedal is relatively inexpensive, and allows you to further your knowledge during the process so that you can potentially tackle more complex builds in the future.
One thing to bear in mind before starting is that although Fuzz Face pedal builds are pretty straightforward, it’s still very easy to create one with a sub-par tone. You must take your time with this build and ensure that you follow the relevant instructions and schematics closely.
For a Fuzz Face circuit schematic, bill of materials, and recommended board layout that you can build yourself, see this PDF here.
4. Build Your Own Overdrive Pedal
Once you’ve successfully built your DIY fuzz pedal using the relevant schematics, the next logical step is to attempt an overdrive pedal.
The following video is a great starting point for understanding a fundamental Overdrive circuit schematic as well as basic component needs:
To get you started building your own classic overdrive DIY pedal kit complete with circuit schematic, bill of materials, and board layout, see this PDF here.
Comprehensive Guide to DIY Guitar Pedal Projects
In this comprehensive guide, you’ll find all of the necessary information you need to start producing DIY pedals. Regardless of your experience, or the scale of your ambitions, there will be plenty of useful tips to get you started, along with more advanced concepts.
The topics you will find in this guide are:
- Essential equipment
- Optional equipment
- Hardware and components
- Design and aesthetics
- Why should you build your guitar pedals?
- Other useful information
Essential Equipment Needed
If you’re considering making your DIY guitar pedals but feel that you might be lacking in the necessary equipment, rest assured. You don’t need that much in the way of tools and specialized equipment to get started.
There are some pieces of equipment that are required to start the pedal producing process, but thankfully these are common and easy to get hold of. They’re also fairly inexpensive, so you don’t need to invest a lot of cash initially.
Let’s take a look in detail at the essential equipment you’ll need to get started.
Wire Cutters/Stripper
A large portion of creating a guitar pedal comes down to manipulating wires. To do this, you need a decent set of wire cutters and wire stripper. These tools are both classed as essential because you’ll be doing plenty of cutting and preparing of wires.
You could in theory use a wire cutter to also strip the wires, but this is a technique that usually requires experience and practice. A wire stripper makes this job much easier. The stripper is used to remove the plastic covering from the wire accurately and efficiently.
Soldering Iron & Solder
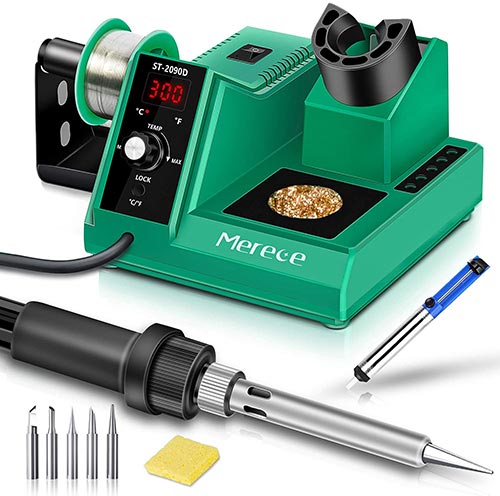
Two other pieces of equipment you’ll need are a soldering iron and solder. If you’ve got no experience using a soldering iron before, don’t be disheartened. It’s a very easy skill to learn and you’ll get the hang of it in no time.
You don’t need to spend a small fortune on your soldering iron. Providing it has enough power (30w +), it will do the job effectively. Soldering irons are good investments for guitarists because they can also be used for changing pickups and several other music-related purposes.
A soldering iron similar to the one shown above will be more than capable for DIY pedal builds.
The two main types of solder you’ll likely come across are lead-free solder and lead-based solder. These two differ in terms of the temperature at which they begin to melt. The melting temperature of lead-free solder is much higher than its lead-based counterpart, and therefore you need to use the latter for this purpose.
Using a lead-based solder that has a tin/lead ratio of 60:40 is your best bet when creating DIY guitar pedals. This is because it will be easy to manipulate, but at the same time, strong enough to handle the process.
Multimeter
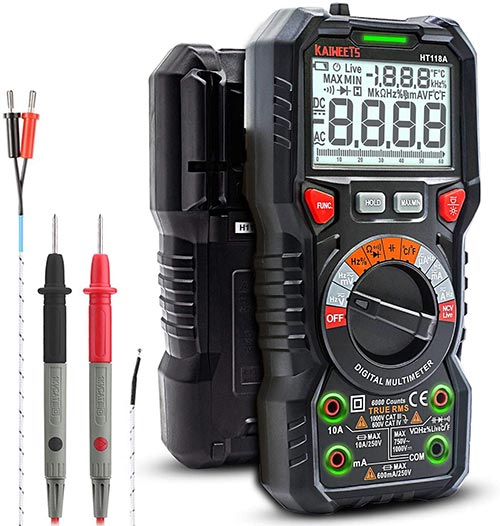
Another thing you’ll need when building your pedals is a multimeter device. This useful piece of kit is not as vital as the aforementioned equipment, but having one at your disposal makes the process much easier and prevents you from running into common problems along the way.
What exactly is a multimeter? It is a compact device that allows you to test the electrical current of your guitar pedal circuitry, ensure that the wiring is correct, and identify any mishaps that may have occurred. They’re pretty simple to use and require very little time to become familiar with.
Optional Equipment
In addition to the required equipment I just listed, there are some items that, although may not be quite as essential, still make the process of building your guitar pedals much easier. For convenience, if you can get hold of the following pieces of equipment I would strongly recommend doing so.
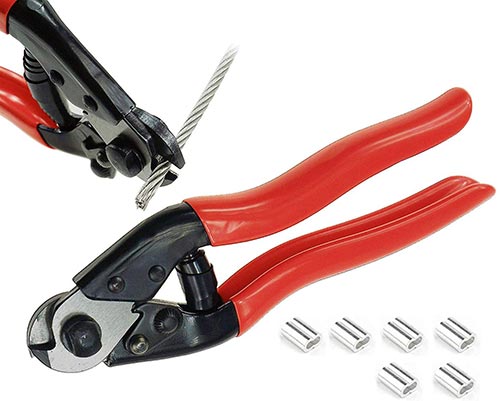
Pliers
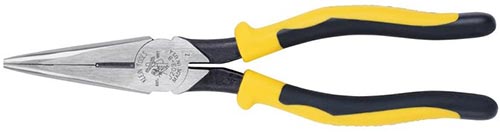
Using a reliable pair of needle nose pliers is will help you to reach into the tight spaces when building your guitar pedal. If you intend to build small DIY effects, then thin pliers will come in very useful indeed. When you’re wiring up the inputs and outputs, or the footswitch, you’ll need to reach into tight gaps.
Clips
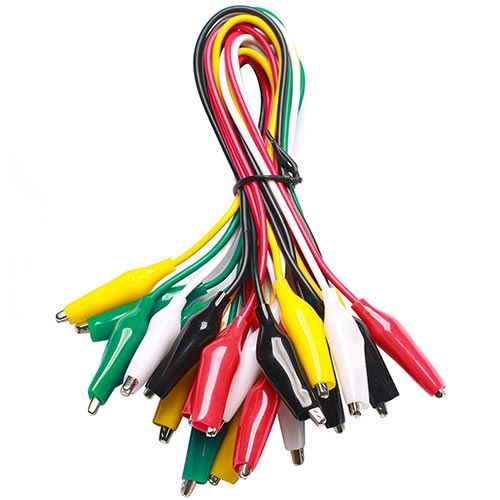
If you can get hold of some alligator clips, these will prove useful too. Although it is possible to test your pedal using tape and wires, clips make this process much easier and faster. You’ll need to test the pedal’s circuitry before you encase it in the chassis, and alligator clips are the most effective ways to do this.
Fan
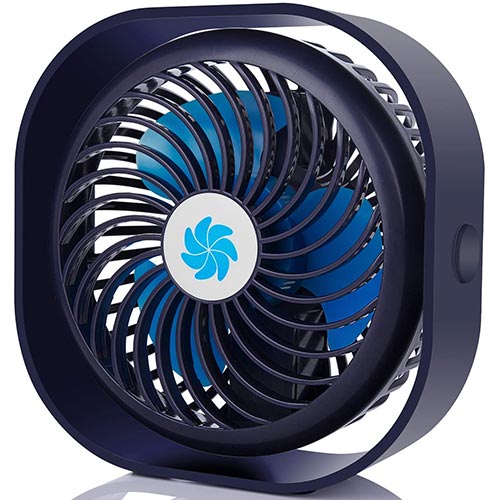
Due to the toxicity of the fumes created when heating solder, you might want to use a small fan, or some kind of extractor fan to prevent them from being inhaled. A simple USB fan will do the job, and redirect the fumes away from your airways to protect you from any harm. Make sure that you point it away from you to avoid inhaling the smoke!
Magnification Headset
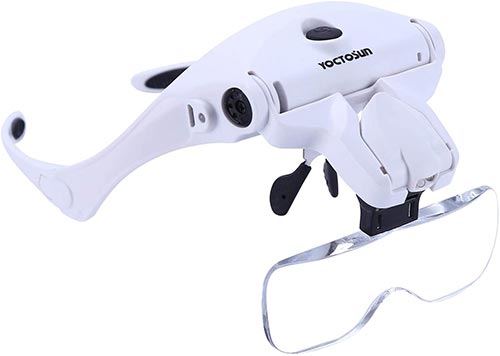
For those of us who don’t have the clearest eyesight, magnification headsets provide a useful way to see exactly what’s going on inside a pedal. Everything can get quite tight and compact when you’re building DIY pedals, so being able to see what you’re doing is essential to avoid making any mistakes.
Third Arm Kit
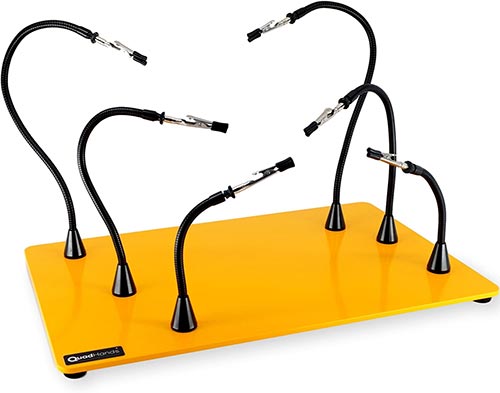
Another useful tool that would make building DIY pedals easier is a third arm kit. These smart inventions provide you with multiple holders that can grip the components of the pedals while you work on them, allowing your hands to be free for other purposes.
Soldering in particular can prove difficult if you don’t have an extra pair of hands, but a third arm kit takes care of this problem.
Hardware and Components
One of the common stumbling blocks that aspiring guitar pedal builders often come across is being unfamiliar with the various components and hardware that make up an effects pedal. The truth is, it’s pretty simple if you break them down individually.
In the following section you’ll find a description of all the hardware and components you’ll encounter on your first build.
Pedal Chassis & Enclosures
The chassis or enclosure of an effects pedal is the casing that protects its inner components. They are made from a variety of materials and come in many different sizes, depending on how large or small you want to make the pedal.
Most pedal enclosures are made from aluminum, which is a reliable metal that provides adequate shielding. Some manufacturers like to use alternatives, such as customized tins, wood, or plastics. If you’re looking for a conventional pedal design, then I’d stick with the solid choice of aluminum.
When you search for pedal chassis and enclosures, you’ll likely be presented with four different sizes. Each size fits a different type of pedal and has fixed dimensions. Depending on the number of controls and parameters you want to install on your DIY pedal, you’ll need to get an enclosure that can fit them on.
Also, if you intend to make your pedal capable of being powered by a 9-volt battery, you will need to ensure that the chassis you choose gives you enough space for the circuitry to sit alongside the battery.
The main sizes are as follows:
- 1590A – 92 x 39 x 27mm
- 1590B – 112 x 60 x 27mm
- 125B – 121 x 66 x 35mm
- 1590BB – 119 x 93 x 30mm
PCBs (Printed Circuit Boards)
I’ve mentioned them several times already in this guide, but if you’re just starting on your DIY pedal building expedition, you might be unaware of what exactly a PCB is. Short for printed circuit boards, these devices are the most common and most effective ways to wire a guitar pedal circuit up correctly.
The great thing about most PCBs is that they have symbols and labels etched on the front which signify where each component should be located. This makes it much easier to position all of the various components and limits the chance of making a mistake.
If you find yourself taking pedal building more seriously, you could even get into designing your PCBs. This is a pretty difficult skill to undertake, but it’s achievable with dedication and perseverance.
Guitar Pedal Footswitches
If you have a guitar pedal nearby, examine its components. The chances are, if it’s a conventional-style effects pedal, it will have a footswitch located somewhere in the center, or along the bottom, which is used to activate and turn off the pedal.
Footswitches are integral parts of any effects pedal. Not only do they control when the pedal is on or off, but they can also be used to switch between various modes, select certain effects, or change parameters such as tap tempo.
When building DIY guitar pedals, you should be aware of two varieties of footswitches. Firstly, momentary footswitches work by enabling a section of the circuit when they are depressed. These are less commonly used for guitar pedals, compared to the other variety, latching footswitches.
The reason that latching foot switches are so effective for guitar pedals is that they allow you to switch between two states (on/off) every time the switch is depressed. When you’re looking for a DIY pedal build kit, make sure it includes a latching footswitch.
Other Components
We’ve covered the main components and hardware that you will need for building your first DIY guitar pedal. Now let’s take a look at some of the additional components that you are likely to come across. Don’t worry if you haven’t seen any of them before, I’ll explain what they do and how you can use them.
Some common additional components are:
- LEDs
- Resistors
- Capacitors
- Diodes
- ICs
- Transistors
LEDs are used to indicate whether the pedal is on or off. They are useful because they provide a relatively bright light that can be viewed on a dimly lit stage. Although they’re not essential, it is a good idea to consider installing one on your DIY pedal.
Resistors consist of four or five colored lines, which describe the electrical value. They usually come in blue or cream aesthetics. Capacitors vary in size and are shaped either as circles or cylinders.
Diodes are small plastic or glass casings that are lined on one side. ICs or integrated circuits are small black chips that have a minimum of six pins. Finally, transistors are cased in black silicon or metal housing and have three-pin legs.
Design and Aesthetics of DIY Pedals
Once you’ve grasped the methods used to build your DIY guitar pedal, the next logical thing to consider is how you want to design the pedal. Although music purists would argue that the sonic results of an effects pedal are by far the most important selling point, many guitarists tend to be attracted to pedals that have appealing aesthetics.
Indeed, this is a purely subjective matter. What one guitarist considers a fine-looking pedal, might seem very unattractive to another. That’s why it’s important to design your pedal to suit your personal preferences. You can use existing popular pedals for inspiration when choosing the color and design of your own.
The simplest method you can use to design your pedal is by sticking with the original finish of the metal housing that you choose. If you enjoy the blank look of aluminum or steel, then you can stick with this and keep things simple.
Or, if you are more of a flamboyant character, you might prefer to print some custom graphics on the housing of your DIY pedal. This can be a really fun and rewarding process. You could either draw out your design or use graphics software to create it. Then, you’ll need to screen-print the design to your pedal, which is a process that is pretty easy to learn and looks highly professional.
Other methods you could use to improve the appearance of your DIY pedal include polishing it with sandpaper to make it smooth, etching a 3D design into the pedal’s casing, spray painting it with colors of your choice, or creating swirling designs using the hydro dipping technique.
Powder-coating is another popular method, which results in a refined finish. Some might prefer to use the easy and impermanent option of using vinyl stickers. You could also use a UV laser to print the artwork onto the pedal’s chassis.
The Simplest Types of Guitar Effects Pedals to Build
If you’re interested in building your DIY guitar pedals, then I assume you’ve got some knowledge of the various types of effects pedals that you have to choose from. If you aren’t familiar, don’t worry, I’ll describe the most common ones in the following section. Some effects are easier to build than others, so I’d recommend starting with something simple like a small fuzz pedal.
Gain Boosters
Gain booster pedals are perhaps the easiest variety to build. The effects that fall into this category are distortion, fuzz, and overdrive. These types of pedals use fairly primitive and simplistic circuitry that provides a perfect entry point for novices and beginners.
The great thing about gain-boosting pedals is that they completely transform the tone of your guitar. They are ideal for ramping up the ferocity and aggressiveness for a solo, or a riff. They provide a nice contrast from the clean tone.
Modulation
Another type of guitar effect that you could potentially build, is modulation pedals. They are a little more complex than fuzz or distortion, but it depends on which form of modulation you choose to build. The effects that fall into this category include chorus, flangers, phasers, tremolo, vibrato, octave-shifters, and filters.
Modulation pedals are highly compatible with a variety of guitar playing styles, so building one would be a great idea if you feel confident enough. You could start with something simple like a chorus pedal, and build up to octave shifters once you’ve got more experience.
Reverb/Delays
Reverb and delay pedals are two of the most popular varieties of guitar effects. They drape your clean tone in spacey atmospheric sounds, causing the notes to decay and tail off. These pedals aren’t the easiest to build, but it’s doable if you’ve built up the necessary skills.
Reverb and delay can be used either as dramatic effects that make your guitar’s tone almost unrecognizable or in more subtle ways. They are very versatile pedals that lend themselves to several musical styles and genres.
Dynamic Pedals
Dynamic pedals are pretty simple to create. They use fairly primitive circuitry, similar to a fuzz pedal. These effects control the dynamics and volume of a guitar. They include compressors, EQ, limiters, volume pedals, and wah.
Although dynamic pedals don’t produce the tone-bending effects of some of the more dramatic pedals I’ve listed, they are equally as important nonetheless. Creating a good quality compressor, for example, will allow all of your other pedals to work to the best of their abilities.
Multi-Effects Pedals
If you manage to successfully create many single-effect guitar pedals, and you’re very confident in your ability, you could try creating a multi-effects pedal. This is a very difficult thing to do, and it requires expert-level skills.
Multi-effect pedals are great because they provide a guitarist with access to several processing options without having to switch between standalone pedals. They invoice very complex circuitry, but building one would be very impressive and rewarding. If you’re feeling up to the task, this could be a good end goal to aim for!
Why should you build your Guitar Pedals?
Many reasons building your DIY pedals is a better option than buying a pre-existing one. Of course, some classic guitar pedals can’t be easily recreated, and therefore do need to be bought. However, learning to build your own is a great way to expand your knowledge and add a personal touch to your pedalboard.
If you’re the kind of person who enjoys a challenge, then you’re in luck. The great thing about DIY guitar pedals is that you can choose how complex you want to make them. If you’re experienced with electronics, you might feel comfortable diving straight into the deep end. Conversely, a complete novice can start with a simple pedal build and progress from there.
Revolutionize Your Sound
Perhaps the greatest benefit to making your guitar pedals other than the gained knowledge is the sonic effect it has on your tone. If you are a guitarist or other instrumentalist, the thought of creating a unique pedal should excite you.
In many ways, guitar tones have stagnated in recent years, simply due to the repetitive use of popular pedals, amps, and guitars. Therefore, when you design a DIY guitar pedal, you can ensure that it is slightly different from anything else on the market.
When you reach an advanced skill level, you will be able to recreate the tones that you hear in your head and bring them to fruition. Indeed, this requires plenty of time invested into perfecting your craft, but why not aim big.
Learn To Modify Your Effects
Another reason that you should consider building your DIY guitar pedals is that it teaches you to modify your existing effects. I’m not suggesting you should start taking all of your expensive pedals apart and rearranging the inner circuitry, but with experience, you will be capable of tweaking and personalizing them if you wish.
Again, this personal touch will ensure that your tone is different from everyone else’s. The more knowledge you gain about producing DIY pedals, the more you will understand how popular stompboxes operate, and you can swap out certain components to personalize their effects.
You can also save a lot of money by creating DIY pedals, rather than forking out for the real thing. Some pedals cost a significant amount of money, and although there are many benefits to buying a genuine product, you can get similar results by building your own.
Enjoying the Process
Finally, another good reason for building DIY guitar pedals is the simple fact that it’s a lot of fun. Don’t get me wrong, there will be challenges and plenty of frustrating moments along the way, but on the whole, you’ll find the learning experience to be extremely rewarding.
Imagine plugging into a distortion pedal that you created, and shredding out a solo. The feeling of satisfaction is enough reason to embark on this journey. Not to mention, the more time you put in, the better you’ll get, and the more complex creations you can attempt.
General Tips and Advice for Building DIY Guitar Pedals
Building your guitar effects pedals is like any other skill – it requires research, patience, and perseverance. Whatever your experience level, there are some basic rules to follow that will help your endeavor to be a success.
Provided you take your time and gather all the information you need, there’s no reason that you can’t start to produce high-quality DIY pedals in a relatively short time. In the following sections, you’ll find some general advice that will help you to stay on track.
Start Small
If you are a complete novice or have limited experience building effects pedals, it’s a good idea to start small. Indeed, it can be tempting to jump straight into complex builds, as these are arguably the most exciting. However, this will likely lead to disappointment if they aren’t a success right away, so starting with basic pedal builds is the better long-term option.
You should aim to build your foundational knowledge before physically starting. It’s important not to “run before you can walk”, as the saying goes. Set achievable, short-term goals that will help you to gain the required skills to build DIY pedals. Once you’ve ticked them off, you can increase the complexity of your builds gradually.
It’s similar to learning how to play the guitar or any other instrument. We’d all love to start shredding out a Van Halen-style solo the moment we first pick up a guitar. The reality is, we must learn basic concepts and skills, such as pentatonic scales, chord shapes, and strumming techniques. If we dive straight into the deep end, this will end in us become disillusioned by our lack of ability and knowledge, and make it much more likely for us to give up.
If your skill level is already developed, then, by all means, aim to create more complex DIY pedals. Self-awareness is the key here. Someone with a background in electronics is likely to find the learning process much easier than someone who has never seen a circuit or breaker switch in action before. Assess your ability, and challenge yourself to improve.
Use the Resources at Your Disposal
To successfully build DIY guitar pedals, you will need to acquire the equipment I covered earlier in this article. Nevertheless, don’t let a lack of resources prevent you from getting started. If you have some of the equipment but not all of it, you can start to build your pedals and learn about the functions of the various components through trial and error.
Over time, you can build up a collection of tools and equipment that will make the process much easier. Too many people fail to get started because they don’t have the necessary resources initially, but there’s always something you can do to begin the process. Even if it’s just taking one of your pedals apart and rebuilding it, this will teach you valuable skills and prepare you for when you have the equipment you need in the future.
Perseverance is Key
Building DIY pedals is easy once you gain the necessary skills and resources. With that being said, cultivating these skills requires a level of patience. It’s likely that you’ll get frustrated when something doesn’t work, and these are the times when many aspiring pedal creators give up.
If you push through the setbacks, you’ll be rewarded in the near future. Again, it’s similar to learning how to play the guitar. Many people buy a guitar and amplifier, but get downhearted when they can’t get their fingers in the right place to make a nice sound.
Persevering through the initial discomfort of learning how to create DIY pedals is vital if you want to make it a long-term hobby. Research extensively, and use all of the resources at your disposal, but most of all, stick at it and you’ll get there eventually!
Learn from your Mistakes
When you inevitably make a mistake, it’s important to learn from it rather than see it as a reflection of your skills. Keeping a journal is a great way to monitor your progress, and ensure that you don’t make the same mistake twice.
The good news is, most of the components that are used to create DIY pedals are fairly cheap to replace. And, in most cases, you won’t damage them beyond repair if you make a mistake. Although it can be frustrating to get things wrong, these mishaps are actually the most beneficial times for learning how to do things more effectively.
Get Feedback from Musicians
If you are part of a community of musicians, you can use this to your advantage when creating DIY effects pedals. There’s nothing more valuable than genuine feedback from guitarists. It’s difficult to critique your own creations accurately because you are likely to get attached to the pedal, and this could skew your perception of how well it performs.
Get in contact with any friends you have who play guitar, and whose opinions you trust. Let them borrow your newly designed DIY pedal, and ask for their honest feedback on aspects like the tone, operation, control placement, robustness, and reliability.
If you don’t know many people who play the guitar, ask your friends if they know of anyone. Guitarists are everywhere if you look for them! You could even consider making a survey list that allows the guitarists to rate each aspect of your pedal, and leave you feedback on how it can be improved.
If someone points out a weakness in your creation, be sure not to take it personally. It’s all part of the process, and the more you learn from the opinions of dedicated musicians, the more you can improve your DIY pedals in the future. It’s no good asking your best friend who doesn’t play the guitar what they think of the effect you’ve created because they’re likely to tell you it’s great out of politeness!
Set Short & Long Term Goals
One of the most effective ways to ensure your progression as a DIY guitar pedal builder is by setting tangible goals to aim for. Of course, the goals you set will directly correlate to your ambitions. If you’re aiming to create a single, simplistic fuzz pedal, you are likely to achieve this pretty quickly.
If you’re aiming higher and want to eventually produce a full pedalboard worth of DIY effects, then setting long term goals is essential. Even if it’s something that seems relatively insignificant in the grand scheme of things, such as learning how to connect a footswitch, ticking this goal off your list will provide you with a sense of progression and satisfaction.
Setting goals also encourages you to stick to a timeframe. It’s easy to put off spending time improving your guitar effects projects if you don’t set deadlines. Give yourself a certain amount of time to reach your goals, and this will hold you accountable when you perhaps don’t feel like putting in the work on some days.
Testing Your Pedals Live & Recorded
When you’ve created your first DIY effects pedal, you’ll be understandably excited to test it out. To get a balanced representation of how well you’ve done, it’s a good idea to test the pedal using a variety of guitars, pickups, amplifiers, and in combination with other effects.
Additionally, you should check how it performs in a recording environment. Many guitarists prefer to record directly into the input of their mixer of the audio interface in today’s digital production era. Therefore, you should test your DIY pedal in this way, and see how it sounds on a recording.
Use different preamps, microphones, and whatever other equipment you can get your hands on. This will give you a wide range of knowledge based on how well the pedal responds to different applications, and allow you to incorporate this into your next build project.
Signal Chain Experimentation
Once you’ve successfully made your first DIY guitar pedal, you can test it out in different positions within a signal chain. To do this, you’ll need other effects pedals to create the chain too. Depending on the effect you’ve created, there will be a conventional positioning based on the way that it interacts with other pedals.
Varying the positioning of the DIY guitar pedal will change the way it sounds dramatically. Therefore, experimenting with its placement is a good way to gauge how well it can interact with other effects. You might find that it sounds better after your distortion-based pedals, or that it doesn’t sound so good after modulation.
Recreating Classic Tones
As your confidence and competence grow in the field of making your guitar pedals, you can try to emulate some of your favorite tones. If you’re listening to a record and a particular guitar tone stands out, make a note of it and try to research which pedal the guitarists used to create their sound.
You can then extensively research the construction of the pedal they used, and aim to recreate it with your next project. Granted, this requires a certain level of skill and knowledge, but it is a good long term aim to have.
With every DIY guitar pedal that you create, you’ll uncover more tricks of the trade that will allow you to be deliberate with your designs. Having a sonic template to refer back to is a great way to keep your methods focused towards an end goal.
Using DAWs & Plugins for Inspiration
Another great way to gain inspiration when creating DIY guitar pedals is by using VST plugins and the built-in effects rack in a DAW. If you don’t have a DAW, you can download some decent free ones online, but I would recommend investing in high-quality software like Ableton Live, ProTools, or Logic Pro if you plan on doing any recording in the future.
The advantage of learning about effects within a Digital Audio Workstation is that you can load up multiple types of effects simultaneously, and tweak the parameters to get an instant result. I’ve learned almost everything I know about different effects by experimenting with controls in a DAW and noting how they affect the sound.
Why is this important if you’re creating physical DIY pedals? Well, for starters, you need to know why certain pedals produce their desired effects. The electronic elements can be learned based on reading and following instructions, but improving your ear can only be done through direct experience.
For example, if you aim to produce a simple fuzz or overdrive pedal, you can load up one of these effects within a DAW, and play around with the various parameters to gain an understanding of what they do. You can then implement this knowledge into the design of your pedal.
Many VST plugins are in fact emulations of physical hardware, such as effects pedals, preamps, compressors, and other units. Therefore, the two are intrinsically linked. Learning in a digital format is both times effective and convenient.
Creating a Workspace
The environment is key when you’re creating DIY guitar levels. Just as a carpenter requires space to work and keep all of their tools, a pedal creator needs a comfortable environment where they can focus solely on the task at hand.
If you don’t have access to a garage or workspace, you could simply clear your desk to use for the DIY pedal building. The important thing is to have enough space to work without any distractions, and room for the necessary tools and equipment to be close by for when you require them.
Due to the number of small components involved in the manufacturing of DIY guitar pedals, it’s also imperative to keep everything organized in one place. There’s nothing worse than resuming your project only to find that you’ve misplaced a switch, lost a screw, or accidentally thrown a vital piece of circuitry in the trash.
Safety Precautions
Although building DIY guitar pedals is a pretty safe undertaking, you still need to be aware of the risks and take care to avoid them. As with any electrical tasks, use your common sense and don’t mess around with faulty cables or connections. Ensure that everything is in good working order before you get to work.
There’s very little risk of anything going wrong when making guitar pedals unless you use unconventional circuitry methods etc. Provided you follow the instructions featured earlier in this guide, and make sure you have all of the required equipment to hand, you should be just fine.
It’s worth looking into the subject of grounding, as this can sometimes cause problems with guitar pedals. Also, make sure that the power supply you use with your DIY pedal is in good working condition and can supply it with the required voltage, which is likely to be 9v DC.
Starting a Guitar Pedal Business
You’ve gone through the initial learning curves, produced some good quality guitar pedals that have impressed your musician friends, now what? If you’re passionate about DIY pedal production, you could consider producing more and turning it into a small (or big) business venture.
Guitar pedals are a competitive market, with many new manufacturers popping up constantly. However, guitarists never get bored of experimenting with new sounds, so there’s plenty of room at the table for your designs.
Build a Client Base
The first thing you’ll need to do if you want to start selling some of your DIY guitar pedals is to find some clients. Using the aforementioned advice I gave on sending pedals out to musicians, you are likely to get some inquiries about buying the pedals permanently, providing they are built to a high standard.
Start Local
Just like a band trying to build a following, it’s always best to start in your local area. That way, you can build personal relationships with the musicians who are interested in buying your DIY guitar pedals. Word of mouth is still a powerful way to gain traction, even in the digital age.
By attending local live shows and other music-related events, or speaking to people in your local record store, you can get people interested in your DIY pedals. Business cards are a great way to quickly retain contact with potential customers.
Use Social Media
The most powerful tool for selling any product is without a doubt the internet. It’s completely transformed the way businesses function and created a platform for people like you to sell their DIY guitar pedals to customers all over the globe, instantly.
Take some professional photos of your pedals, and create social media accounts where you can connect with guitarists and other musicians. This is the quickest and easiest way to showcase your DIY pedals. Also, you could send free pedals to guitarists who have a decent following on social media, and let them keep it for free in return for them doing a demo video.
Final Thoughts
Building a DIY guitar pedal is a satisfying challenge that can be enjoyable once you get the hang of it. Inevitably, you’ll go through periods where it frustrates you due to mistakes, or a lack of progress. Providing you push through those moments, you will be making your pedals in no time.

My name is Chris and I’ve had a passion for music and guitars for as long as I can remember. I started this website with some of my friends who are musicians, music teachers, gear heads, and music enthusiasts so we could provide high-quality guitar and music-related content.
I’ve been playing guitar since I was 13 years old and am an avid collector. Amps, pedals, guitars, bass, drums, microphones, studio, and recording gear, I love it all.
I was born and raised in Western Pennsylvania. My background is in Electrical Engineering, earning a Bachelor’s degree from Youngstown State University. With my engineering experience, I’ve developed as a designer of guitar amplifiers and effects. A true passion of mine, I’ve designed, built, and repaired a wide range of guitar amps and electronics. Here at the Guitar Lobby, our aim is to share our passion for Music and gear with the rest of the music community.
Hi Im Richie,
Ive played guitar and other instruments over 40 yrs and been monkeying around with electronics about the same. For my 55th Bday I bought myself a Landtone distortion kit. At age 15 I found a schematic for a muff fuzz and soldered together some recycled components together without a board, taped it down to a cardboard box and it worked well.
I put together the Landtone together fairly quickly and plugged in a battery and got nothing, no signal and no led light. Im going over each wire and everything looks in its right place. I know these small chips can be tested so ill find a schematic of it but dont know what to do if that checks out ok. I guess the only thing is to contact the seller and tell him my story and send it back.
If you have any suggestions of what to try next I would be greatful.
Thanks, Richie
Hi, very interesting site with lots of useful information. Just one word of caution though, the reason lead free solder is used now is due to the risk involved in breathing in lead vapour fumes (which is why lead additive was removed from petrol of course). It is a neurotoxin, and people who work with solder regularly, as employees or as hobbyists are accordingly at a very high risk to their mental well-being, a risk that shouldn’t be ignored or underestimated and has long been known by manufacturers but minimally publicised for the same reasons as applied to vehicle fuel – profit and low concern for public welfare.
Just saying….
I have been working on a stereo tremolo build for a few weeks and having a problem getting a good pulse/ triangle waveform from the oscillator circuit, I have made a couple of separate 4049 circuits that are giving me the same problem, the pulse is ramped and triangle is low with one side slightly higher, I don’t know enough about how things work (maths) to correct this if anyone can help
Regards Steve