The G major chord, or simply referred to as the G chord, is typically one of the first few guitar chords teachers will introduce to their beginner students. An extremely popular chord in rock, pop, and country music, the G major chord is a great fundamental starting point on your guitar learning experience.
As well as being a great beginner chord, the G major is a popular reference point to learning the whole fretboard with its different shapes and variations. In this article, we will teach you the most common G major shapes and also some lesser-known variations that will help create unique sounds. Here are the most common G guitar chord shapes you should know.
1. G Major – Open Chord
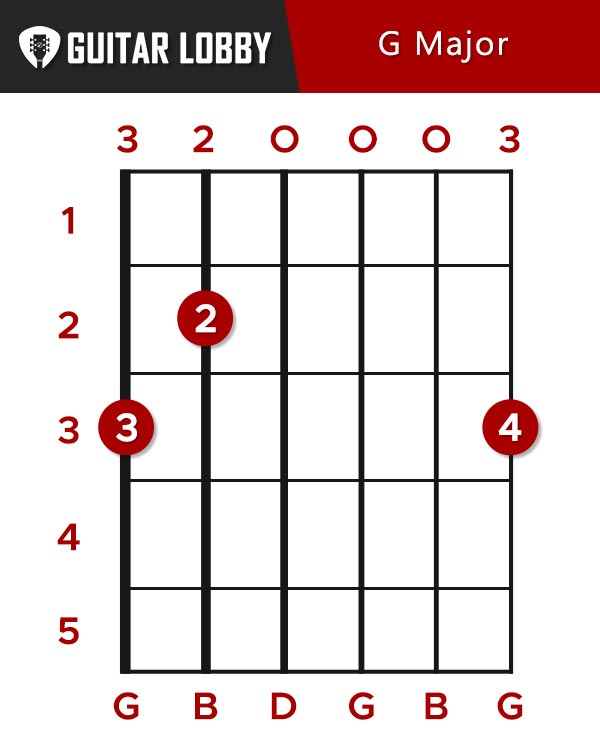
The most common shape of the G major chord is the open shape. Open shapes are called so because they use open strings among fretted ones. Commonly now known as “cowboy chords,” open chords are the best starting chords for all guitarists, as many songs can be played by combining 3 or 4 of them. Also, the guitar, especially the acoustic, resonates better and sounds fuller when open strings are involved.
The G major chord has the following fingering:
- Put your second finger (middle) on the 3rd fret of the Low E string
- Put your first finger (index) on the 2nd fret of the A string
- Put your fourth finger (pinky) on the 3rd of the high E string
2. G Major – Alternate Open Chord
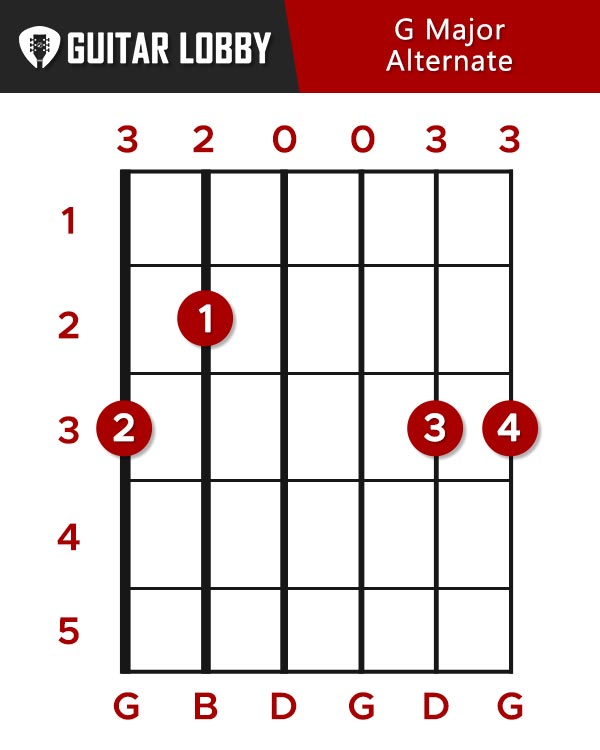
Another common way to play the open G chord is by a D note played on the B string, rather than playing the B string open.
This alternative G major chord shape has the following fingering:
- Put your second finger (middle) on the 3rd fret of the Low E string.
- Put your first finger (index) on the 2nd fret of the A string.
- Put your third finger (ring) on the 3rd fret of the B string.
- Put your fourth finger (pinky) on the 3rd of the high E string.
As you will see in the theory section, the notes played are the same. It’s up to you to play the shape you want or play both and switch between them.
The G guitar chord is probably the most challenging of the open chord shapes, that’s why we prepared a video to help you get the fingering right.
Brief Music Theory
All chords are formed from the corresponding major scale. A scale is made up of 7 notes, known as intervals.
The notes of the G major scale are the following:
| G | A | B | C | D | E | F# |
| 1 | 2 | 3 | 4 | 5 | 6 | 7 |
Each note corresponds to a number, numbers refer to intervals which are the distance between 2 notes. For example, the distance from the G note to the C notes is a 4th since G is 1 and C is 4.
Major chords are made up of the 1st, 3rd, and 5th intervals of the major scale. So the G major chord is formed from the notes G, B, and D.
The G note is called the root of the chord and 3 note chords are called triads.
Go back a moment to the open G chord shape and find the notes that make it up, Even though your strum 6 strings the notes are only G, B and D repeated 2 times.
If you take a second look at the Alternate G chord we looked at previously, the reason why the fingering works is that the open B string is obviously a B note, and the 3rd fret of the B strings is a D note – both notes are part of the G major triad. Although each chord will have a very slightly different sound, they are both G Major chords.
Try to find on the fretboard some other positions of these 3 notes (G, B, and D) and see if you can play them as a chord.
3. G Major – Barre Chord
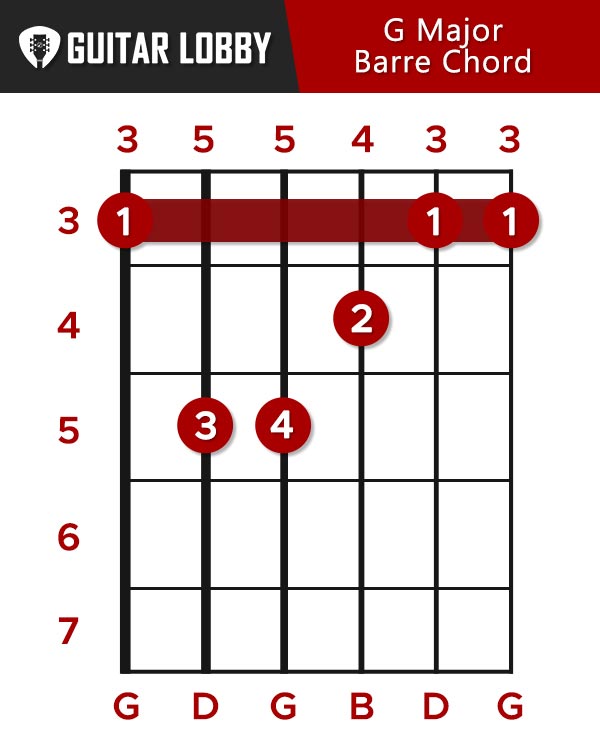
The 3 notes that make up the G major chord are found in multiple places on the fretboard. That means that there are multiple ways to play the G major chord, called chord variations.
The first G major chord variation is a barre chord. If you are new to the concept, barre chords are chord shapes where one of the fingers, usually the index finger, presses down more than 1 string by laying down the strings as a sort of barre. Another way to understand barre chords is to imagine the index finger as a guitar capo.
The fingering for the G major barre chord is the following:
- Barre your first finger (index) on the 3rd fret across all 6 strings.
- Put your second finger (middle) on the 4th fret of the G string.
- Put your third finger (ring) on the 5th fret of the A string.
- Put your fourth finger (pinky) on the 5th fret of the D string.
Barre chords are widely misunderstood, some players avoid them as much as they can by using capos. But, if you apply the proper technique, barre chords can be very easy to master and very useful.
4. G Major – Barre Chord Variation 2
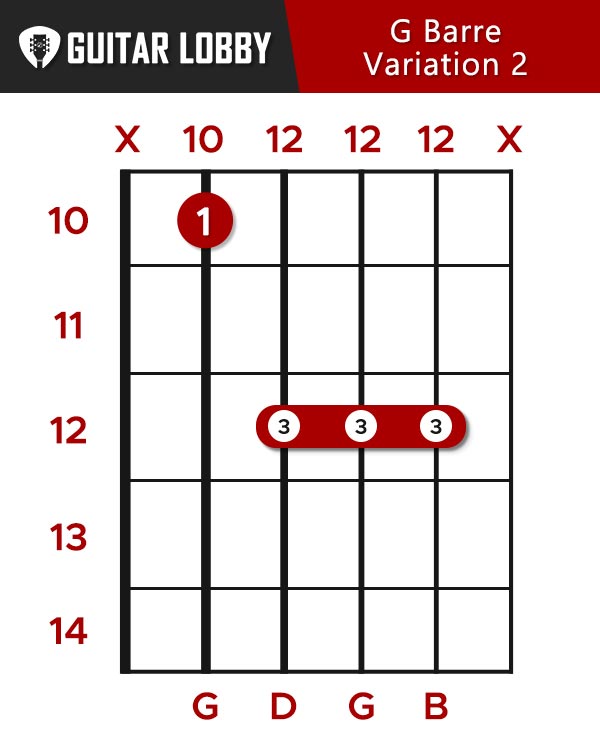
The Second G major is based on the A string and can be fingered in 2 different ways. The first fingering is the following
- Put your first finger (index) on the 10th fret of the A string.
- Barre your third finger (ring) or your fourth finger (pinky) on the 12th fret of the D, G, and B strings.
- Keep the high and low E strings muted.
This shape involves using a barre with either your ring finger or pinky, depending on what feels best for you. The high E string, as you can see if you try fretting the chord, gets muted and does not ring out.
The other way to make this chord shape does not use a barre but compresses the Middle, Ring, and Pinky on the 12 frets of respectively the D, G, and B strings.
5. G Major – Barre Chord Variation 2 Alternate
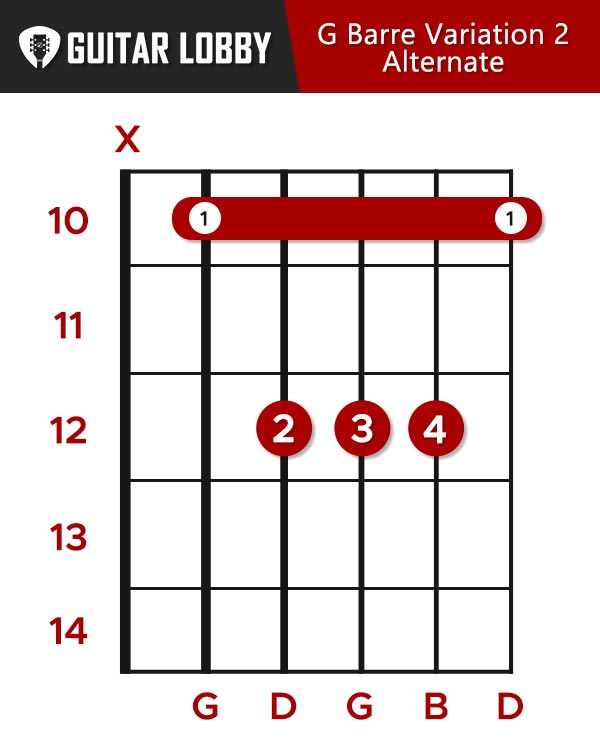
This shape is not usually used in the upper frets, since they get smaller as you go up the neck, and placing 3 fingers in one fret gets more difficult. However this shape is movable, so it’s great to know it. Also, it allows for the E string to ring. Even if it does not, it’s not crucial to the full chord sound good.
Barre chords can be tricky, that’s why we prepared this video that will show you the exact fingering and some extra tips on getting the barre right.
Expert Insight
Barre chords high up the neck are usually used for electric guitar. On acoustic, open strings tend to sound more full and bring out the whole tone of the guitar. On electric guitar, however, sometimes it’s best to play notes high up the neck, especially if you are playing with another guitarist that is already playing open shapes or barre chord low on the neck.
The merge of 2 different register chords, one of higher pitch than the other, makes for a great sounding mix.
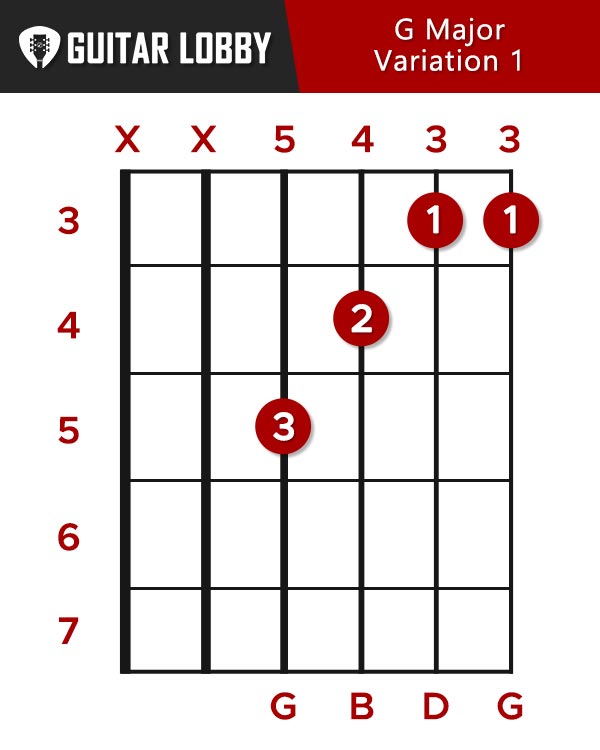
6. G Major – Variation 1
The G major can be played in many other positions on the neck, apart from the open chord and barre chord positions. Some of these variations are very easy to play and also add a special flavor to the familiar sound of the G major chord.
The first variation is based on the barre chord shape with a root on the E strings. You can imagine it as playing the bottom part of the chord.
The fingering is the following:
- Put your first finger (index) as a barre on the 3rd fret of the B and high E strings.
- Put your second finger (middle) on the 4th fret of the G string.
- Put your third finger (ring) on the 5th fret of the D string.
This shape is a simplified version of a barre chord shape, as it uses only a partial chord on the 2 bottom strings.
These types of chords that avoid the low E and A strings are great to use on an electric guitar or when playing in bands with multiple guitar players or a bass player – since the bass notes are played by either the bass player or one of the guitar players.
7. G Major – Variation 2
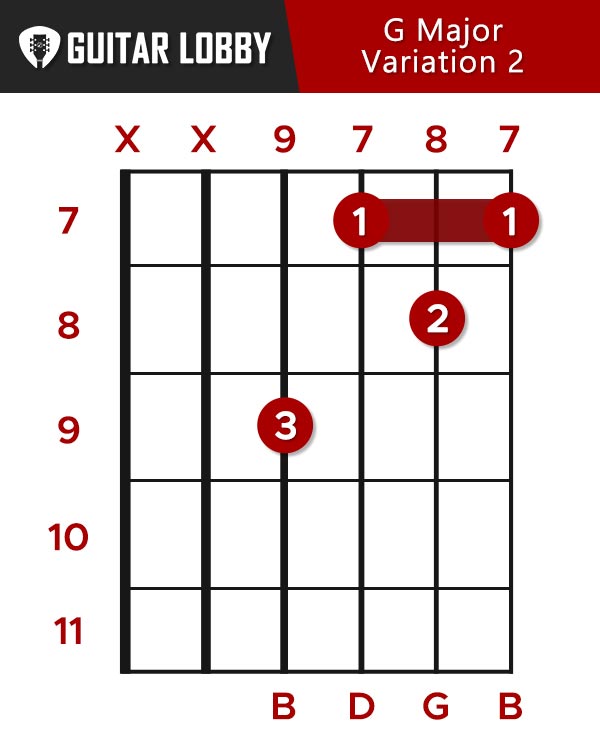
Another variation of the G major chord uses the following fingering:
- Put your first finger (index) as a barre on the 7th fret of the G, B, and high E string
- Put your second finger (middle) on the 8th fret of the B string.
- Put your third finger (ring) on the 9th fret of the D string.
8. G Major – Variation 3
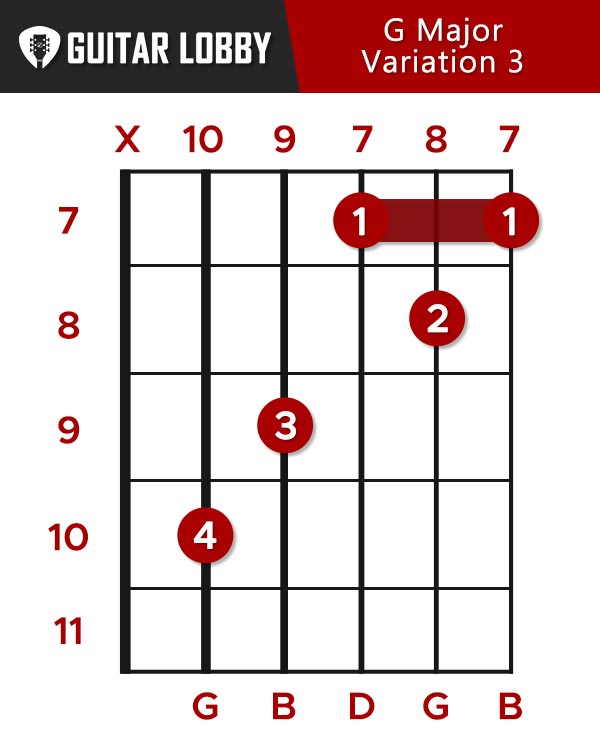
Similar to the previous variation, this chord can be played by adding the pinky of the 10th fret of the A strings.
9. G Major – Variation 4
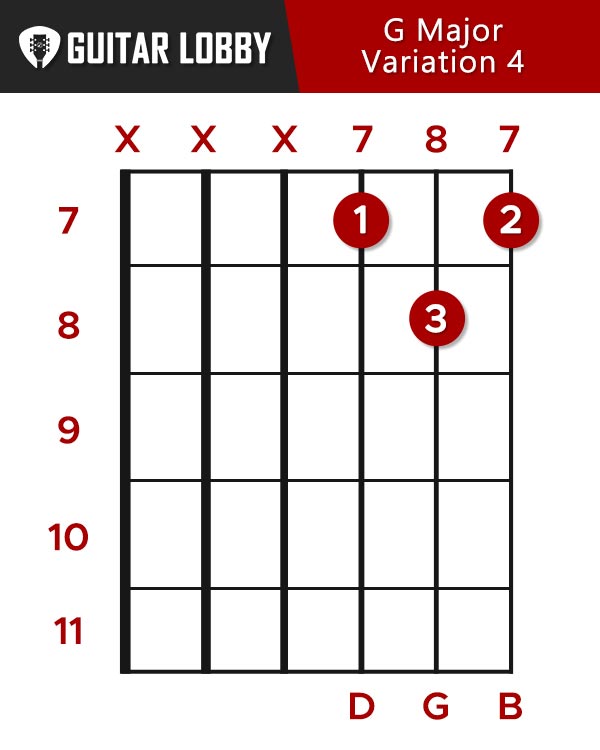
Another variation includes only playing a triad, meaning only the G, B, and D notes on the G, B, and high E string.
- Place your first finger (index) on the 7th fret of the G string.
- Put your third finger (ring) on the 8th fret of the B string.
- Put your second finger (middle) on the 7th fret of the E string.
You can visualize this chord as a D major shape played up the neck.
10. G Major – Variation 5
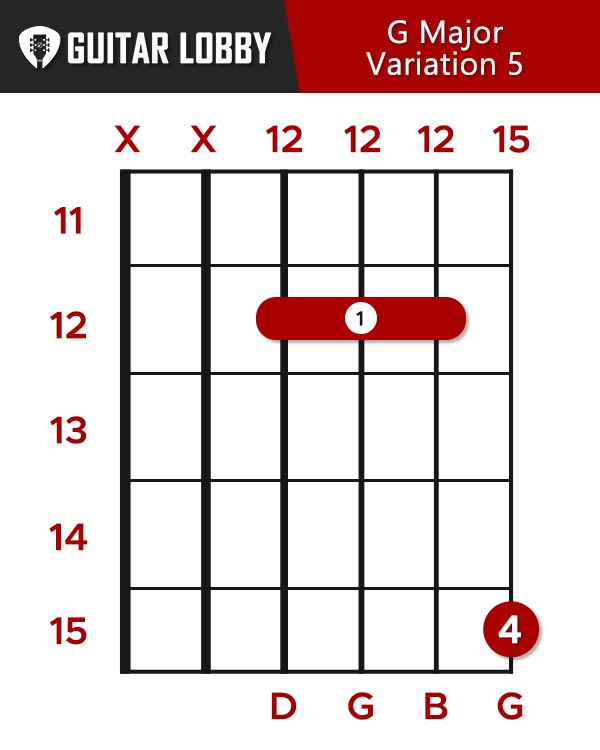
Another variation of the G major chord is found way up the neck. The fingering is as follows:
- Place your first finger (index) as a barre on the 12th fret of the D, G, and B strings.
- Place your fourth finger (pinky) on the 15th fret of the high E string.
- Play the bottom 4 strings keeping the low E and A string muted.
This shape is on a higher octave compared to the Open G major shape. That means it’s the same chord but in a higher register, 12 frets up the fretboard.
Another variation of this G major chord is based around the 12th fret of the strings but does not use a barre.
Instead, it involves compressing the middle, ring, and pinky on respectively the 12th fret of the D, G, and B string, while the index finger is playing the 10th fret of the high E string.
11. G Major – Variation 6
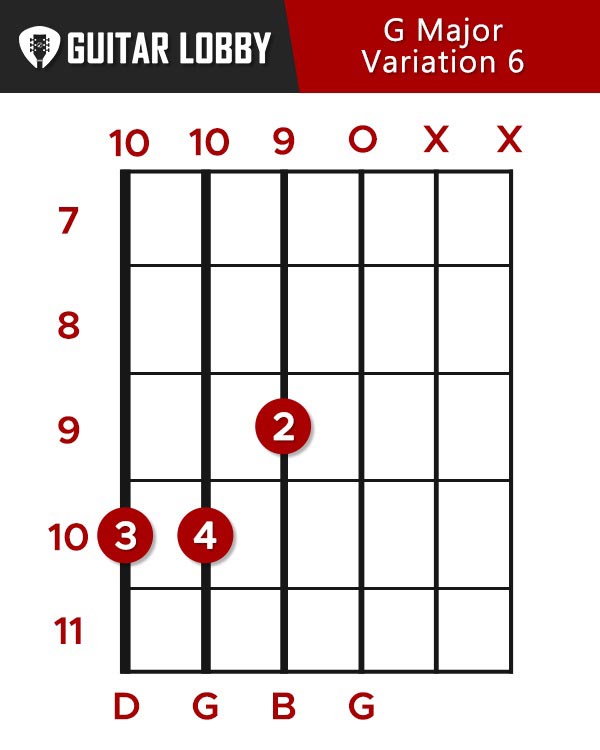
Another variation that produces a heavy sound uses the following fingering:
- Put your third finger (ring) on the 10th fret of the low E string.
- Put your fourth finger (pinky) on the 10th fret of the A string.
- Put your third finger (middle) on the 9th fret of the D string.
Expert Insight
All these different G major chord variations use a lot of muting from both hands.
- Muting with your left hand involves resting your hand slightly on the strings without pressing down to hard, just enough to mute them.
- Muting with your right hand involves resting your hand on the strings close to the bridge, the farther from the bridge and the harder you press down, the more muted the sound comes out.
- You can also mute with the tip of your index finger or any other finger the string above it. For example, when playing the first G major variation on the list, you can mute the A string by slightly touching it with the tip of your index finger.
Muting is a skill that develops itself through time. You will get to a point where it becomes instinctive to mute the string when you don’t want sounds to ring out.
12. CAGED G Major Chords
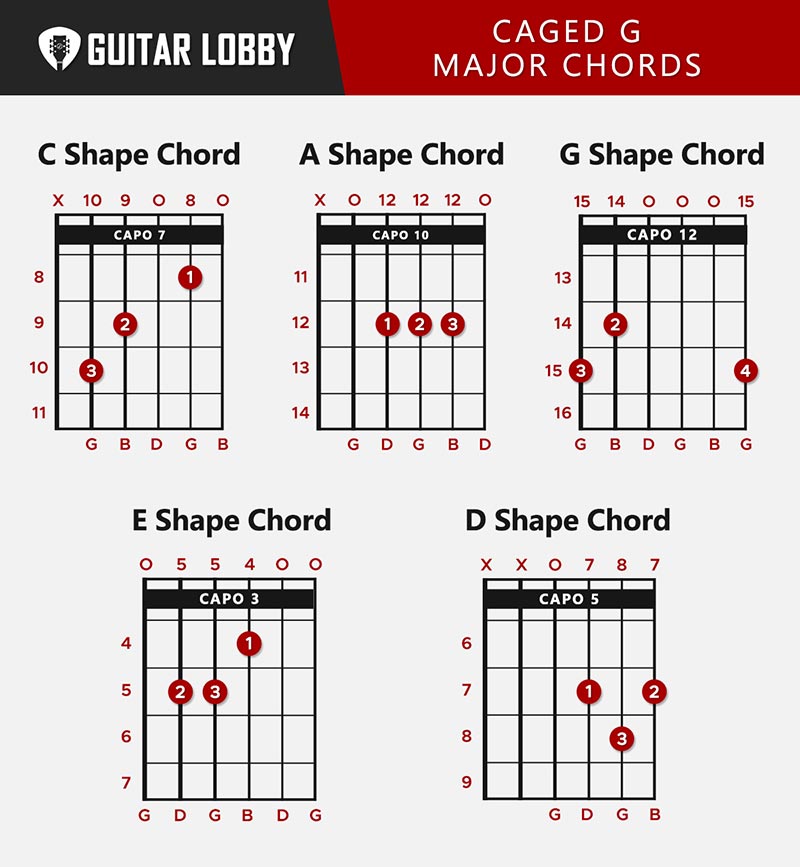
The CAGED system is a way of organizing the fretboard that focuses on playing all chords in 5 different shapes across the whole fretboard. Specifically the C, A, G, E, and D major open chord shapes. So with these 5 shapes, a G major Caged chord can be found and played on 5 different locations on the fretboard.
The way the system works is that it moves the shape up and down the neck while changing the root of the chord. For example, a G major barre chord with the root on the E string is an E shape chord moved 3 frets up.
If it sounds complicated, just imagine your index finger being a capo and then notice the shape that’s formed with the other 3 fingers.
The same thing applies to some of the chord variations detailed in the previous section.
To help you understand better the CAGED system, we prepared this video.
The CAGED system is connected to all the different scale shapes you can solo on top of any chord. Learning the CAGED system will prove useful in all aspects of your guitar playing, being that rhythm or lead playing.
13. G7 Chord – G Major Blues Chord
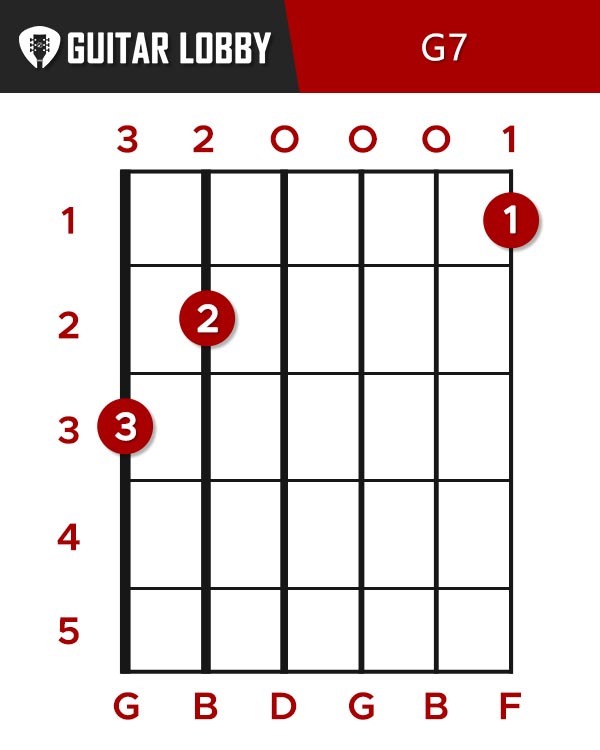
7th chords are used extensively in blues music and are very common in funk, pop, and rock music too. Sound-wise, a 7th chord is more “tense” sounding and adds a unique typical blues flavor to the G major chord. Theory wise the chord has the same formula but with an added 7th interval. Referring to the theory section, the 7th interval of the G major scale is the F note.
So the G7 basically is a G major chord with an added F note. The first G7 chord shape is based on an open chord shape.
- Place your third finger (ring) on the 3rd fret of the Low E string.
- Place your second finger (middle) on the 2nd fret of the A string.
- Place your first finger (index) on the 1st fret of the high E string.
14. G7 Barre Chord
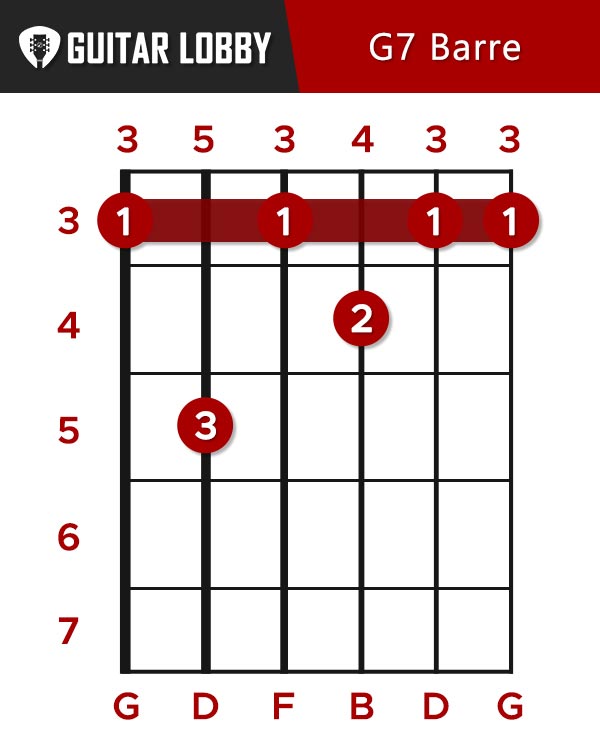
The other shape is based on the G major barre chord shape.
- Hold the G major shape with the root on the 3rd fret of the E string
- Raise your pinky and have the 3rd fret of the D fretted from the Barre
Check out his video for a more detailed explanation of the G7 chord:
G Major Chord on Electric Guitar
Playing chords on electric guitar needs a slightly different approach than acoustic. We will list out here some main differences and how to approach them.
Strumming – Strumming open chords on acoustic sounds great. Strumming the same way on an electric can make the guitar sound muddy and chaotic, even if you are playing with a very clean tone.
The best approach to take on electric is first start out by playing soft until you find the sweet spot. Listening and learning a lot of guitar songs helps build the necessary muscle memory.
Using partial chord shapes – When playing lead guitar on electric, the G major variations that do not use the bass strings are very popular. These shapes work great because they avoid causing too much chaos on the chord and leave space for the bass player, or another guitar player.
Play according to your effect – If you are playing with a tone with a lot of gain, delay, or reverb effects, strumming will sound chaotic. There are certain techniques that work best with different effects. If you want to achieve a tone similar to an acoustic, then it’s better to play with only a clean amp and no other fx, maybe just a bit of reverb.
Proper Muting – Muting is far more noticeable in electric guitar, especially in heavier genres. Leaving an electric guitar without muting the string with either your hand will almost make noise. Practice resting your hand on the string and find your one personal way of what works best.
15. G7 Power Chord

Power chords are the sound of rock music. In most rock or metal songs, power chords make up most rhythm guitar parts. From classic rock to heavy metal, power chords are present in almost every song.
Playing a power chord is easy and will help you learn a lot of classic riffs.
The fingering is the following:
- Put your first finger (index) on the 3rd fret of the low E string.
- Put your third finger (ring) finger on the 5th string of the A string.
- Put your fourth finger (pinky) on the 5th string of the D string.
Try this chord with some heavy palm muting with your right hand and down pick the top 3 strings.
Have a look at this video to see the chord in action and for a more detailed Insight on the fingering
Final Tips on Playing the G Major chord
Think about the next chord – When playing the G chord, always think about the chord that comes next. If for example, you are playing after the G chord a B barre chord at the 7th fret, then it’s probably better to play the G in a position close to that.
Strumming technique – Try not to strum too hard at first when you are learning chords. Strumming too hard can bring buzzes out of any guitar and also makes it more difficult to coordinate your hands.
Mix up different chord shapes – When playing with a band or even jamming with a buddy try mixing up different shapes of the same chord. Playing the same chord shape results sometimes in a canceling effect, where the sum of both guitar tones is less than both tones combined. Try playing different shapes and the music will get wider, louder, and generally brighter.
Tips, Trick, and Common Challenges
In this section, we will share some tips and tricks based on guitarists’ most common challenges while learning the G guitar chord.
Hand Positioning – In general, the “best” position suggested for beginners who are struggling is the classical guitar position. What this suggests is holding the guitar in your left lap (right for lefties), sitting on the edge of your chair, and pointing your guitar neck up. All while keeping your back straight to avoid developing bad habits in the early stages of your guitar playing. The classical position is perfect in helping the left hand sit in a more comfortable position to make wider stretches and have more finger efficiency.
Fret Buzz – Fret buzzing is usually caused by not fretting close enough to the frets, and rarely by not applying enough pressure. Not holding your fingers straight above the fretboard is the general cause of fret buzzes.
The thumb position is very important to avoid fret buzz, and also to make playing easier, in general, to play the G major chord.
Place your thumb in the center of the back of the neck and make sure your wrist and fingers are as close to a 90 angle from the fret board as possible. This might not feel “natural” at first and many guitarists skip it to later encounter issues with more difficult chord shapes, like barre chords. The most important thing when you are a beginner is to not cut corners and learn bad habits in the process. If a technique feels odd, that’s because you have never applied it before. Like with this thumb positioning technique, the pain will pass in just a few days of practicing.
Strumming Technique – Strumming when you are a complete beginner might not be very intuitive. You might find yourself strumming too hard or too soft, sometimes not even the string you should strum.
A good way to start approaching strumming the G chord is to first start by playing all the strings individually with your thumb or pick. For complete beginners, the thumb probably is better.
Start strumming very lightly using your thumb or pick, then add more power until you feel that the strings start buzzing or things become too messy. The right balance of strength will come with time.
Expert Insight
Some discomfort in the hand is normal if you are just starting out, or even if you have not practiced or played regularly for some days.
Generally, all types of pain like sore fingers or wrist hurting is not serious. The only serious type of pain is the one you might feel in the inner part of the forearm.
If you feel pain there, stop and take a break before you continue practicing.

My name is Chris and I’ve had a passion for music and guitars for as long as I can remember. I started this website with some of my friends who are musicians, music teachers, gear heads, and music enthusiasts so we could provide high-quality guitar and music-related content.
I’ve been playing guitar since I was 13 years old and am an avid collector. Amps, pedals, guitars, bass, drums, microphones, studio, and recording gear, I love it all.
I was born and raised in Western Pennsylvania. My background is in Electrical Engineering, earning a Bachelor’s degree from Youngstown State University. With my engineering experience, I’ve developed as a designer of guitar amplifiers and effects. A true passion of mine, I’ve designed, built, and repaired a wide range of guitar amps and electronics. Here at the Guitar Lobby, our aim is to share our passion for Music and gear with the rest of the music community.
Variations 1 and 4 were exactly what I was looking for. I get caught up with the cowboy chords sometimes so I’ve really been looking for ways to get out of that little box on the first 4 frets.