The basic E chord, formally known as the E major chord, is one of the best beginner guitar chords you can learn. The simplicity of the “open” chord shape variation of the E chord as well as other useful variations make it a necessary building block for learning to play the guitar.
The E guitar chord is also a perfect study for those looking to dig a bit deeper into guitar fretboard knowledge. In this article, we will learn the most common E major chord shapes and also some very interesting variations that can add a special flavor to your playing.
Table of Contents
- 1. E Major – Open Chord
- 2. E Major Variation 1
- 3. E Major Variation 1 (Full Chord Version)
- 4. E Major Variation 2
- 5. E Major Variation 3
- 6. E Major Variation 4
- 7. E Major Variation 5
- 8. E Major Barre Chord – Root Note on the A String
- 9. E Major Barre Chord – Alternative Shape
- 10. E Major Barre Chord – Root Note on the Low E String
- 11. CAGED E Major chords
- 12. E7 – Open Chord
- 13. E7 – Alternative Shape
- 14. E Power Chord – Root Note on the A string
- 15. E Power Chord – Root Note on the Low E string
1. E Major – Open Chord
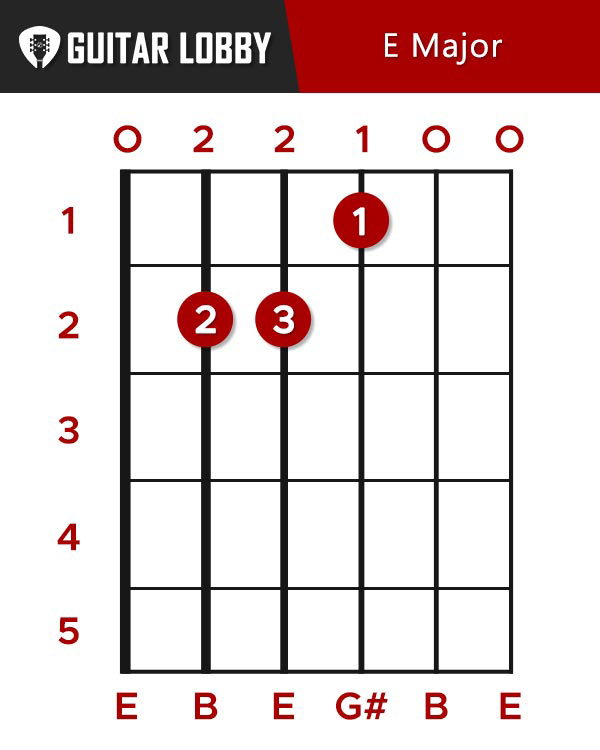
The open E chord is very easy to play and is probably one of the chords that guitar teachers or your guitar player friends will teach you first. The “open” chord shape is the most common variation of the chord you will use, so it’s an important starting point to learn and get the hang of.
The fingering is the following:
- Place your first finger (index) on the 1st fret of the G string.
- Place your second finger (middle) on the 2nd fret of the A string.
- Place your third finger (ring) on the 2nd fret of the D string.
- Play all of the strings open. The low E is the most important open string to hit as it is the bass root note.
Focus on placing your fingers as close to the frets as possible, without touching them.
Also don’t press too hard, you should press just hard enough to make the string ring. Fretting too hard will change the pitch of the string, begin to wear out your strings and frets, as well as tire your hand and fingers faster.
Check out this video for a more detailed explanation of the chord fingering:
Tips, Trick, and Common Challenges
Luckily the E guitar chord is not hard to play in comparison to other open shapes. But like everything on guitar, it’s very easy to sound bad and to learn bad habits.
Two of the most common challenges for guitarists on the E major chord are the following:
Buzzing Frets – The most common issue here is not putting your finger close enough to the frets and rarely is not pressing hard enough. As suggested above try to fret closer to the frets.
The B string is not ringing – This usually happens when the string is blocked by another finger. In this case, the B string gets blocked by the index finger. A slight touch is enough to mute any string.
Expert Insight
It’s important not to strum too hard. Instead, focus on comfortably fretting the notes and getting into a comfortable rhythm with your strumming that allows each note to sound out when played. Strumming too hard can result in the guitar buzzing against other frets as well as unwanted harmonics that take away from the tone of your playing. Remember to always practice both hands in every aspect. Fretting the chord and having your fingers in the right place is not enough if you arent able to strum out the chord properly.
Brief Music Theory
Chords are formed from the major scale, which is comprised of 7 interval notes. Major chords are comprised of 3 notes, the 1st, 3rd, and 5th intervals of the Major scale.
The notes of the E major scale are:
| E | F# | G# | A | B | C# | D# |
| 1 | 2 | 3 | 4 | 5 | 6 | 7 |
Therefore, an E major chord is formed by the combination of notes E, G#, and B. A chord formed from these 3 notes is called a triad.
One thing you should remember is that the 3rd interval dictates whether a chord is major or minor. If we “flatten” the 3rd interval note, and play along with the natural 1st and 5th intervals, the corresponding chord is known as the “minor” chord. For example, If we take our E major chord, flatten the G# by taking it half-step down to a G note, you get an E minor chord.
The E Major offers many possibilities on the guitar. Other than the common open shape that are many other shapes that we will learn about in this article. Some of these shapes are less used and add a lot to the usual E major chord.
2. E Major Variation 1
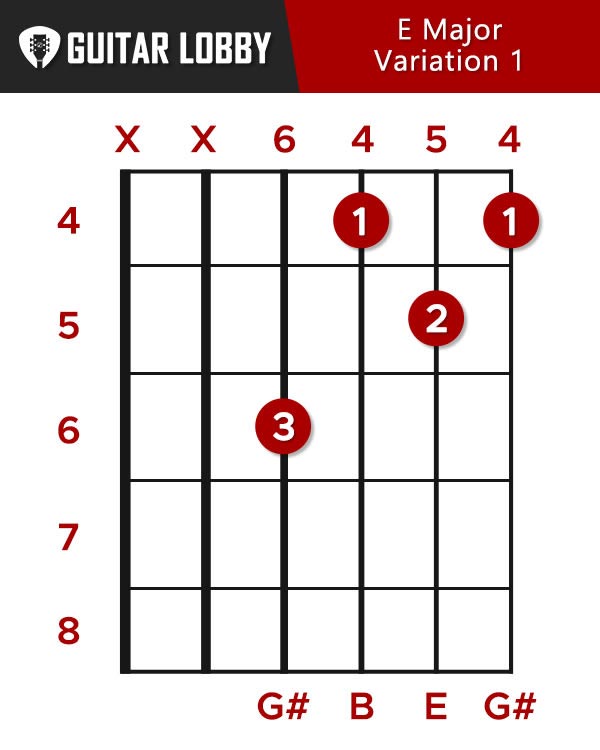
The first variation skips the low E and A strings and is fingered as follows:
- Put your third finger (ring) on the 6th fret of the D string.
- Put your second finger (middle) on the 5th fret of the B string.
- Barre your first finger (index) on the 4th fret of the G, B, and high E
- Avoid playing the low E and A while your strum the other 4 strings.
As you can see this chord has a barre on the 3 bottom strings. If you are new to the concept of barre chords, it implies that the index finger (or in some cases the other finger) press down more than 1 string and act as a sort of barre.
Imagine your index finger like a capo, or like the guitar nut (where the string passes through on the neck). This chord has a relatively easy bar since it only presses down 3 strings.
3. E Major Variation 1 (Full Chord Version)
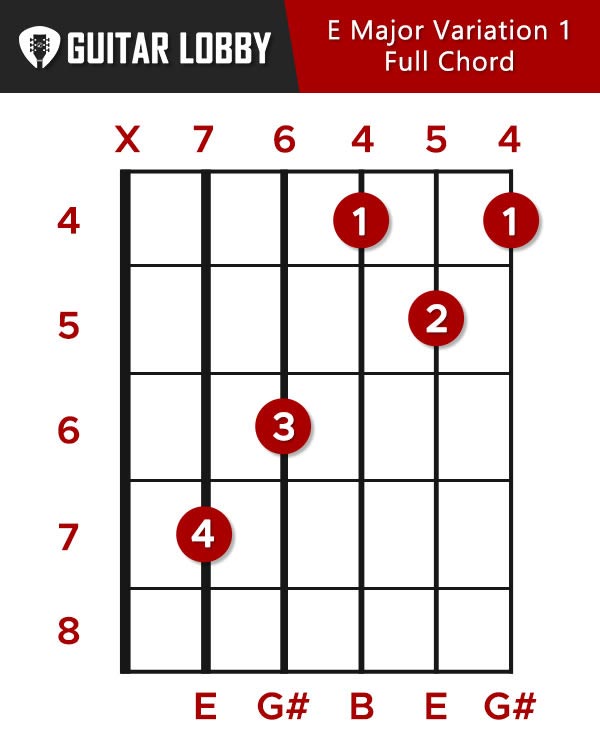
The “full” chord of this position has almost the same fingering but adds your fourth finger (pinky) on the 7th fret of the A string.
4. E Major Variation 2
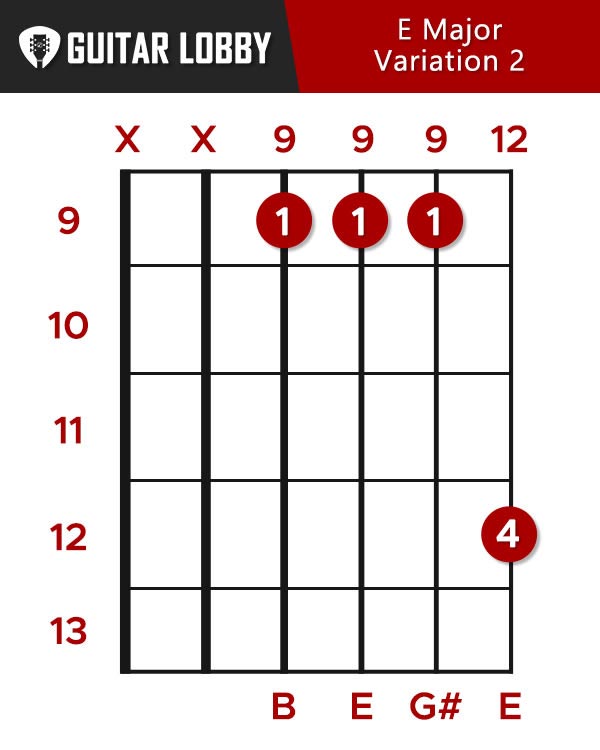
Another variation of the E major chord can be found upon the neck. This position is easy to play and involves, like the last shape, a barre.
- Put your index finger as a Barre on the 9th fret of the D, G, B, and E string
- Put your pinky on the 12th fret of High E string
- Strum the 4 strings from the D below softly
This chord will sound particularly good when you are playing with another guitar player. Since the chord has high-pitched notes, they combine great with low now – for example, if the other player is playing the E major open chord shape.
Popular Related Article: List of Easy Guitar Chords for Beginners (with Charts)
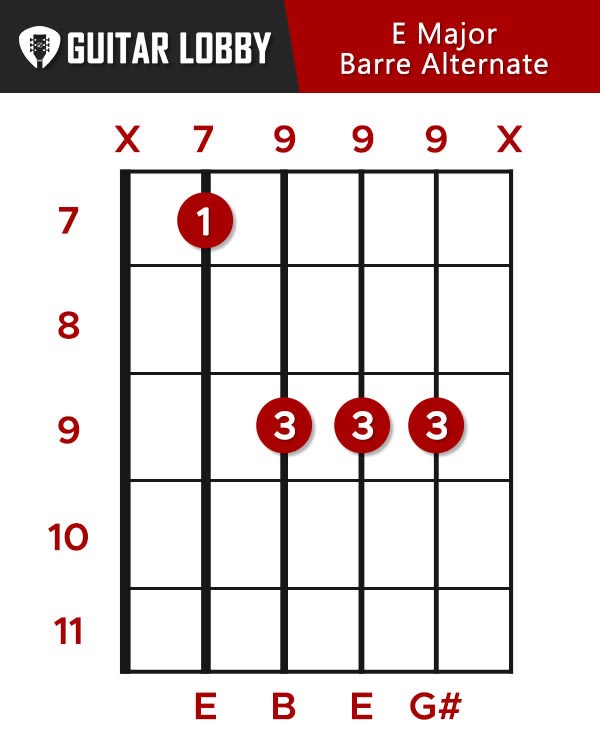
5. E Major Variation 3
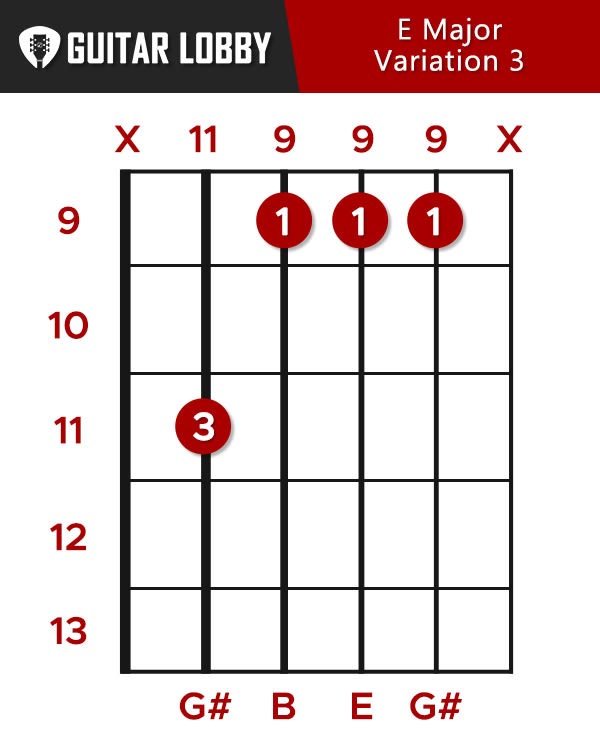
Another way to play this is to play the 9th Fret of the D, G, and B using a barre with the index finger and placing your pinky on the 11th fret of the A string. This shape is what’s called an inversion. That means that the order of the notes changes in the way you play the chord. In this particular shape, the G# (3rd) interval is on top replacing the usual E.
6. E Major Variation 4
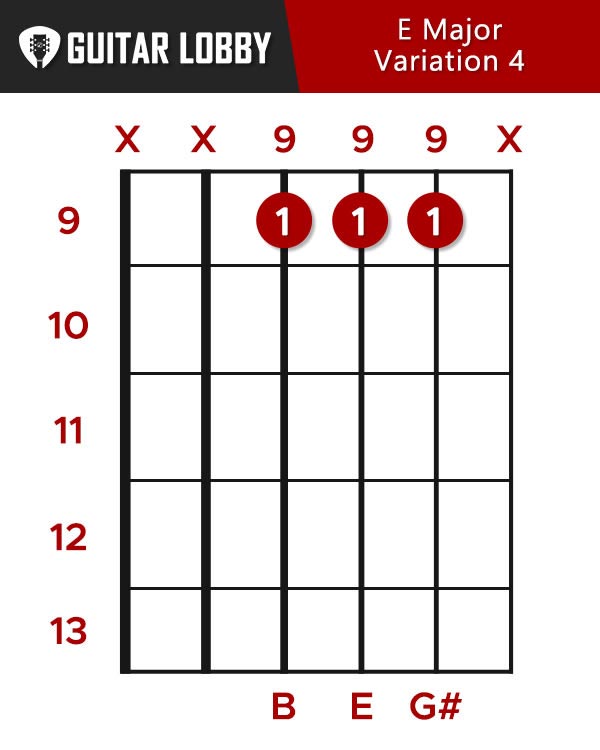
If you have difficulties with the previous inversion chord, you can try simplifying the chord by removing your third finger (ring) from the 11th fret of the A string. Just ensure that the A string stays muted when you strum in this case.
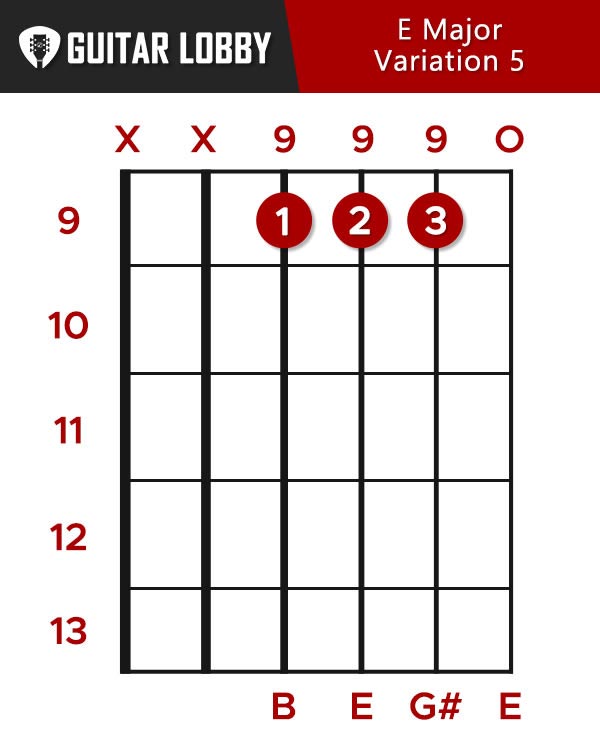
7. E Major Variation 5
One more slight tweak to the previous chord, you can try playing with the high E string open. this will add an extra high pitch E to your chord which may help your sound cut through a mix. Try it to see if that’s the sound you’re looking for!
Expert Insight
The acoustic guitar can develop a natural reverb if you play chords and notes without muting.
Try to hold your finger as vertical as you can and let all the notes ring out with no muting whatsoever from either hand. Also, add some open strings when you can such as Variation 5 above, for example.
Notice a sympathetic harmonic ringing out of the guitar. Now play the same thing how you would usually do with your hand resting on the strings close to the bridge.
8. E Major Barre Chord – Root Note on the A String
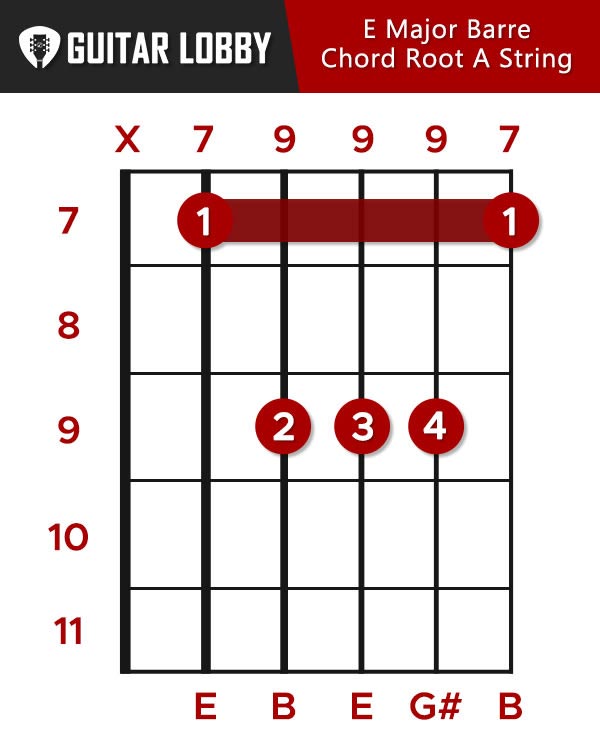
As with all chords, you can play the E major chord with a full barre covering all six strings, or five of them, depending on where the root note is located.
The first barre chord shape with a root on the A string has the following fingering:
- Barre your first finger (index) on the 7th fret of the A, D, G, B, and high E strings.
- Place your second finger (middle) on the 9th fret of the D string.
- Place your third finger (ring) on the 9th fret of the G string.
- Place your fourth finger (pinky) on the 14th fret of the B string.
This is a common E major barre chord and can be a bit challenging than the other shapes since the barre presses down 5 strings.
Another challenge is to compress all 3 fingers on the 9th fret of the D, G, and B strings. This is not ideal since the 9th fret is not a wide enough space, especially on guitars with a shorter scale. That’s why you can alternatively play this chord using another bar on the 9th fret with either the pinky or ring finger.
9. E Major Barre Chord – Alternative Shape
This fingering is easier for most people but sacrifices the high E string by muting it with the barre.
10. E Major Barre Chord – Root Note on the Low E String
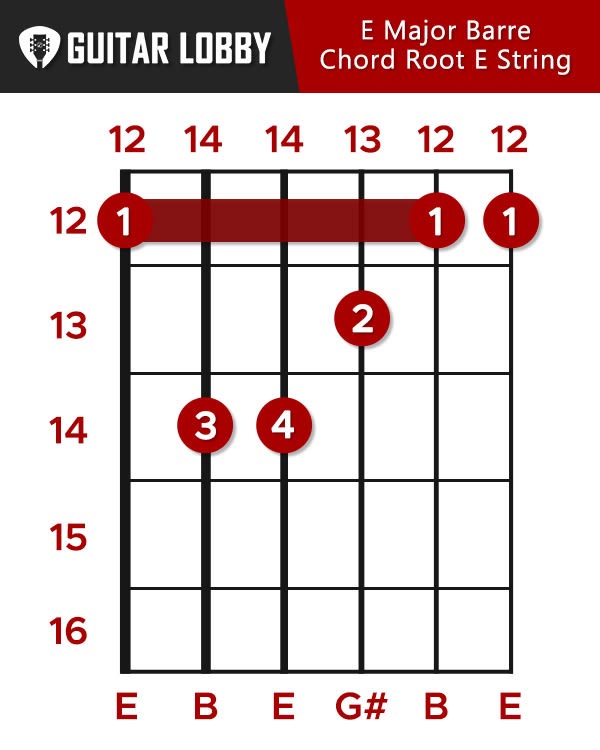
The second E major barre chord is built around the 12th fret of the guitar. Just imagine that you are taking the E major open chord shape to the 12 fret. This is known as taking the chord up an “octave”.
The fingering is the following:
- Use your first finger (index) barring all 6 strings from the 12 fret of E string
- Use your third finger (ring) to fret the 14th fret of A string.
- Use your fourth finger (pinky) to fret the 14th fret of the D string.
- Use your third finger (middle) to fret the 13th fret of the G string.
Check out this video for a more detailed insight E major barre chords:
Having the notes on the B and high E string ring out can be a challenge for this chord shape. You can combine the classical guitar stand and thumb position with a lesser-known trick – Try to raise the index finger just a bit so that the part with the most flesh is fretting the bottom strings.
11. CAGED E Major chords

The CAGED system is a way of organizing the fretboard and playing chords based on the 5 different open chord shapes. The shapes are the open C, A, G, E, and D, as suggested by the name. The E shape suggests the open E guitar chord shape. Take that shape to the 12th fret to form the E major barre chord to understand how a CAGED chord looks like. Take the same shape of the open D chord to the 10th fret and you can play another version of an E major chord using the D shape. You will find in this chart all the different CAGED chord positions of the E major, some of which are the positions/shapes we already covered.
Try to find and finger these shapes while always visualizing the E note first on one of the strings. This way you will both learn some great shapes and also the fretboard in the process.
12. E7 – Open Chord
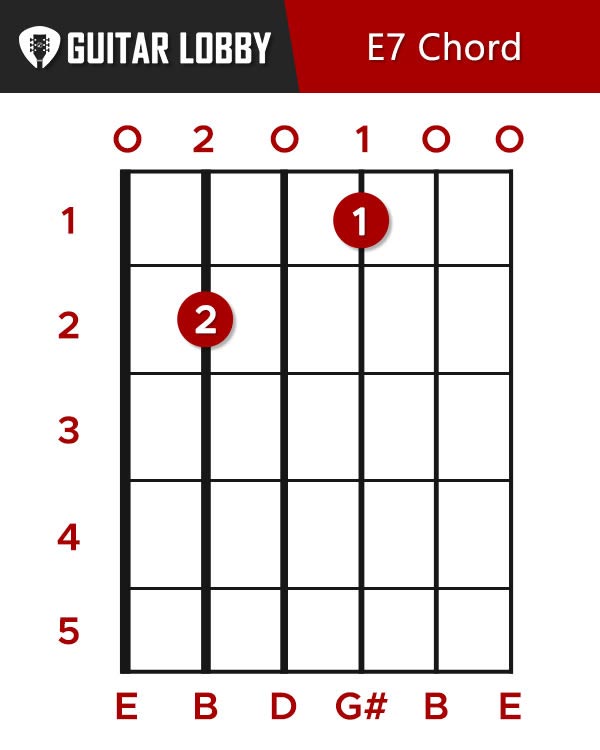
The E7 is a great easy chord to add a blues sound to your playing. Theory wise you should just know that the 7 refers to the 7th intervals on the E major scale. An E7 adds a minor 7th to the chord. In this case, that is the D note. So put simply, an E7 chord is an E Major chord + a D note, so we have E, G#, B, D.
The fingering for the E7 open chord is based on the E open chord and goes as follows:
- Place your first finger (index) on the 1st fret of the G string.
- Place your second finger (middle) on the 2nd fret of the A string.
- Leave the D string open.
Check out this video for more details on the E7 chord:
13. E7 – Alternative Shape

A great way to play this is by adding the pinky at the 3rd fret of the B, which is also a D note. The chord would look like this
Expert Insight
The blues in E is very common and fun to play due to the open positions of the chords.
Try to play these 3 chord shapes E7, A7, and B7. These are the chords behind the famous 12 bar blues.
Practice switching between these chords, and if you don’t know them yet – head out to our other lesson where we cover the common shapes and variations.
14. E Power Chord – Root Note on the A string
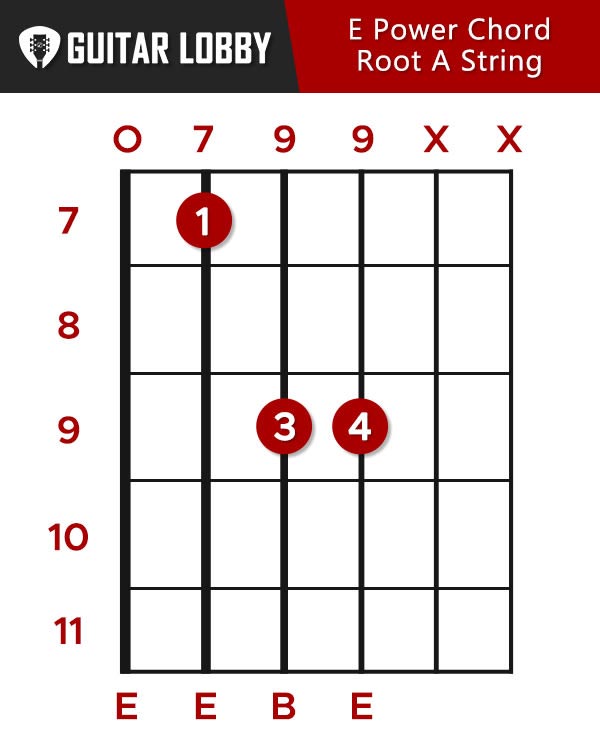
Power chords are the basics of rock and metal music and the E power is especially popular since you can get the heaviest tone in standard tuning with the E power chord.
- Place your first finger (index) on the 7th fret of the A string.
- Place your third finger (ring) on the 9th fret of the D string.
- Place your fourth finger (pinky) on the 9th fret of the G string.
On this chord feel free to also play the Low E note. Do this while mixing in palm muting, down picking, and a distorted to get a typical rock and metal tone.
E Major Chord on Electric Guitar
Try to apply a different approach when switching between electric and acoustic guitar. On the acoustic, you can play the cowboy shapes (another way to call open chord shapes) and strum all the strings to make a great percussive effect. On the electric guitar, even with a clean tone, the guitar can sound ‘mudded” or “chaotic” if you do that.
Try to avoid playing too many open chord shapes on electric if it’s not what the song needs and play some of the chord variations detailed above. Also, muting is very important on an electric guitar. You should always have your right hand resting softly on the strings close to the bridge when you are not playing. Muting works great also as an effect to make playing more percussive. The more pressure you apply with the right hand the farther from the bridge you get – the more of a muted tone you get.
15. E Power Chord – Root Note on the Low E string
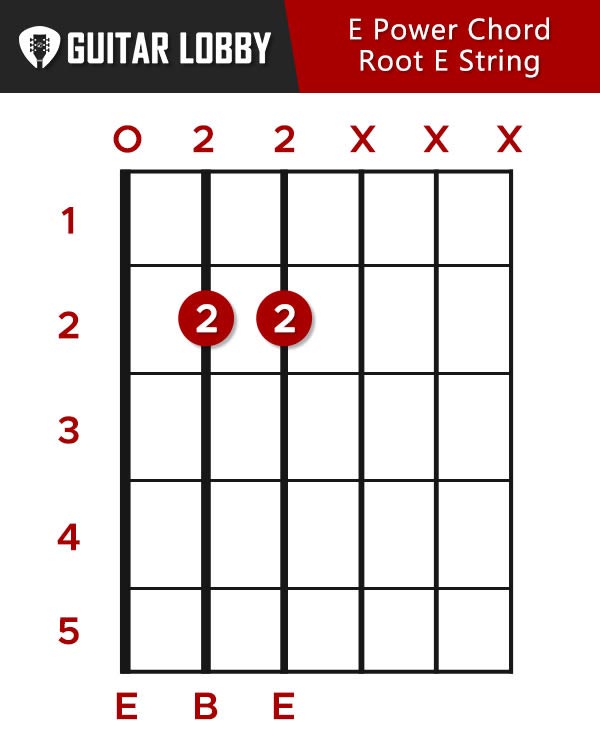
An alternate way of playing an E power chord use the open Low E string to root the chord.
- Place your finger as a bar on the 2nd fret of the A and D strings.
- Play the low E string open.
- Mute the other string and play the Low E, A, and D strings.
This will produce the heaviest sound and it’s also really easy to play. Again, feel free to try this with some distortion as this is a great rock chord to play on electric guitar.
Final Tips on Playing the E Major chord
Practice with a metronome. A metronome will help in many ways! Try to place it on a slow, about 70bpm, and play an E major shape wherever you hear the click. Change shapes after each click and also try to combine this with other chords. Try this progression, E major, A minor, and D minor in no particular order. Just start and end-all with the E chord and also play following the metronomes click.
Make adjustments if you feel pain in your hand or arm. Having sore fingers and pain in your wrist or joint between thumb and index is normal for the left. However if you feel pain in the inner part of your arm, stop and take a break.
Get into good practicing habits. Try to balance practicing and playing for fun. If you are just starting out then 30 minute exercises on playing chords will go great along with you just playing for the fun of it. Also, have a plan for your practice and include a max of 3 things to practice for a session.
Before you go you might want to check out some of our other chord pages such as our guides on the A Guitar Chord, D Guitar Chord, and C Guitar Chord. Let us know if you have any questions about how to play the E Guitar chord below.

My name is Chris and I’ve had a passion for music and guitars for as long as I can remember. I started this website with some of my friends who are musicians, music teachers, gear heads, and music enthusiasts so we could provide high-quality guitar and music-related content.
I’ve been playing guitar since I was 13 years old and am an avid collector. Amps, pedals, guitars, bass, drums, microphones, studio, and recording gear, I love it all.
I was born and raised in Western Pennsylvania. My background is in Electrical Engineering, earning a Bachelor’s degree from Youngstown State University. With my engineering experience, I’ve developed as a designer of guitar amplifiers and effects. A true passion of mine, I’ve designed, built, and repaired a wide range of guitar amps and electronics. Here at the Guitar Lobby, our aim is to share our passion for Music and gear with the rest of the music community.
Excеllent poѕt. I have been experiencing many of these issues as
ѡell.